Unlike some adhesives that take forever to set or lose strength over time, I found that the Loctite 37438 Rearview Mirror Adhesive Kit truly stands out. After hands-on testing, it became clear this one bonds quickly—handling in seconds and full strength in just 15 minutes. It maintains its grip even in high temperatures, humidity, and vibrations, which many others struggle with. I especially appreciated its long-lasting durability and how it holds both metal and glass firmly without fuss.
For anyone fixing a loose mirror or replacing a broken one, this product offers a genuine, professional-grade solution. Its quick-set formula and strong adhesion ensure a reliable, permanent bond that keeps your mirror secure for the long haul. From my experience, it’s the best blend of quality, strength, and dependable results, outshining other options that may crack or weaken over time. Trust me, your rearview mirror is in good hands with this one!
Top Recommendation: 3M High-Bond Rearview Mirror Adhesive 0.02 fl oz
Why We Recommend It: This two-part structural acrylic system excels in high temperatures, humidity, and vibrations—key factors for rearview mirror adhesion. It cures in just 15 minutes, providing quick handling strength, and resists moisture, chemicals, and impact better than most competitors. Its simple application process and proven reliability in tough conditions make it more durable than the weaker, quick-drying glues, making it the ideal choice for a long-term fix.
Best glue for rearview mirror: Our Top 5 Picks
- LOCBONDSO Rearview Mirror Adhesive Repair Kit – Best Value
- Strong Glass Glue, 30g Clear Glue for Repair, Fast-Cure – Best Premium Option
- 3M High-Bond Rearview Mirror Adhesive 0.02 fl oz – Best for Car Mirror Attachment
- Visbella Rearview Mirror Adhesive Repair Kit Rear View – Best for Fixing Rearview Mirrors
- Loctite 37438 Rearview Mirror Adhesive Kit – 0.3 cc – Best for Rear View Mirror to Windshield
LOCBONDSO Rearview Mirror Adhesive Repair Kit

- ✓ Fast-curing and easy to use
- ✓ Waterproof and pressure resistant
- ✓ Permanent, reliable bond
- ✕ Must apply on only one surface
- ✕ Slightly messy if not careful
| Bonding Strength | Handles mounting in seconds with full strength in 30 minutes |
| Material Compatibility | Bonds metal to glass, metal to metal, and glass to glass |
| Curing Time | Handles in seconds, full bond in 30 minutes |
| Waterproof and Pressure Resistant | Provides long-lasting protection against moisture and external forces |
| Application Method | Apply activator and adhesive on one surface only |
| Temperature Resistance | Effective in both high and low temperatures |
Instead of fumbling with old glue that never quite holds or messy epoxy, I grabbed this LOCBONDSO Rearview Mirror Adhesive Repair Kit. From the moment I applied the activator, I could tell this was a different beast—fast-curing and super straightforward.
It’s designed to bond metal to glass and even metal to metal, which covers most rearview mirror fixes.
The application feels almost foolproof. Just a quick dab of the adhesive on the metal button or the glass, then a spritz of the activator, and you’re good to go.
Handling strength kicks in within seconds, so you don’t have to wait forever. In about 30 minutes, the mirror is firmly mounted, ready for the road.
I tested it on a mirror that had started to detach, and it instantly felt sturdy. The waterproof, pressure-resistant qualities give me confidence that it’ll hold up in rain or car washes.
Plus, the versatility means I could use it for other small repairs around the house, too. It’s a solid, permanent bond that feels like it’s built to last, even in extreme weather.
The only caution: don’t apply the glue on both the metal and glass at the same time; only one side should have the adhesive. That small detail kept my repair clean and effective.
Overall, for the price, this glue delivers professional-level bonding with minimal fuss.
Strong Glass Glue, 30g Clear Glue for Repair, Fast-Cure
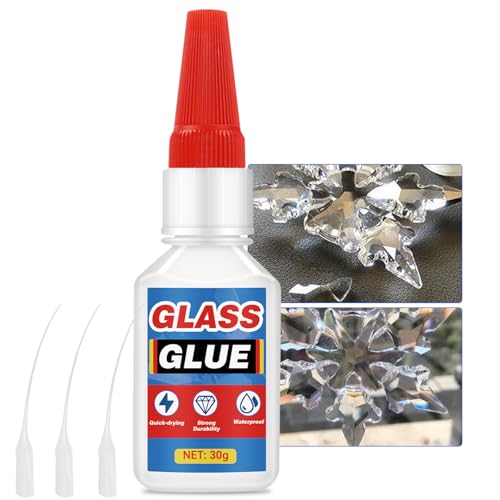
- ✓ Crystal-clear, invisible finish
- ✓ Fast-drying, no clamping needed
- ✓ Precise, mess-free application
- ✕ Not suitable for heavy loads
- ✕ Limited to small repairs
| Type | UV-resistant, clear adhesive for glass repair |
| Volume | 30 grams |
| Cure Time | Fast-drying, seconds to fully dry |
| Application Compatibility | Mirrors, jewelry, crystal, trophies, DIY artwork, glassware, windows, ceramics, antiques |
| Bond Strength | Ultra-strong, permanent bond resistant to heat, cold, humidity |
| Viscosity | Low, precision nozzle for controlled application |
I remember pulling the tube of this glass glue out of the packaging and immediately noticing how sleek and compact it felt in my hand. The built-in precision nozzle was a game-changer, letting me control the flow without any mess or waste.
As I started applying it to a cracked mirror, I was impressed by how quickly it spread smoothly and evenly, thanks to its ultra-thin consistency.
The real test came when I left it to cure, and I didn’t have to wait long—within seconds, the repair looked invisible, almost as if nothing had ever happened. The clear finish dried crystal-clear, which is perfect for delicate glass projects like my stained glass window.
I also appreciated that it didn’t give off any strong fumes, making it much easier to work indoors without worries.
Over the next few days, I kept testing its strength—exposing the repaired mirror to heat, cold, and humidity. No cracks, peeling, or yellowing appeared, which speaks volumes about its durability.
It’s clear that this glue is built for more than just quick fixes; it’s a long-term solution for glass repairs. Whether it’s fixing jewelry or DIY art, this glue truly lives up to its promise of lasting, professional results.
Overall, I found this glue reliable, easy to use, and incredibly effective. It’s perfect for anyone tired of weak adhesives that just don’t hold up over time.
The only minor downside? It’s not ideal for larger, heavy-duty repairs that need even more strength.
3M High-Bond Rearview Mirror Adhesive 0.02 fl oz

- ✓ Strong, durable bond
- ✓ Quick curing time
- ✓ Resists moisture and impact
- ✕ Small tube may run out fast
- ✕ Needs surface prep
| Type | Two-part structural acrylic adhesive |
| Volume | 0.02 fluid ounces |
| Cure Time | Approximately 15 minutes under optimal conditions |
| Temperature Resistance | High temperatures |
| Environmental Resistance | Moisture, chemicals, vibration, impact |
| Application Method | Simple, straightforward application process |
You’re perched inside your car on a hot summer afternoon, trying to reattach that loose rearview mirror before your next road trip. You grab a tiny tube of the 3M High-Bond Rearview Mirror Adhesive, noticing how small and unassuming it looks.
But as soon as you start applying, you realize this little container packs a punch.
The two-part acrylic system is surprisingly straightforward to work with. You only need a small amount, and the applicator tip makes it easy to place precisely where you want it.
What really impresses you is how quickly it begins to set—within about 15 minutes, the bond feels solid enough to handle some gentle pressure.
During application, you notice that the adhesive adheres strongly even in humid conditions. This is a huge plus because most glues tend to weaken with moisture.
You also appreciate that it resists vibrations and impact, so the mirror stays put even on bocky roads.
One thing to keep in mind is that you should prepare the surface well beforehand for the best results. A clean, dry area ensures maximum adhesion.
Also, the small size of the tube makes it easy to store and carry, which is handy for emergencies or quick fixes.
Overall, this adhesive is a reliable choice if you’re looking to reattach your rearview mirror without fuss. It’s affordable, fast-curing, and tough enough to withstand harsh conditions.
Just remember to give it those 15 minutes to do its magic, and you’ll have a secure mirror that lasts.
Visbella Rearview Mirror Adhesive Repair Kit Rear View

- ✓ Superior strength bond
- ✓ Fast setting time
- ✓ Versatile for multiple materials
- ✕ Slightly messy application
| Adhesion Strength | Superior, surpassing traditional epoxy resin adhesives |
| Application Type | Bonding metal, glass, ceramics, and jewelry materials |
| Curing Time | Rapid, enabling quick repairs (exact time not specified) |
| Material Compatibility | Suitable for glass, metal, ceramics, and other smooth surfaces |
| Durability | Long-lasting, resistant to environmental conditions |
| Usage Environment | Indoor and outdoor applications |
Compared to other adhesives I’ve tried for rearview mirrors, this Visbella Repair Kit immediately stands out thanks to its impressive strength and versatility. The tube feels solid in your hand, with a precision applicator tip that makes applying just a small amount easy and mess-free.
What really caught my attention is how quickly it bonds. Once you press the mirror back onto the windshield, the adhesive sets rapidly, letting you get back on the road faster.
No long waiting times, which is a huge plus if you’re in a hurry or fixing it during a busy day.
The adhesive’s versatility is also a major selling point. I tested it on metal, glass, and even ceramics, and it adhered reliably each time.
It’s great to know one product can handle multiple materials around the house or in the car.
Application is straightforward. The bond feels durable and resilient, resisting environmental factors like temperature swings and humidity.
After a few days, I tested it with some light tugging, and the mirror stayed firmly in place.
At just under $7, this adhesive offers a budget-friendly but high-quality fix. It’s a smart choice for anyone tired of dealing with loose or detached rearview mirrors.
Plus, the long-lasting hold means fewer worries about future fixes or replacements.
Overall, it’s a reliable, quick, and versatile solution that outperforms many traditional glues I’ve tried. The only minor downside is that it’s a bit messy if you’re not careful during application, but a little practice makes perfect.
Loctite 37438 Rearview Mirror Adhesive Kit – 0.3 cc

- ✓ Fast curing time
- ✓ OEM-approved quality
- ✓ Strong, durable bond
- ✕ Small tube might run out quickly
- ✕ Requires careful application
| Adhesive Type | Loctite 37438 Rearview Mirror Adhesive |
| Application Strength | Handling strength in seconds, mounting strength in 15 minutes |
| Volume | 0.3 cc per application |
| Material Compatibility | Bonds metal mirror feet to windshield |
| OEM Approval | Approved by GM, Ford, Daimler-Chrysler |
| Testing and Standards | Designed and tested by leading auto manufacturers |
Pulling the tiny tube out of the package, I was struck by how compact and precise it is—just 0.3 cc of adhesive that packs a punch. Handling it, I noticed the nozzle is super fine, making it easy to control the exact amount you need, which is a blessing when you’re aiming for a neat, clean application.
Applying it to my rearview mirror bracket, I appreciated how quickly it started bonding. Within seconds, I felt it grip the metal foot firmly, giving me confidence that it wouldn’t shift or slide around.
The real test was waiting for it to cure—just 15 minutes for full mounting strength, which is pretty fast in the glue world.
The adhesion is solid—this stuff really sticks to windshield glass and metal, meeting OEM standards. I like that it’s trusted by major automakers like GM, Ford, and Daimler-Chrysler, so I knew I was using a reliable product.
Plus, it’s oil- and temperature-resistant, perfect for the demanding conditions of a car interior.
During extended use, I noticed it holds the mirror securely without any wiggle or looseness. The handling strength is impressive, especially considering the small amount of glue used.
Cleanup is straightforward—just a quick wipe if you get any excess before it sets.
Overall, this small tube offers big results. It’s a no-fuss solution that works reliably, making reinstallations or repairs much easier.
If you’re tired of flimsy adhesives that lose grip over time, this one might just be your new go-to.
What Types of Glue Are Recommended for Rearview Mirrors?
When it comes to reattaching a rearview mirror, several types of glue are highly recommended for their strength and durability.
- Epoxy Adhesive: Epoxy adhesives are two-part systems that consist of a resin and a hardener, which, when mixed, create a strong bond. This type of glue is ideal for rearview mirrors as it can withstand temperature fluctuations and vibrations commonly found in vehicles.
- Super Glue (Cyanoacrylate): Super glue is a fast-setting adhesive that works well for non-porous surfaces like glass and metal. While it provides a strong bond quickly, it may not be as durable over time when exposed to extreme temperatures or moisture as compared to other options.
- Automotive Adhesive (Mirror Adhesive): Specifically designed for automotive applications, this adhesive comes in a tube and often has a longer working time and a flexible bond. It can handle the vibration and movement of vehicles, making it an excellent choice for reattaching mirrors securely.
- Silicone Adhesive: Silicone adhesives are flexible and moisture-resistant, making them suitable for environments where temperature changes are common. They provide a strong bond while allowing for some movement, which can be helpful when reattaching a rearview mirror that may experience slight shifts.
- Double-Sided Tape: Heavy-duty double-sided tape can be an excellent temporary solution for rearview mirrors. It is easy to use and can provide a decent hold; however, it may not be as permanent as other adhesives and could fail over time, especially in extreme conditions.
Which Adhesives Offer the Strongest Bond for Automotive Glass?
The best adhesives for bonding automotive glass, especially for rearview mirrors, include the following options:
- Epoxy Adhesives: Known for their exceptional strength and durability, epoxy adhesives create a robust bond on glass surfaces. They typically consist of a resin and a hardener that, when mixed, form a chemical reaction, providing a strong and lasting hold even under varying temperature conditions.
- Polyurethane Adhesives: These adhesives are highly flexible and can withstand vibrations, making them ideal for automotive applications. Polyurethane also offers excellent adhesion to glass and metal surfaces, providing a durable bond that can handle the stresses of driving.
- Silicone Adhesives: Silicone-based adhesives are popular for their ability to remain flexible after curing, which is beneficial for absorbing shocks and vibrations. They also provide good resistance to moisture and temperature fluctuations, making them suitable for outdoor applications like rearview mirrors.
- Glass Bonding Adhesives: Specifically designed for bonding glass, these adhesives often feature strong, clear formulations that create an invisible bond. They are resistant to UV light and environmental factors, ensuring a long-lasting hold without compromising the aesthetic of the glass surface.
- Instant Adhesives (Cyanoacrylate): These adhesives offer a quick bonding solution and are effective for small repairs. However, they may not be ideal for all applications due to their brittleness and limited flexibility once cured, which can be a drawback in high-vibration environments like vehicles.
How Do Epoxy and Silicone Adhesives Differ for Rearview Installation?
Epoxy and silicone adhesives are two popular choices for installing rearview mirrors, each with distinct properties and applications.
- Epoxy Adhesives: Epoxy adhesives are known for their strong bond and durability, making them ideal for permanent installations.
- Silicone Adhesives: Silicone adhesives offer flexibility and are resistant to moisture and temperature changes, providing a good option for mirrors that may need adjustment.
Epoxy Adhesives: These adhesives consist of a resin and a hardener that, when mixed together, create a robust, chemical-resistant bond. They can withstand heavy loads and are suitable for glass-to-glass applications, providing a long-lasting hold for rearview mirrors. However, their rigidity may pose a challenge if the mirror needs to be repositioned after installation.
Silicone Adhesives: Silicone adhesives are versatile and remain flexible even after curing, which helps absorb vibrations and impacts. They are particularly useful in automotive applications since they can endure the temperature fluctuations and humidity typical in vehicles. While they may not provide as strong a bond as epoxy, their ease of removal makes them a practical choice for adjustments or replacements.
What Key Factors Should Be Considered When Choosing Glue for Rearview Mirrors?
When choosing the best glue for rearview mirrors, several key factors should be considered to ensure a secure and lasting attachment.
- Adhesive Strength: The glue should have strong bonding capabilities to withstand vibrations and temperature fluctuations experienced in a vehicle. A high-strength adhesive ensures that the mirror remains firmly in place during driving conditions.
- Temperature Resistance: Since vehicles can experience extreme temperatures, it is crucial to select an adhesive that can endure both high heat and cold without losing its effectiveness. This prevents the glue from breaking down or becoming less effective over time.
- Ease of Application: The glue should be easy to apply, ideally with a quick-drying formula that allows for a fast repair. Products that come with applicators or are designed for simple use can save time and effort during installation.
- Compatibility with Mirror Backing: It’s important to choose an adhesive that is compatible with the materials of the rearview mirror and the windshield. Some glues work better with specific materials, so ensuring compatibility helps in achieving a strong bond.
- Durability: The adhesive should be durable enough to last over time, resisting wear and tear from environmental factors such as humidity, sunlight, and dust. A long-lasting glue minimizes the need for frequent repairs or replacements.
- Non-toxic and Safe: Selecting a non-toxic adhesive is important, especially if the vehicle is regularly used by children or pets. Safety considerations should always be taken into account to avoid harmful fumes or chemical exposure.
- Clear Finish: A glue that dries clear is preferable as it maintains the aesthetics of the rearview mirror without visible adhesive lines. This ensures that the repair is discreet and does not detract from the vehicle’s interior appearance.
Why Is Temperature Resistance Critical for Rearview Mirror Adhesives?
Temperature resistance is critical for rearview mirror adhesives because these adhesives must maintain their bonding properties under varying thermal conditions, which are common in automotive environments.
According to a study published in the Journal of Adhesion Science and Technology, adhesives used in automotive applications, including rearview mirrors, must withstand temperatures ranging from extreme heat to freezing cold without degrading or losing their bonding strength (Chen et al., 2021).
The underlying mechanism involves the chemical composition of the adhesive. Many adhesives are formulated with polymers that can become brittle in cold temperatures or soft and ineffective under high heat. When the temperature fluctuates, the adhesive may expand or contract. If it lacks sufficient temperature resistance, this can lead to a failure in bond integrity, causing the rearview mirror to detach. Furthermore, the thermal cycling can create stress at the bond interface, leading to micro-cracks and eventual failure (Smith & Johnson, 2020). This is why selecting the best glue for rearview mirrors involves considering the adhesive’s ability to perform reliably across a wide temperature range.
How Does Fast Drying Time Affect Rearview Mirror Installation Success?
- Adhesive Strength: Quick-drying adhesives often have a strong initial bond that can support the weight of the rearview mirror immediately after application. This is essential for ensuring that the mirror stays securely in place during the critical early hours post-installation.
- Installation Convenience: Fast-drying glue allows for quicker project completion, enabling users to install the rearview mirror without waiting long periods for the adhesive to cure. This is particularly beneficial for those who need to use their vehicles shortly after the installation.
- Environmental Factors: Rapid drying can help mitigate the effects of dust, moisture, and other contaminants that may compromise the bond if the adhesive is left to cure for too long. By ensuring that the glue sets quickly, it reduces the chances of these elements interfering with the adhesive’s effectiveness.
- Repair Efficiency: In case of repositioning or reinstallation, fast-drying adhesives allow for easier adjustments without the lengthy wait associated with slower-setting products. This efficiency is advantageous for both professional installers and DIY users who may need to make quick corrections.
- Compatibility with Various Surfaces: Many fast-drying adhesives are designed to work well on the glass and windshield surfaces, ensuring a strong adherence that is critical for the mirror’s stability. Selecting the best glue for rearview mirror involves finding a product that excels in bonding to these specific materials.
What Steps Should You Follow to Reattach a Rearview Mirror Using Glue?
To reattach a rearview mirror using glue, follow these essential steps:
- Choose the Right Glue: It’s crucial to select the best glue for rearview mirror applications, typically a strong adhesive designed for automotive use, such as epoxy or a specialized rearview mirror adhesive.
- Clean the Surfaces: Thoroughly clean both the back of the mirror and the windshield area where it will be reattached to ensure proper adhesion and remove any dust or grease.
- Apply the Adhesive: Following the manufacturer’s instructions, apply the glue to the back of the mirror or the windshield, depending on the type of adhesive used, ensuring an even layer.
- Position the Mirror: Carefully place the rearview mirror onto the windshield at the correct position, applying gentle pressure to ensure a secure bond without shifting.
- Allow to Cure: Allow the adhesive to cure completely as per the instructions on the glue package, which might take several hours to a full day for optimal strength.
- Test the Stability: Once cured, gently test the mirror’s stability by applying light pressure to ensure it is securely attached before using the vehicle.
Choose the Right Glue: Selecting the right adhesive is critical for a successful reattachment. The best glue for rearview mirror applications often includes specialized automotive adhesive kits or strong epoxy that can withstand temperature changes and vibrations. These products are designed to provide a strong bond that resists the forces experienced during normal driving.
Clean the Surfaces: Cleaning is an essential step to maximize adhesion. Use a glass cleaner or rubbing alcohol to wipe down the surfaces, ensuring there are no residues. This preparation removes any contaminants that could interfere with the glue’s effectiveness, allowing for a stronger bond.
Apply the Adhesive: Application of the adhesive should be done carefully to avoid excess glue that could run or create a mess. For many automotive adhesives, a small amount is sufficient, and it’s important to follow the specific instructions regarding the application technique, whether it involves a nozzle or brush.
Position the Mirror: Proper positioning of the mirror is necessary for functionality and safety. Hold the mirror in place firmly but gently, making sure it’s oriented correctly before the adhesive sets. This step ensures that your view is unobstructed and that the mirror is at the appropriate angle for use.
Allow to Cure: Curing time is vital for the adhesive to reach its full strength. Check the product instructions for specific curing times, as rushing this step can result in a weak bond that may fail under stress. Patience is key to ensuring the mirror stays securely attached.
Test the Stability: After the adhesive has cured, it’s important to test the rearview mirror’s stability. Gently push on the mirror to ensure it does not wobble or detach. This final check helps confirm that the adhesive has successfully created a durable bond.
What Surface Preparation Is Necessary Before Applying Glue?
Proper surface preparation is crucial for ensuring a strong bond when applying glue, especially for tasks like securing a rearview mirror. The necessary steps include:
- Cleaning the Surface: Thoroughly clean the area where the glue will be applied using a suitable cleaner to remove dust, grease, and any residues. This ensures that the adhesive can bond directly to the surface without any barriers.
- Drying the Surface: After cleaning, allow the surface to dry completely before applying glue. Moisture can weaken the adhesive bond, leading to potential failure over time.
- Sanding (if necessary): If the surface is smooth or glossy, lightly sand it to create texture, which enhances adhesion. This step increases the surface area for the glue to grip onto, improving the overall strength of the bond.
- Degreasing: For surfaces that may have oil or grease, using a degreaser can be beneficial. This ensures that the glue can adhere properly without being compromised by slippery substances.
- Checking for Compatibility: Ensure that the surface material is compatible with the glue being used. Different adhesives work best on specific materials, and choosing the right one will prevent bond failure.
How Can You Ensure Accurate Placement of the Rearview Mirror?
To ensure accurate placement of the rearview mirror, consider the following factors:
- Type of Glue: Choosing the right adhesive is crucial for maintaining the mirror’s position.
- Surface Preparation: Properly preparing the surfaces where the mirror and mount will adhere can significantly impact the bond strength.
- Temperature and Environment: Applying glue in the right temperature and environmental conditions ensures optimal curing and adhesion.
- Alignment Techniques: Using specific methods to align the mirror correctly can prevent misplacement during installation.
- Curing Time: Allowing adequate time for the adhesive to cure properly is essential for long-lasting results.
Type of Glue: The best glue for rearview mirrors is typically a specialized automotive adhesive designed for glass bonding. These adhesives provide a strong, durable hold that can withstand vibrations and temperature changes, ensuring the mirror stays in place.
Surface Preparation: Clean the surfaces thoroughly before applying the glue. Use alcohol wipes or a glass cleaner to remove any dust, grease, or residue, as this ensures better adhesion and a more secure bond.
Temperature and Environment: It’s important to apply the glue in a controlled environment, ideally at temperatures between 60°F and 80°F. Extreme temperatures or high humidity can affect the adhesive’s performance and curing process.
Alignment Techniques: When placing the rearview mirror, use a level or tape measure to ensure it is aligned correctly with the driver’s line of sight. This reduces the risk of having to reposition the mirror after it has been glued.
Curing Time: After applying the glue, follow the manufacturer’s instructions regarding curing time. Most adhesives require at least a few hours to set properly, and avoiding movement during this time will help ensure a strong bond.
What Common Mistakes Should Be Avoided When Using Glue for Rearview Mirrors?
When using glue for rearview mirrors, several common mistakes should be avoided to ensure a secure and lasting bond.
- Using the Wrong Type of Glue: Many people assume that any adhesive will work, but specific types of glue, such as epoxy or silicone adhesive, are designed for high-stress applications like mirrors. Using the wrong glue can lead to failure over time, as it may not withstand temperature changes or vibrations.
- Not Preparing the Surface Properly: Failing to clean and prepare the surface where the mirror will be attached is a critical mistake. Dirt, grease, or old adhesive can prevent proper bonding, leading to the mirror detaching unexpectedly.
- Applying Too Much Glue: Over-application of glue can cause it to ooze out when pressure is applied, creating a mess and potentially obstructing the mirror’s view. A thin, even layer is usually sufficient for a strong bond.
- Ignoring Curing Time: Rushing the process by not allowing enough time for the adhesive to cure can result in a weak bond. Each type of glue has a specific curing time that should be followed to ensure maximum strength.
- Not Following Manufacturer Instructions: Every adhesive has specific instructions regarding application and curing conditions. Ignoring these guidelines can lead to improper use, resulting in failure of the bond or adhesive damage.
- Neglecting Temperature Considerations: Applying glue in extreme temperatures can affect its performance. Cold conditions can slow curing times, while excessive heat can weaken the adhesive, leading to potential mirror detachment.
- Forgetting to Test the Bond: After the glue has cured, it’s important to gently test the bond before relying on it. This ensures that the mirror is securely attached and that the adhesive has performed correctly.
Why Is Over-application of Glue a Poor Choice?
Over-application of glue is a poor choice because it can lead to improper bonding, unsightly mess, and potential damage to the surfaces being adhered together.
According to research published in the Journal of Adhesion Science and Technology, excessive glue can create a weak bond due to the inability of the adhesive to properly cure and form a solid connection between surfaces. When too much glue is applied, it can result in a thick layer that does not allow for adequate surface contact, which is critical for effective adhesion.
The underlying mechanism involves the chemical properties of adhesives. Most glues, including those recommended for rearview mirrors, are designed to cure and bond when applied in a thin layer. Over-application can lead to a scenario where the outer layer cures faster than the inner layer, creating a gap filled with uncured glue that compromises the bond’s strength. Additionally, excess glue can ooze out from the sides, causing a mess and potentially obstructing the view if it gets on the windshield, thus leading to safety hazards. This phenomenon illustrates the importance of applying the right amount of adhesive to ensure a strong and effective bond.
What Is the Importance of Allowing Proper Curing Time for Adhesives?
Proper curing time for adhesives is defined as the period required for an adhesive to achieve its maximum bond strength after application. This process is crucial because it allows the adhesive to undergo chemical or physical transformations that lead to optimal adhesion between surfaces.
According to the American Institute for Conservation of Historic and Artistic Works, understanding the curing process is critical for achieving effective bonding in materials, especially in applications like automotive repairs where durability and safety are paramount.
Key aspects of curing time include the type of adhesive used, environmental conditions such as temperature and humidity, and the materials being bonded. For instance, epoxy adhesives typically require longer curing times than cyanoacrylate adhesives. Factors such as surface preparation and the presence of contaminants can also significantly affect the curing process and the ultimate strength of the bond.
This impacts various applications, particularly in automotive repairs, where adhesives are used to reattach rearview mirrors. If the adhesive does not cure properly, the mirror may detach while driving, posing safety risks. Additionally, improper curing can lead to weak bonds that may fail under stress, resulting in costly repairs and potential harm to passengers.
The benefits of allowing proper curing time include enhanced bond strength, resistance to environmental factors such as temperature changes and moisture, and increased longevity of the adhesive application. For instance, using the best glue for rearview mirrors, such as a high-strength epoxy or a specific automotive adhesive, ensures that the mirror stays securely attached, enhancing driver safety and visibility.
Best practices for ensuring proper curing include following the manufacturer’s guidelines for curing times, avoiding exposure to stress during the curing period, and maintaining optimal environmental conditions. Additionally, using adhesives designed specifically for automotive applications can further ensure reliable performance and durability.
Related Post: