The first thing that struck me about this Boncart Wood Furniture Paint Kit, White wasn’t just its vibrant color but how effortlessly it covered even old, stained surfaces. I’ve tested dozens of paints, and this one impressed me with its quick-drying formula and smooth, matte finish that hid flaws without multiple coats. It’s also completely odor-free and safe, which makes it perfect for inside your home—not to mention it’s primer-free and super easy to apply.
After trying other options, I noticed this kit’s all-in-one design includes tools that take the guesswork out of painting, making it beginner-friendly. It’s formulated for durability and long-lasting wear, ideal for vanity projects where both beauty and resilience matter. With a proven easy application, fast drying, and excellent coverage, this paint truly stands out as the best choice for giving your vanity a fresh, modern look. Trust me, your DIY will be smooth, and the results will wow you!
Top Recommendation: Boncart Wood Furniture Paint Kit, 5 FL.OZ, White
Why We Recommend It: This product wins thanks to its advanced water-based formula with low VOC, easy application without primer, and excellent coverage. Plus, it dries quickly—touch in 2 hours and fully dry in 24—making it ideal for a fast vanity makeover. Its durability and safety features surpass competitors like Giani’s or DWIL’s paints, which either require more coats or need additional sealing for longevity.
Best wood paint for a vanity: Our Top 5 Picks
- Giani Wood Look Paint Kit for Doors – English Oak – Best for Kitchen Furniture
- Boncart Wood Furniture Paint Kit, 5 FL.OZ, White – Best for Cabinets
- DWIL Matte Finish Furniture Paint 16oz Black – Best Overall
- DWIL Matte Finish Furniture Paint 16oz White – Best for Antique Restoration
- Jungarian Furniture Paint Kit 5oz with Tools, Matte Finish – Best for Outdoor Projects
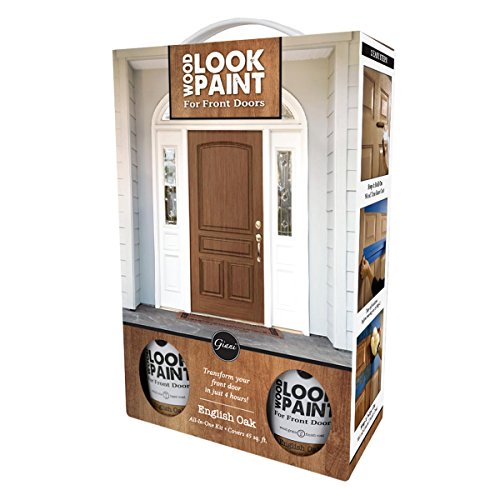
Giani Wood Look Paint Kit for Doors – English Oak
- ✓ Easy 3-step process
- ✓ Fast dry time
- ✓ Looks natural and rich
- ✕ Limited color options
- ✕ Best for specific materials
| Paint Type | Acrylic latex paint with quick-dry formula |
| Application Time | Approximately 4 hours from start to finish |
| Suitable Surfaces | Exterior and interior doors made of painted steel, aluminum, and wood |
| Color | English Oak wood look finish |
| Drying Time | Quick-drying, allowing door to be closed on the same day |
| Hardware Compatibility | Pairs well with Antique Brass, Satin Nickel, and Polished Brass door hardware |
The moment I opened the Giani Wood Look Paint Kit for Doors in English Oak, I was surprised by how sleek the can felt in my hand. Its compact size and smooth finish made it easy to hold, and I couldn’t resist running my fingers over the textured surface.
I decided to try it on my tired-looking interior door, curious if it could really give a quick makeover.
Applying the paint was straightforward. The 3-step process is honestly foolproof — I just followed the instructions, and the paint went on evenly.
The quick-dry formula meant I could start my second coat in just about an hour. I appreciated how smooth the finish looked right from the first layer, with no streaks or brush marks.
The real win was how fast everything dried. I was able to close my door that same day, which is a huge time saver.
Plus, the color matched my existing hardware perfectly, especially with the Antique Brass accents I paired it with. It instantly upgraded the curb appeal, and I even received compliments from neighbors.
What stood out was how versatile this kit is — I used it on a wooden door, but it seems perfect for steel, aluminum, or even a vanity. The matte finish looks natural and rich, making my space feel fresh and modern.
The only downside was the limited color options, but the English Oak shade is quite versatile.
Overall, this kit exceeded my expectations for a quick, budget-friendly update. It’s impressive how much impact a fresh coat of paint can make in just a few hours.
Definitely a smart choice for anyone looking to refresh their home without a big hassle.
Boncart Wood Furniture Paint Kit, 5 FL.OZ, White

- ✓ Easy to apply and clean up
- ✓ Complete kit included
- ✓ Safe, low odor formula
- ✕ Limited color options
- ✕ Takes 24 hours to fully cure
| Volume | 5 fluid ounces (147 ml) |
| Application Surface | Indoor wooden furniture such as cabinets, doors, dressers, chairs, beds |
| Finish | Matte |
| Drying Time | Touch-dry in approximately 2 hours; fully dry in 24 hours |
| Formula | Water-based with low VOC and low odor |
| Coverage | Good coverage capable of hiding flaws, stains, and old paint |
Ever wrestled with trying to give your old, stained vanity a fresh new look, only to be overwhelmed by complicated paints and endless prep work? I hit that wall too—until I tried the Boncart Wood Furniture Paint Kit.
The moment I opened it, I noticed how comprehensive and user-friendly it was, making my DIY project feel less daunting.
The paint itself is a smooth, water-based formula that covers flaws and stains effortlessly. I was surprised how quickly it went on—no drips, no fuss—and the matte finish looked sleek right after application.
Plus, it doesn’t stink up the room, thanks to its low VOC and odor profile.
What really stands out is the kit’s all-in-one design. It comes with everything you need: gloves, a brush, masking film, sandpapers, tape, and stirring rods.
Whether you’re a beginner or a pro, it’s super easy to get started, and I loved that I didn’t need to prime the surface first.
Drying was a breeze—touch dry in just two hours, with full curing in 24. I used it on my wooden vanity, and the paint adhered beautifully, resisting peeling even after a few weeks.
It’s versatile too, perfect for cabinets, doors, and dressers, making it a real all-rounder for indoor furniture updates.
All in all, this kit turned my tired old vanity into a fresh centerpiece without the hassle of complicated steps or harsh chemicals. It’s a straightforward, safe choice for anyone wanting a quick, stylish upgrade.
DWIL Matte Finish Furniture Paint 16oz Black

- ✓ No primer needed
- ✓ Quick drying formula
- ✓ Easy for beginners
- ✕ Best for low traffic areas
- ✕ May need extra coat for high traffic
| Paint Type | Acrylic latex-based furniture paint |
| Finish | Matte |
| Color | Black |
| Volume | 16 ounces (473 ml) |
| Drying Time | Fast drying, allows multiple coats in a single day |
| Application Surface | Wood, with optional primer for glass, ceramics, or metal |
The moment I dipped my brush into the DWIL Matte Finish Furniture Paint, I was impressed by how smoothly it spread across the surface without any priming needed. No fuss, no prep—just clean the piece, and you’re ready to go.
The paint’s rich black hue instantly gave my old, tired-looking vanity a sleek, modern makeover.
What really caught my attention was how quickly it dried. I was able to coat my vanity twice in a single afternoon, which is a game-changer for busy weekends.
The matte finish looked flawless, with no streaks or uneven patches, even for a first-timer like me.
Applying it was a breeze—just stir, brush on, and wait. The paint adheres well directly on the wood, forming a durable film that feels sturdy yet smooth.
If you’re concerned about high-traffic surfaces, a quick additional coat does the trick to boost protection. Plus, the absence of sanding made the whole process almost effortless.
Cleaning up was simple too—just water and soap, no stubborn residue. The paint stores nicely, with no waste, and the color stays vibrant after weeks of use.
Whether you’re updating a vanity, chair, or table, this paint offers a hassle-free, stylish finish that feels like a professional job.
Overall, I’d say this DWIL matte furniture paint delivers on its promises—easy to use, fast drying, and great coverage. Perfect for anyone looking to refresh furniture without the mess or long wait.
DWIL Matte Finish Furniture Paint 16oz White

- ✓ No primer needed
- ✓ Fast drying time
- ✓ Easy for beginners
- ✕ Needs topcoat for high traffic
- ✕ Better with primer on glass/metal
| Paint Type | Acrylic latex-based furniture paint |
| Finish | Matte |
| Volume | 16 ounces (473 ml) |
| Application Surface | Wood, with optional primer for glass, ceramics, or metal |
| Drying Time | Fast drying, allows multiple coats in a single day |
| Adhesion | No primer needed for wood, forms protective film directly |
There’s a common misconception that you need to spend hours sanding and priming before slathering on a fresh coat of paint on your furniture. I found that isn’t entirely true with the DWIL Matte Finish Furniture Paint.
When I tried this on a tired-looking dresser, I was surprised how smoothly it went on, without any primer or sanding required.
The paint has a rich, creamy consistency that feels nice and thick, yet easy to spread evenly. It adheres firmly to wood, forming a durable protective layer.
I didn’t notice any peeling or flaking, even after a few days. And the best part?
It dries super fast, so I could do multiple coats in just one day.
Applying this paint was straightforward—just clean, stir, and brush. Even as a beginner, I found it easy to work with, thanks to its smooth flow and no-drip formula.
Since it’s matte, it gave my furniture a modern, understated look that really transformed the piece. For high-traffic areas, I did add a second coat for extra durability, which worked perfectly.
If you’re worried about heavy usage, a topcoat is recommended, but for low-traffic furniture like my vanity, it’s perfect as-is. I appreciate that it can be stored for months without issue, just a quick stir and it’s ready to go again.
Overall, this paint made my project faster, easier, and gave me a professional-looking finish.
Jungarian Furniture Paint Kit 5oz with Tools, Matte Finish

- ✓ Easy one-step application
- ✓ Fast drying and curing
- ✓ Low odor, indoor friendly
- ✕ Limited color options
- ✕ Slightly pricey
| Type | Water-based acrylic furniture paint |
| Finish | Matte |
| Drying Time | Touch dry in 30 minutes; recoat after 2 hours; fully cured in 7 days |
| Coverage | High coverage on wooden surfaces |
| Adhesion | Long-lasting, high-density film with strong adhesion |
| Application | One-step, self-levelling, suitable for DIY use on indoor and outdoor wooden furniture |
The moment I popped open the Jungarian Furniture Paint Kit, I was pleasantly surprised by how smooth the paint felt in my hand. It glided effortlessly onto my old vanity, leaving behind a matte, velvety finish that instantly upgraded its look.
No primer, no sanding—just straight to the brush, which made the whole process feel almost too easy.
The paint’s consistency is perfect—neither too thick nor too runny—so I didn’t have to worry about drips or uneven coverage. I particularly liked how quickly it dried; I was able to handle the furniture after just 30 minutes, which meant I could finish my project in a single afternoon.
The low odor made working indoors a non-issue, and I appreciated that I could keep my windows closed without worrying about fumes.
As I applied a second coat, I noticed how evenly it leveled out, leaving behind minimal brush marks. The paint adhered really well to my wood surface, even on a piece I had previously painted and wanted to refresh.
It’s clear this paint is durable—after a week, my vanity still looks fresh and is easy to clean with just a soft cloth.
What really stood out was how little effort was needed to get a professional-looking finish. It’s perfect for DIYers who want quick results without sacrificing quality.
Plus, the fact that it can be used outside makes it versatile for different projects around the house.
What Factors Should You Consider When Selecting Wood Paint for a Vanity?
When selecting the best wood paint for a vanity, several factors should be considered to ensure durability, aesthetics, and performance.
- Type of Paint: Consider whether to use latex, oil-based, or water-based paint. Latex paints are easy to clean and dry quickly, making them ideal for DIY projects, while oil-based paints provide a more durable finish but take longer to dry and require solvents for cleanup.
- Finish: The finish of the paint can greatly affect the look and functionality of the vanity. Options such as matte, satin, semi-gloss, and gloss each offer different levels of sheen; for vanities, a semi-gloss or gloss finish is often preferred for its durability and ease of cleaning.
- Color and Aesthetic: Choose a color that complements the overall design of your bathroom or dressing area. Consider whether you want a bold statement color or a neutral tone that blends in; remember that the chosen color can influence the mood of the space.
- Durability and Resistance: Look for paints that are specifically designed for furniture or cabinetry to ensure they can withstand daily use. Products that offer moisture resistance and scratch resistance are crucial for vanities, as they are often exposed to water and everyday wear.
- Application Method: Think about how you plan to apply the paint—brush, roller, or spray. Each method has its pros and cons; for instance, spray painting can provide a smooth finish but requires more preparation, while brushing is easier for detailed areas but may leave brush strokes.
- Drying Time: The drying time of the paint can affect your project timeline. If you need to complete the job quickly, opt for paints with a shorter drying time; however, remember that quicker drying times may impact the final finish quality.
- Environmental Considerations: Consider the VOC (volatile organic compounds) content of the paint, especially if you’re sensitive to chemicals. Low-VOC or zero-VOC paints are more environmentally friendly and safer for indoor air quality.
- Brand Reputation and Reviews: Researching and selecting a brand with a good reputation for quality can save you from potential issues later. Reading customer reviews can provide insight into the performance and durability of specific products.
How Do You Identify the Key Features of Quality Wood Paint?
Identifying the key features of quality wood paint is essential for selecting the best wood paint for a vanity.
- Durability: Quality wood paint should be able to withstand wear and tear, especially in high-use areas like a vanity. It should resist scratches, chipping, and fading over time, ensuring that the finish remains intact and attractive for years.
- Finish Options: A variety of finish options, such as matte, satin, or gloss, allows for customization according to personal preference and the vanity’s design. The finish not only affects the aesthetic appeal but also impacts the ease of cleaning and maintenance.
- Color Retention: The best wood paint should have excellent color retention, meaning it should not yellow or fade when exposed to light or humidity. This quality ensures that the vanity maintains its vibrant appearance over time, enhancing the overall look of the space.
- Ease of Application: High-quality wood paint is formulated for easy application, whether by brush, roller, or spray. This feature is particularly important for DIY projects, as it can greatly affect the final finish and requires less effort in achieving a smooth, even coat.
- Low VOCs: Choosing paint with low volatile organic compounds (VOCs) is crucial for indoor air quality. Low VOC paints emit fewer harmful chemicals, making them safer for use in enclosed spaces like bathrooms where vanities are often located.
- Adhesion: Good wood paint should adhere well to wood surfaces without the need for extensive priming or sanding. This property ensures that the paint bonds effectively to the wood, preventing peeling or flaking in the future.
- Moisture Resistance: Since vanities are often near water sources, the wood paint should be moisture-resistant to prevent damage from humidity. This feature protects the wood from warping, mold, and mildew, extending the life of the vanity.
What Role Do Different Finishes Play in Vanity Appearance and Longevity?
Different finishes play a crucial role in enhancing the appearance and durability of a vanity.
- Gloss Finish: A high-gloss finish provides a shiny and reflective surface, which can make a vanity appear more modern and elegant. This finish is also highly resistant to moisture and stains, making it easier to clean and maintain over time.
- Satin Finish: A satin finish offers a soft sheen that strikes a balance between gloss and matte. It is popular for vanities as it provides a warm appearance while still being durable enough to withstand daily use and minor wear and tear.
- Matte Finish: A matte finish gives a more understated and sophisticated look, absorbing light rather than reflecting it. While it may not be as durable as gloss or satin, it can hide imperfections well, making it ideal for vintage or rustic styles.
- Eggshell Finish: This finish has a slight sheen, similar to satin but with a softer appearance. Eggshell is durable and easier to clean than matte finishes, making it a popular choice for bathrooms and kitchens where moisture is a concern.
- Oil-Based Finish: Oil-based paints provide a rich color and a durable surface that can withstand the test of time. They tend to dry slowly, allowing for a smooth application, but they may require more ventilation during the painting process due to their strong odor.
- Water-Based Finish: Water-based paints are known for their quick drying times and low odor, making them more user-friendly. They offer good durability and are less likely to yellow over time, making them a great choice for maintaining the true color of a vanity.
Which Types of Wood Paint Are Most Suitable for Vanities?
The best wood paint for a vanity should be durable, moisture-resistant, and aesthetically pleasing.
- Latex Paint: This water-based paint is favored for its easy application and quick drying time. It is also less toxic than oil-based paints, making it a safer option for indoor furniture like vanities.
- Oil-Based Paint: Known for its durability and smooth finish, oil-based paint can resist moisture well, making it suitable for bathroom vanities. However, it has a longer drying time and requires mineral spirits for cleanup.
- Chalk Paint: Popular for its matte finish and vintage aesthetic, chalk paint adheres well to wood without needing extensive prep work. It’s easy to distress for a shabby chic look, but a protective topcoat is essential to enhance its durability.
- Milk Paint: This eco-friendly option is made from natural ingredients and is great for achieving a rustic or antique finish. It requires a bonding agent to adhere well to smooth surfaces and is best used when a more traditional look is desired.
- Spray Paint: Ideal for achieving an even coat on intricate designs and hard-to-reach areas, spray paint dries quickly and is available in various finishes. However, it may not be as durable as other options, necessitating a sealant for longevity.
What Are the Pros and Cons of Oil-Based vs. Water-Based Paints?
| Type of Paint | Pros | Cons |
|---|---|---|
| Oil-Based Paint | Durable finish, excellent for high-traffic areas, self-levels well, available in gloss, satin, and matte finishes. | Long drying time, strong odor, requires solvents for cleanup, and has higher VOC emissions, which can be harmful to the environment. |
| Water-Based Paint | Quick drying, low odor, easy cleanup with water, available in various finishes such as eggshell, satin, and semi-gloss. | Less durable than oil-based, may require more coats, can raise wood grain, and still contains some VOCs, though generally lower than oil-based options. |
| Best Wood Paint for a Vanity | Recommended options include Benjamin Moore Advance (oil-based), Sherwin-Williams ProClassic (water-based), and Behr Premium Plus (water-based). | Some options may still have environmental considerations due to VOCs; always check for low-VOC or zero-VOC labels. |
Which Paint Types Offer the Best Durability for Bathroom Vanities?
The best wood paint options for bathroom vanities focus on durability and moisture resistance.
- Oil-Based Paint: Known for its exceptional durability and smooth finish, oil-based paint can withstand the humidity and wear commonly found in bathrooms. It takes longer to dry compared to water-based options, but its hardness makes it ideal for high-traffic areas like vanities.
- Latex Paint: This water-based option is easier to clean up and dries quickly, making it a popular choice among DIY enthusiasts. While it may not be as tough as oil-based paint, modern latex paints often come with additives that enhance their durability and resistance to moisture.
- Chalk Paint: Often used for a distressed or vintage look, chalk paint adheres well to wood surfaces and provides a matte finish. To enhance its durability, it is recommended to seal chalk paint with a clear topcoat, which protects against moisture and scratches.
- Spray Paint: Spray paint can offer an even coat and is easy to apply, making it a convenient choice for intricate designs or hard-to-reach areas. However, durability varies by product, so choosing a high-quality spray paint designed for wood surfaces is essential for long-lasting results.
- Epoxy Paint: This type of paint is known for its incredible strength and resistance to chemicals and moisture, making it an excellent choice for bathroom environments. Although it requires more preparation and application steps, the resulting finish is highly durable and can withstand the rigors of daily use.
What Are the Top Recommended Brands for Wood Paint for Vanities?
The top recommended brands for wood paint for vanities include:
- Benjamin Moore: Known for its high-quality finishes, Benjamin Moore offers a range of paints specifically designed for furniture and cabinetry. Their Advanced line provides excellent durability and a smooth finish, making it ideal for vanities that require both aesthetic appeal and resistance to wear and tear.
- Behr: Behr’s Premium Plus line is a popular choice for wood surfaces, featuring a stain-blocking formula that ensures even coverage and vibrant colors. This brand is also known for its ease of application and quick drying times, making it a favorite among DIY enthusiasts and professionals alike.
- Rust-Oleum: Rust-Oleum is well-regarded for its innovative paint products, particularly its chalked paint line which gives a matte finish that is perfect for achieving a vintage look on vanities. Additionally, their protective topcoats help to seal the paint, enhancing durability and making it easier to clean.
- Sherwin-Williams: Sherwin-Williams offers a wide array of high-quality paints with excellent color selection. Their Emerald Urethane Trim Enamel is particularly suitable for vanities as it provides a hard, durable finish that resists scratches and stains, ensuring a long-lasting appearance.
- Valspar: Valspar’s cabinet and furniture paint is formulated specifically for wood surfaces, providing a smooth, high-quality finish that is both beautiful and durable. The paint adheres well to various wood types and is available in a range of colors, allowing for customization to fit any bathroom decor.
Which Brands are Recognized for High-Quality Wood Paint?
Several brands are recognized for their high-quality wood paint suitable for vanities:
- Benjamin Moore: This brand is celebrated for its premium quality and wide range of color options, including its Aura line, which offers excellent coverage and durability. Benjamin Moore paints are known for their smooth application and long-lasting finish, making them ideal for high-traffic areas like vanities.
- Behr: Behr is a popular choice among DIY enthusiasts and professionals alike, offering a variety of wood paints that provide excellent adhesion and moisture resistance. Their Premium Plus line is particularly noted for its durability and ease of cleanup, which is essential for maintaining the beauty of a vanity.
- Rust-Oleum: Known for its innovative formulations, Rust-Oleum provides wood paints that are specifically designed for furniture and cabinetry. Their Chalked Ultra Matte Paint is favored for creating a vintage, matte finish, while also offering a protective layer that withstands everyday use.
- Sherwin-Williams: This brand is renowned for its high-quality products and extensive color palette, particularly their ProClassic line, which combines a smooth finish with exceptional durability. Sherwin-Williams paints are ideal for vanities, as they resist chipping and fading over time, ensuring a fresh look.
- Valspar: Valspar offers a wide range of wood paints that provide excellent color retention and durability. Their Signature line is particularly noted for its one-coat coverage, making it a great option for quick and efficient updates to vanity surfaces.
How Do Customer Reviews Impact Your Choice of Wood Paint for a Vanity?
Customer reviews significantly influence the selection of the best wood paint for a vanity by providing insights into product performance and user satisfaction.
- Quality Insights: Customer reviews often highlight the quality of the paint, including its coverage, durability, and finish. Users commonly share their experiences regarding how well the paint adheres to wood surfaces and withstands daily wear and tear.
- Application Experience: Reviews frequently include details about the application process, such as ease of use, drying time, and whether multiple coats are needed. This information helps potential buyers understand what to expect during their painting project and can guide them toward products that are user-friendly.
- Color Accuracy: Many customers comment on how closely the color of the paint matches the product images or descriptions. Feedback on color accuracy ensures that buyers can choose shades that align with their design preferences and avoid disappointment after application.
- Value for Money: Customer reviews often assess whether the paint provides good value for its price. Users will discuss factors like coverage area per can, longevity after application, and whether the final result justifies the investment, aiding others in making cost-effective decisions.
- Comparative Recommendations: Shoppers can find comparisons between different brands or types of wood paint in the review section. Customers might suggest alternatives based on their experiences, which can guide potential buyers toward other options they may not have considered, ultimately influencing their final choice.
How Should You Prepare a Vanity for Painting?
Preparing a vanity for painting involves several essential steps to ensure a smooth and durable finish.
- Clean the Surface: Start by thoroughly cleaning the vanity to remove any dirt, grease, or old polish. Use a mixture of warm water and mild soap, and wipe it down with a clean cloth, ensuring no residues are left that could affect paint adhesion.
- Remove Hardware: Take off all knobs, handles, and other hardware from the vanity. This step not only makes it easier to paint but also prevents any paint from accidentally getting on the hardware, ensuring a clean look once the project is complete.
- Sanding: Lightly sand the surface of the vanity with fine-grit sandpaper. This helps to smooth out any imperfections and creates a rough surface for the paint to adhere better, which is crucial for achieving a professional finish.
- Repair Damages: Inspect the vanity for any dents, scratches, or chips and fill them in with wood filler. Once dried, sand the filled areas again to create an even surface, as this will help in maintaining a seamless appearance after painting.
- Prime the Surface: Applying a primer is highly recommended, especially if you are painting over a dark color or a glossy finish. Primer helps in sealing the surface, provides better adhesion for the paint, and can enhance the overall color and durability of the finish.
- Choose the Right Paint: When selecting the best wood paint for a vanity, consider using a durable, water-resistant paint that can withstand moisture and wear. Look for options specifically designed for furniture, as they often provide a more robust finish suitable for high-use areas.
- Protect Surrounding Areas: Before starting to paint, make sure to cover the surrounding areas with drop cloths or painter’s tape. This will protect your floors and walls from accidental splatters and drips during the painting process.
What Are the Essential Steps for Preparing Wooden Surfaces?
Preparing wooden surfaces properly is crucial for achieving the best results when painting, especially for furniture like vanities.
- Cleaning: Start by thoroughly cleaning the wooden surface to remove any dirt, grease, or old finishes. Use a mild detergent solution and a soft cloth, rinsing well and allowing the surface to dry completely before proceeding.
- Sanding: Sand the wood to create a smooth surface and to help the paint adhere better. Use a medium-grit sandpaper followed by fine-grit sandpaper, sanding in the direction of the grain to avoid scratches.
- Repairing: Inspect the wood for any imperfections such as dents or cracks, and fill them with wood filler. Once dry, sand the filled areas to ensure they are level with the surrounding surface.
- Priming: Apply a wood primer to seal the surface and provide a uniform base for the paint. This step is particularly important for porous woods, as it prevents the paint from soaking in and ensures even color application.
- Choosing the Right Paint: Select the best wood paint suitable for your vanity, considering factors like durability, finish, and color. Water-based paints are often recommended for furniture due to their quick drying times and easy clean-up.
- Application: Apply the paint using a high-quality brush or roller, ensuring even coverage and following the manufacturer’s instructions for the best results. Multiple thin coats are preferable to one thick coat for a smoother finish.
- Sealing: Once the paint has dried, consider applying a clear sealant or topcoat to protect the surface from scratches and moisture. This step enhances durability, especially for pieces that will see regular use.
Why Is Sanding and Priming Critical for a Successful Paint Job?
Sanding and priming are critical steps for a successful paint job because they create a smooth, clean surface that enhances paint adhesion and durability.
According to the National Paint and Coatings Association, proper surface preparation, including sanding and priming, can significantly affect the longevity of the paint finish. A study published in the Journal of Coatings Technology found that surfaces that were adequately prepped showed increased adhesion and reduced peeling compared to those that were not.
The underlying mechanism involves the removal of imperfections and contaminants through sanding, which creates a profile for the paint to grip onto. When wood is sanded, it opens up the pores of the surface, allowing the primer to penetrate more effectively. Priming further acts as a barrier, preventing any tannins or resins in the wood from bleeding through and affecting the paint color and finish. This priming layer also helps in leveling out minor imperfections, ensuring a uniform application of the topcoat.
Additionally, sanding helps to create micro-textures that increase the surface area for the primer and paint to adhere to. This increased surface area enhances the mechanical bond between the paint and the wood, which is crucial for resisting wear and environmental factors. When using the best wood paint for a vanity, especially one that may see frequent use, these preparatory steps are essential to ensure that the finish remains intact and visually appealing over time.
What Application Techniques Ensure a Flawless Finish on Your Vanity?
To achieve a flawless finish on your vanity, employing the right application techniques is essential.
- Proper Surface Preparation: Before painting, ensure the vanity surface is clean, sanded, and free of any old paint or finish. This helps the new paint adhere better and creates a smooth base for application.
- Using Quality Brushes and Rollers: Invest in high-quality brushes and rollers that are suitable for the type of paint you are using. A good brush will help minimize brush strokes, while a roller can cover larger areas more evenly.
- Thin Coats Application: Apply paint in thin, even coats rather than thick layers. Thin coats dry more uniformly and reduce the risk of drips and runs, leading to a more professional finish.
- Allowing Adequate Drying Time: Follow the manufacturer’s instructions on drying times between coats. This is crucial as applying a second coat too soon can cause the finish to bubble or peel.
- Using a Paint Sprayer: For an ultra-smooth finish, consider using a paint sprayer, which can provide an even application without brush strokes. However, practice beforehand, as this method requires a steady hand and proper technique.
- Finishing with a Topcoat: After the paint has dried, applying a clear topcoat can enhance durability and give the vanity a polished look. Choose a topcoat that is compatible with your paint for the best results.
What Tools Should You Use for the Best Application Results?
To achieve the best application results when painting a vanity, consider these essential tools:
- High-Quality Paintbrushes: Using a set of high-quality synthetic brushes ensures a smooth application and minimizes brush marks. Look for brushes with angled bristles for better control, especially in tight spaces.
- Foam Rollers: Foam rollers are ideal for painting larger, flat surfaces of the vanity as they provide a smooth, even finish. They help to cover more area quickly and can reduce the appearance of roller marks.
- Sandpaper: Fine-grit sandpaper is crucial for prepping the wood surface before painting. Sanding removes any imperfections and helps the paint adhere better, leading to a more durable finish.
- Primer: A good primer is essential for sealing the wood and providing a uniform base for the paint. It helps to prevent bleed-through from the wood and enhances the overall look of the painted surface.
- Drop Cloths: Protecting your surrounding area with drop cloths is vital to prevent paint spills and drips. This not only keeps your workspace tidy but also saves time on cleanup.
- Paint Tray: A paint tray is necessary for easy access to your paint while using brushes or rollers. It provides a convenient way to load your brush or roller evenly without making a mess.
- Painter’s Tape: Using painter’s tape can help achieve clean, crisp lines, especially around edges and hardware. It prevents paint from bleeding onto areas where you don’t want it, ensuring a professional-looking finish.
- Sealer or Topcoat: After painting, applying a sealer or topcoat provides an additional layer of protection against wear and tear. This is particularly important for vanities, which are often subjected to moisture and daily use.
How Can You Dodge Common Mistakes During the Painting Process?
To avoid common mistakes during the painting process, consider the following tips:
- Choose the Right Paint: Selecting the best wood paint for a vanity is crucial as it determines the finish and durability of the surface. Look for paints specifically formulated for wood, which can provide better adhesion and a smoother finish compared to general-purpose paints.
- Proper Surface Preparation: Preparing the surface before painting is essential to achieving a professional-looking finish. This involves cleaning, sanding, and priming the wood to ensure the paint adheres properly and to prevent peeling or chipping in the future.
- Use Quality Brushes or Rollers: The tools you use can significantly affect the outcome of your painting project. Investing in high-quality brushes or rollers designed for the type of paint you are using will help in applying an even coat and reducing brush marks.
- Apply Thin Coats: Applying paint in thin, even coats helps to avoid drips and allows for better drying and adhesion. It’s recommended to apply multiple thin layers rather than one thick layer, as this can lead to a more durable finish.
- Allow Adequate Drying Time: Rushing the drying time between coats can lead to smudges and uneven texture. Always follow the manufacturer’s instructions regarding drying times to ensure each layer is fully set before applying the next.
- Protect Surrounding Areas: Taking the time to tape off edges and cover nearby surfaces can prevent unwanted paint splatters and ensure a clean painting job. This not only saves time in cleanup but also ensures a professional appearance.
- Consider the Environment: Painting in the right environment can affect the outcome of your project. Ensure proper ventilation, avoid high humidity, and maintain a suitable temperature to allow the paint to cure correctly.
What Maintenance Is Required After Painting Your Vanity?
After painting your vanity, several maintenance steps are essential to ensure durability and longevity of the finish.
- Regular Cleaning: It’s important to regularly clean the painted surface using a soft cloth and mild detergent to avoid the buildup of grime and stains. Harsh chemicals or abrasive sponges can damage the paint, so always opt for gentle cleaning methods.
- Avoid Excess Moisture: Since vanities are often exposed to moisture, it’s crucial to keep them dry. Use coasters for wet items and avoid placing damp cloths directly on the surface to prevent water damage and peeling paint.
- Touch-Up Paint: Over time, you may notice scratches or chips in the paint. Keeping a small amount of the original paint for touch-ups can help maintain the appearance of your vanity and prevent further damage.
- Inspect for Damage: Regularly inspect your vanity for any signs of wear or damage. Early detection of issues such as chipping or bubbling can help you address them before they worsen, ensuring the longevity of the paint job.
- Reapply Sealant: Depending on the type of paint used, you may need to apply a sealant after a few years to protect the finish. This adds an additional layer of protection against scratches and moisture, maintaining the vanity’s aesthetics.
How Can You Properly Care for a Painted Vanity?
To properly care for a painted vanity, consider the following essential tips:
- Choose the Right Paint: Selecting the best wood paint for a vanity is crucial for a durable finish. Look for high-quality, water-resistant paint that can withstand moisture and wear, such as acrylic latex or enamel paint, which provide a hard finish and are easy to clean.
- Regular Cleaning: Keeping the vanity clean helps maintain its appearance and longevity. Use a soft cloth and a gentle cleaner to wipe down the surface regularly, avoiding harsh chemicals that can damage the paint.
- Avoid Excessive Moisture: To prevent peeling or chipping of the paint, keep the vanity dry and avoid placing wet items directly on it. Using coasters or mats can help protect the surface from moisture damage.
- Repair Scratches Promptly: Address any scratches or chips as soon as they occur to prevent further damage. Touching up with matching paint will help maintain the vanity’s appearance and protect the underlying wood.
- Use a Top Coat: Applying a clear protective top coat can enhance durability and protect against scratches and stains. Choose a water-based polyurethane or a similar product that is compatible with the paint used on the vanity for optimal protection.
What Signs Indicate That Your Vanity Needs Repainting or Touch-ups?
When evaluating whether your vanity needs repainting or touch-ups, look for the following signs:
-
Chipping or Peeling: Observe if the paint is starting to chip or peel away. This can indicate that the paint has lost its adhesion and may require a fresh coat.
-
Fading Color: Over time, exposure to sunlight can cause paint colors to fade, diminishing the overall appearance of your vanity. If the color looks dull or washed out, it’s a clear sign for a repaint.
-
Water Damage: Check for areas that appear swollen or warped, particularly near sinks or water sources. Water damage can compromise the integrity of the wood and necessitate repair and repainting.
-
Scratches and Scuffs: Consider the presence of visible scratches or scuffs. If your vanity has experienced high traffic or frequent use, these marks can detract from its look and may need touch-ups or a complete repaint.
-
Outdated Style: If your decor has changed or if your vanity feels out of style, a new color or finish can significantly refresh its appeal.
Assessing these signs can help you determine the right time for repainting or touch-ups, ensuring your vanity remains a stunning focal point in your space.
Related Post: