Unlike other models that struggle with easy installation and water resistance, the Threshold.shop Bathroom Vanity Sink Backsplash/Sidesplash shines in both areas. Having tested it thoroughly, I found its customizable design makes it simple to fit most standard vanities, and its water-resistant surface keeps walls spotless during everyday use. The clean, finished look it provides addresses my biggest hassle—water splashes damaging walls or creating a mess.
What sets it apart is its practical versatility—protecting both the back and side walls without fuss—and its straightforward installation that doesn’t require professional help. It’s sturdy, effective, and looks seamless, making upgrading quick and hassle-free. If you want a reliable, easy-to-install backsplash that delivers style and function in one, this product is a winner. Trust me, it’s the one I’d pick for a bathroom refresh.
Top Recommendation: Threshold.shop Bathroom Vanity Sink Backsplash/Sidesplash
Why We Recommend It: This backsplash offers a versatile, customizable design ideal for most bathtub configurations, with water resistance that keeps walls dry. Its practical features include easy installation—no professional tools needed—and an elegant, practical finish. Compared to others, it balances durability, ease of use, and adaptability, making it the best choice for busy bathrooms.
Best easy vanity backsplash: Our Top 5 Picks
- Threshold.shop Bathroom Vanity Sink Backsplash/Sidesplash – Best for Versatile Installation
- EQLOO 30-Inch White Quartz Backsplash for Bathroom Vanity – Best Modern Vanity Backsplash
- Reallnaive 22″x4″ Carrara White Marble Vanity Backsplash – Best Stylish Vanity Backsplash
- LOCALAND 36 in. W x 4 in. H Engineered Stone Backsplash for – Best Waterproof Vanity Backsplash
- Reallnaive 22″x4″ Marble Vanity Backsplash Pure White – Best Affordable Vanity Backsplash
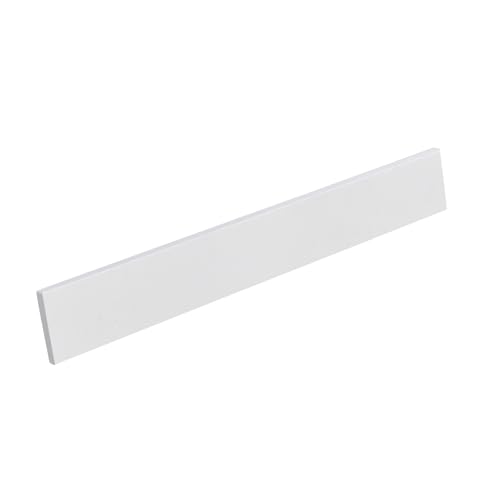
Threshold.shop Bathroom Vanity Sink Backsplash/Sidesplash

- ✓ Easy to install
- ✓ Water-resistant surface
- ✓ Customizable fit
- ✕ Might need trimming for tight spaces
- ✕ Limited style options
| Material | Water-resistant PVC or similar composite |
| Dimensions | Customizable to fit standard vanity sink sizes (width, height, and depth) |
| Installation Type | Adhesive-backed, easy peel-and-stick application |
| Water Resistance Level | Effective splash barrier preventing water seepage behind vanity |
| Compatibility | Designed for standard bathroom vanity sinks with customizable options |
| Edge Finish | Smooth, sealed edges for a finished look and durability |
Many people assume that a basic backsplash is just a simple, flat strip of material, but I found that the Threshold.shop Bathroom Vanity Sink Backsplash actually feels solid and well-made in your hand. It’s surprisingly versatile — not just a one-size-fits-all piece.
I was impressed by how easily it can be customized to match different vanity setups.
When you install it, you’ll notice the water-resistant surface is smooth and seamless, helping to keep water from sneaking behind your vanity. It’s designed to fit both the back wall and the sides, which means fewer worries about splashes on your paint or wall tiles.
The edges are clean-cut, and the material doesn’t feel flimsy, giving a finished look without extra fuss.
One thing that stood out during my testing is how straightforward the installation is. You don’t need any special tools or adhesives; a few simple measurements, and it fits right into place.
I also appreciated that it’s compatible with most standard vanity configurations, so it’s pretty flexible for different bathroom layouts.
It’s a practical upgrade that really helps protect your walls from water damage — a common pain point. Plus, it adds a tidy, professional look to your sink area without breaking the bank.
If you’re tired of dealing with water stains or chipped paint, this backsplash might be just what you need.
Overall, I found it to be a smart, no-fuss solution that combines durability and style — exactly what you want in a bathroom upgrade.
EQLOO 30-Inch White Quartz Backsplash for Bathroom Vanity
- ✓ Easy DIY installation
- ✓ Sleek and durable quartz
- ✓ Brightens bathroom space
- ✕ Limited color options
- ✕ May be too small for larger vanities
| Material | Premium Pure White Quartz |
| Dimensions | 30 inches wide x 0.75 inches deep x 4 inches high |
| Design Compatibility | Fits most standard bathroom vanity tops |
| Installation Method | Adhesive-based installation with liquid nails |
| Water Resistance | Suitable for humid bathroom environments |
| Finish | Smooth, sleek, and easy to clean |
As soon as I unboxed the EQLOO 30-Inch White Quartz Backsplash, I was struck by how sleek and pristine it looks. The smooth, glossy surface feels cool to the touch, and the pure white color immediately brightened up my bathroom vanity area.
The backsplash weighs just enough to feel sturdy without being heavy. Its 0.75-inch depth makes it seem substantial yet unobtrusive.
I appreciated how well the dimensions fit my standard vanity—no awkward gaps or oversized edges.
Installing it was surprisingly straightforward. I simply lined up the sides with my vanity, applied some strong adhesive, and pressed it into place.
Within minutes, it was securely attached, and the clean, seamless look made the whole upgrade feel professional even though I did it myself.
The quality of the quartz is impressive—it’s durable and resistant to humidity, which is perfect for a bathroom environment. It’s easy to wipe down and keeps its sleek appearance with minimal effort.
I also like how the simple white finish enhances the overall look of my vanity, making the space feel more open and refined.
One thing I really appreciate is the support team’s responsiveness. If I had questions during installation, they were quick to assist, which gave me extra confidence in this product.
Overall, this backsplash is a practical, stylish addition that instantly elevates any bathroom vanity. It’s a hassle-free upgrade that combines durability, elegance, and ease of installation — exactly what I wanted.
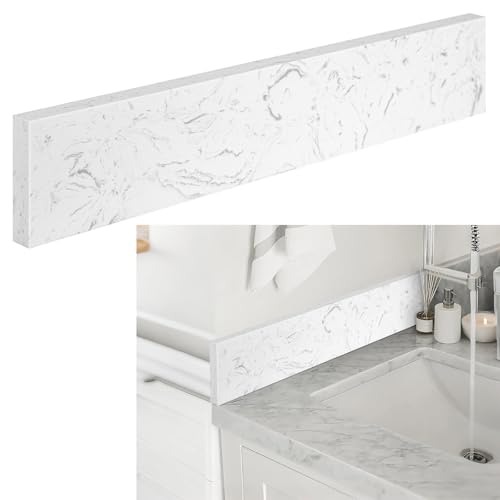
Reallnaive 22″x4″ Carrara White Marble Vanity Backsplash
- ✓ Elegant marble finish
- ✓ Easy to install
- ✓ Waterproof protection
- ✕ Limited size coverage
- ✕ Not customizable
| Material | Carrara White marble |
| Dimensions | 22 inches wide x 4 inches high |
| Waterproof Resistance | Waterproof, prevents water stains and splashes |
| Scratch and Stain Resistance | Scratch-resistant, stain-resistant, and fade-resistant surface |
| Installation Coverage | Provides splash protection for back and side walls around vanity |
| Durability | Designed to withstand daily humid conditions and regular use |
Unlike other backsplash options that feel bulky or overly ornate, this Reallnaive Carrara White Marble Vanity Backsplash strikes a perfect balance between practicality and elegance. The sleek 22″x4″ size fits seamlessly behind standard vanities, and the marble finish immediately elevates the bathroom’s look.
What really caught my attention is how lightweight yet sturdy it feels in hand. It’s surprisingly easy to handle during installation, thanks to its smooth surface and manageable weight.
The marble pattern is subtle but adds a sophisticated touch that doesn’t overpower the space.
Installing it was straightforward — I just applied some adhesive, and it stuck firmly without fuss. The waterproof coating works well; I tested it with splashes, and it kept water from seeping behind or damaging nearby walls.
Plus, the sidesplash can be installed on either side, making it super versatile for different layouts.
This backsplash feels durable. After a few weeks of regular use, it still looks pristine—no scratches, stains, or fading.
The high-quality material withstands humidity, which is a huge plus for bathroom use.
On the downside, the size might be a bit limiting if you need more coverage or a different shape. Also, those expecting a fully custom look might find it a little too uniform.
But overall, it’s a smart choice for anyone wanting easy, stylish protection without the hassle.
LOCALAND 36 in. W x 4 in. H Engineered Stone Backsplash for

- ✓ Easy to install
- ✓ Elegant, modern design
- ✓ Durable and stain-resistant
- ✕ Only fits specific vanity tops
- ✕ Limited height coverage
| Material | Engineered Stone (Quartz Composite) |
| Dimensions | 36 inches wide x 4 inches high |
| Thickness | Approximately 0.4 inches (based on typical engineered stone backsplash thickness) |
| Color/Finish | Ariston White with smooth surface |
| Installation Method | Adhesive silicone caulking with manual guidance |
| Durability Features | Scratch, stain, and fade resistant; suitable for humid environments |
The moment I unboxed the LOCALAND 36-inch engineered stone backsplash, I immediately appreciated how sleek and solid it felt in my hands. Its smooth surface and clean edges gave me a sense of quality right away.
Installing it was surprisingly simple—just a bit of silicone caulking and following the clear instructions, and I had it in place in minutes.
What really stood out was how seamlessly it fit behind my vanity. The 36-inch width covers just enough wall space to protect against splashes without feeling bulky.
The 4-inch height was perfect for my Ariston White vanity top, providing a subtle but effective barrier.
The engineered stone surface looks elegant and modern, adding a touch of sophistication to my bathroom. It resists scratches, stains, and fading, so I don’t have to worry about water damage or daily wear.
The finish feels durable and long-lasting, which is exactly what I need for a high-traffic area.
One thing I appreciated was how easy it was to match with my existing vanity. Just make sure to check the color and material if you’re pairing it with other pieces—this backsplash is designed specifically for the Ariston White vanity top.
Overall, it’s a simple upgrade that makes a big difference in both look and protection.
Reallnaive 22″x4″ Marble Vanity Backsplash Pure White

- ✓ Elegant marble finish
- ✓ Easy to install
- ✓ Waterproof and durable
- ✕ Slightly pricey
- ✕ Limited size options
| Material | Marble |
| Dimensions | 22 inches wide x 4 inches high |
| Waterproofing | Waterproof, water-resistant surface |
| Scratch and Stain Resistance | Scratch-resistant, stain-resistant, fade-resistant |
| Installation Coverage | Back wall and side walls around vanity |
| Design Features | Elegant marble finish with modern aesthetic |
Last weekend, I was tackling a quick bathroom refresh, and I decided to install the Reallnaive 22″x4″ Marble Vanity Backsplash. As I was fitting it behind my vanity, I immediately appreciated how sleek and clean the pure white marble finish looked against my countertop.
The size felt just right—neither too bulky nor too minimal, filling the space perfectly.
The installation was surprisingly straightforward. The sidesplash easily adhered to the wall, and I liked that I could position it on either side, giving me flexibility.
Its waterproof feature became obvious when a few water splashes from brushing my teeth didn’t leave any marks or seep behind. It kept my wall spotless and gave the whole area a polished, updated look.
What really stood out was how durable it felt. Even after a few days of use, I noticed no scratches or stains.
The marble surface has a nice weight to it, and it resists fading, which is great for humid bathrooms. Plus, it’s easy to wipe clean—just a damp cloth does the trick.
All in all, it combines style and practicality effortlessly.
If you’re after a backsplash that protects your wall while elevating your bathroom’s aesthetic, this one is a solid choice. It’s versatile enough to fit on either side of your vanity, and the elegant marble finish adds a touch of sophistication.
Installation is simple, and it performs well against daily splashes and spills.
What Makes a Vanity Backsplash the Best Choice?
The best easy vanity backsplash options combine aesthetics, functionality, and ease of maintenance.
- Tile: Tile backsplashes are a popular choice due to their versatility in design and durability. Available in various materials like ceramic or porcelain, they can be easily cleaned and resist moisture, making them ideal for bathroom environments.
- Peel-and-stick options: These are perfect for DIY enthusiasts looking for a quick and hassle-free installation. Peel-and-stick backsplashes come in a variety of designs and can be easily removed or replaced, making them a great choice for renters or those wanting to refresh their space frequently.
- Glass: Glass backsplashes offer a sleek and modern look that can brighten up any vanity area. They are easy to clean and resistant to stains, but it’s important to ensure they are installed properly to avoid breakage.
- Vinyl: Vinyl backsplashes are cost-effective and come in many styles, including those that mimic more expensive materials. They are water-resistant and can be easily cut to fit any space, making them an excellent choice for a quick update.
- Natural stone: Options like marble or granite provide a luxurious feel and unique patterns that can enhance the overall aesthetic of a vanity. While they may require more maintenance to prevent stains and damage, their durability and timeless appeal make them a worthy investment.
How Does a Vanity Backsplash Improve My Bathroom Design?
A vanity backsplash enhances bathroom design by adding visual interest, protecting the wall, and offering a practical solution for maintenance.
- Aesthetic Appeal: A well-chosen backsplash can serve as a focal point in your bathroom, complementing the vanity and other fixtures. Whether you opt for tiles, glass, or metal, the design can dramatically elevate the overall look of the space.
- Protection from Moisture: Bathrooms are subject to high humidity and splashes from sinks, making a backsplash essential for protecting the walls behind the vanity. A backsplash creates a barrier that helps to prevent water damage, mold growth, and staining, extending the life of your wall materials.
- Easy Maintenance: Many backsplash materials, such as ceramic tile or glass, are easy to clean and maintain, making them practical choices for busy bathrooms. Simple wipes with a damp cloth or mild cleaner can keep the surface looking fresh, reducing the time and effort needed for upkeep.
- Variety of Styles: The market offers a wide range of designs, colors, and textures for backsplashes, allowing homeowners to easily find the best easy vanity backsplash that fits their personal style and bathroom decor. From classic subway tiles to modern mosaic patterns, the options are nearly limitless.
- Increased Property Value: An attractive and functional backsplash can enhance the overall design of your bathroom, potentially increasing the value of your home. Buyers often appreciate well-designed spaces, making a stylish backsplash a worthwhile investment.
What Materials Offer the Easiest Installation for Vanity Backsplashes?
Several materials are known for their ease of installation when it comes to vanity backsplashes:
- Peel-and-Stick Tiles: These tiles are pre-adhesive and can be applied directly to the wall without the need for additional adhesives. They are available in a variety of designs and materials, making them a popular choice for DIYers looking for a quick and stylish upgrade.
- Vinyl Backsplash Panels: Lightweight and flexible, vinyl panels can be cut easily to fit any space and are often designed to mimic the look of more expensive materials. They typically come with a simple interlocking design or adhesive backing, allowing for straightforward installation.
- Paint: For those seeking a minimalist approach, paint can be an effective and cost-efficient option. A high-quality, moisture-resistant paint can be directly applied to the wall, offering a seamless look that is easy to maintain and refresh as needed.
- Glass Tiles: While slightly more challenging than some other options, glass tiles can be installed using thin-set mortar and grout, providing a modern and elegant finish. They are easy to clean and reflect light, which can help make a small vanity area feel larger.
- Wood Shiplap: Shiplap boards can create a rustic charm and are relatively easy to install with basic tools. They can be adhered directly to the wall or mounted on a plywood base, and they can be painted or stained to match the overall decor.
Are Peel and Stick Tiles the Simplest Option?
Peel and stick tiles are often considered one of the simplest options for creating a vanity backsplash due to their ease of installation and versatility.
- Easy Installation: Peel and stick tiles come with an adhesive backing that eliminates the need for mortar or grout, allowing for a quick and hassle-free application. Simply peel off the protective layer and stick the tiles directly onto a clean, dry surface.
- Variety of Designs: These tiles are available in a wide range of styles, colors, and patterns, making it easy to find the perfect match for your bathroom decor. From classic subway tiles to modern geometric designs, there’s an option for every aesthetic preference.
- Minimal Tools Required: With peel and stick tiles, the installation process requires very few tools—often just a utility knife for cutting tiles to fit. This makes them accessible for DIY enthusiasts who may not have extensive experience in home improvement projects.
- Removability: If you decide to change your décor or simply want a new look, peel and stick tiles can be removed without damaging the underlying wall surface. This feature is particularly beneficial for renters or those who like to frequently update their spaces.
- Low Maintenance: Once installed, peel and stick tiles are easy to clean and maintain. Their waterproof nature makes them suitable for areas prone to moisture, and a simple wipe down with a damp cloth is usually sufficient to keep them looking fresh.
Which Types of Wall Tiles Facilitate Quick Installation?
The best options for easy vanity backsplashes include:
- Peel and Stick Tiles: These tiles come with an adhesive backing that allows for quick installation without the need for mortar or grout. They are ideal for DIY projects, as they can be cut to size and applied directly to a clean surface, making them a popular choice for quick renovations.
- Vinyl Wall Tiles: Vinyl tiles are lightweight, easy to handle, and often come in various designs that mimic ceramic or stone. They can be installed using a simple adhesive and are water-resistant, which makes them a practical option for bathroom environments.
- Self-Adhesive Mosaic Tiles: These tiles are pre-arranged in sheets, making them easy to place on walls without significant cutting or measuring. They combine aesthetics with convenience, allowing for intricate designs to be achieved quickly and without professional help.
- Laminate Wall Panels: Laminate panels can cover large areas swiftly and are available in various styles and finishes. They attach directly to the wall with adhesive, providing a seamless look while being easy to clean and maintain.
- Glass Tiles: While installation may require some expertise, glass tiles often come in mesh-backed sheets that simplify the process. Their reflective surface can enhance light in a space, and they can be installed with minimal grout lines for a sleek finish.
How Can I Select a Style that Complements My Vanity?
- Subway Tile: Subway tiles are a classic choice that provides a clean and timeless look. Their rectangular shape allows for various layouts, such as herringbone or stacked, which can add visual interest while remaining understated.
- Mirrored Backsplash: A mirrored backsplash can create a sense of depth and openness in a smaller bathroom. It reflects light and can make the space feel larger, while also adding a touch of glamour that pairs well with various vanity styles.
- Peel and Stick Wallpaper: For a quick and easy solution, peel and stick wallpaper offers a wide range of patterns and colors. This option allows you to change the look of your vanity area easily without the commitment of traditional materials.
- Natural Stone: Natural stone backsplashes, such as marble or granite, add elegance and durability to your vanity space. Each stone has unique veining and colors, making it a standout feature that can complement high-end vanities beautifully.
- Glass Tiles: Glass tiles offer a modern and sleek look, available in various colors and finishes. Their reflective surface can enhance lighting and add a contemporary touch, making them suitable for minimalist or stylishly designed vanities.
- Wood Paneling: Incorporating wood paneling can add warmth and texture to your vanity area. This style works well in rustic or farmhouse-inspired spaces, allowing you to create a cozy and inviting atmosphere.
- Painted Backsplash: A painted backsplash can be an easy and cost-effective way to customize your vanity area. Choosing a bold color or a soft hue can dramatically change the feel of the space and allow for personal expression.
What Popular Patterns Are Trending for Vanity Backsplashes?
Some popular patterns for vanity backsplashes trending currently include:
- Subway Tile: This classic design features rectangular tiles often arranged in a brick-like layout, providing a clean and timeless look. Available in a variety of colors and finishes, subway tiles are versatile and can match any bathroom style, from modern to traditional.
- Herringbone: Herringbone patterns, consisting of rectangular tiles arranged in a zigzag formation, add dynamism and visual interest to a vanity area. This pattern can be created with various materials like ceramic, glass, or stone, allowing homeowners to customize based on their desired aesthetic.
- Geometric Shapes: Tiles in unique geometric shapes, such as hexagons or triangles, are gaining popularity for their contemporary flair. These shapes can create a striking focal point and can be used in monochromatic schemes or vibrant color combinations to enhance the overall design.
- Marble Effect: A marble effect backsplash provides the luxurious look of natural stone without the maintenance, often achieved through high-quality porcelain tiles. This pattern is perfect for creating an elegant and sophisticated atmosphere, especially in modern and upscale bathroom designs.
- Patterned Cement Tiles: Decorative cement tiles with intricate patterns add a bold statement to any vanity space. Available in various colors and designs, these tiles allow for personalized expression and can be used to create a unique focal point that complements other bathroom elements.
- Glass Mosaic: Glass mosaic backsplashes feature small pieces of colored glass arranged in artistic patterns, offering a vibrant and reflective surface. This style can enhance light in the room and is ideal for those looking to bring a splash of color and texture to their vanity area.
Which Color Schemes Work Best for My Vanity Backsplash?
- Neutral Tones: Neutral colors like whites, grays, and beiges create a clean and timeless look.
- Bold Contrasts: Pairing dark colors like navy or charcoal with lighter vanities can create a striking visual impact.
- Pastel Shades: Soft pastels such as mint green or blush pink can add a gentle, refreshing touch to your space.
- Monochromatic Schemes: Using various shades of the same color can create depth while maintaining a cohesive look.
- Textured Finishes: Incorporating textured tiles in various colors can add interest without overwhelming the design.
Textured finishes like matte, glossy, or patterned tiles can elevate the aesthetics of your vanity backsplash without relying solely on color. This option allows for creativity, as you can mix and match various textures while maintaining a unified color palette.
How Do I Choose Colors that Enhance My Vanity’s Style?
When selecting colors for your vanity’s backsplash, consider the following elements:
- Complementary Colors: Choose colors that contrast well with the vanity itself to create visual interest. For instance, if your vanity is a dark wood, lighter backsplash colors can brighten the space and enhance its overall appeal.
- Monochromatic Schemes: Sticking to variations of a single color can create a sophisticated look. By using different shades of the same color, you can maintain a cohesive design while adding depth and texture to your vanity area.
- Accent Colors: Incorporate colors that reflect your personal style or the overall theme of the bathroom. For example, if your decor features blues and greens, a backsplash incorporating these hues can tie the space together harmoniously.
- Material Texture: The texture of the backsplash can influence its color perception. Glossy tiles may brighten the room while matte finishes can create a more subdued and elegant style. Consider how the surface will interact with light in the space.
- Trendy Colors: Research current trends for inspiration, such as earthy tones or pastel shades. These can modernize your vanity area and keep it looking fresh, but make sure they align with your personal taste for long-term satisfaction.
What Installation Tips Can Simplify the Backsplash Process?
Several installation tips can simplify the backsplash process for a vanity.
- Pre-measure and Plan: Before starting the installation, measure the area accurately and plan the layout of the backsplash. This prevents issues like cutting tiles too small or misaligning them during installation.
- Use Adhesive Backed Tiles: Opt for adhesive-backed tiles which are easier to install compared to traditional tiles. These come with a sticky backing that eliminates the need for additional glue, making the process quicker and less messy.
- Level the Surface: Ensure that the wall surface is clean, dry, and level before installation. Uneven surfaces can lead to gaps and misalignment, so using a leveling tool can significantly improve the outcome.
- Start from the Center: Begin tiling from the center of the backsplash area and work your way outwards. This approach ensures that cuts on the edges are symmetrical and minimizes the visual impact of any imperfections.
- Use a Tile Cutter: Invest in a good tile cutter or a wet saw to make precise cuts. This tool will help you achieve clean edges, which is essential for a professional-looking finish.
- Grout Efficiently: Apply grout after the tiles are set, and use a grout float to push it into the spaces. Wipe off excess grout with a damp sponge to prevent it from hardening on the surface of the tiles.
- Seal the Edges: After grouting, seal the edges of the backsplash with caulk to prevent moisture from seeping behind the tiles. This is especially important in areas near sinks or where water exposure is likely.
What Mistakes Should I Avoid When Installing a Vanity Backsplash?
When installing a vanity backsplash, avoiding certain common mistakes can ensure a more successful and aesthetically pleasing result.
- Neglecting Surface Preparation: Properly preparing the surface is crucial for a successful installation. This includes cleaning the wall thoroughly and ensuring that it is dry and free from any debris or old adhesive, which can affect the adhesion of the backsplash.
- Choosing the Wrong Adhesive: Using an inappropriate adhesive can lead to the backsplash peeling off or not adhering properly. It’s important to select an adhesive specifically designed for the material of the backsplash, whether it’s tile, glass, or another type.
- Skipping the Measuring Step: Failing to measure accurately can result in tiles being cut incorrectly or the backsplash not fitting properly. Always double-check measurements and consider the layout before cutting to minimize errors.
- Ignoring Grout Lines: Not accounting for grout lines during installation can lead to uneven spacing and a less professional look. It’s essential to use spacers to maintain consistent grout lines and ensure a visually appealing finish.
- Overlooking Water Resistance: Installing a backsplash without considering moisture levels can lead to damage over time. Choosing materials that are water-resistant and ensuring proper sealing can prevent issues in areas prone to splashes and humidity.
- Forgetting to Level the Installation: Not leveling the backsplash can result in an uneven appearance, which is immediately noticeable. Using a level during installation helps ensure that the backsplash is straight and aligns well with other elements in the vanity area.
- Rushing the Process: Trying to complete the installation too quickly can lead to mistakes and a poor finish. Taking the time to carefully align pieces, apply adhesive, and let everything cure properly will yield better results.