[ad_1]
This newsletter explains methods to combine Storybook and Chromatic to scale your React utility’s element library and get pleasure from transparent documentation, visible regression checking out and staff potency.
Why Use Storybook?
Storybook is a useful software for engineers, product homeowners and stakeholders alike. Storybook permits frontend engineering groups to construct element libraries to facilitate collaboration and save you the advance of elements from being blocked through extra vital challenge structure selections.
It acts as a standalone utility inside your extra intensive challenge that may record elements and their diversifications. Storybook comes filled with a ton of options which will also be custom designed and configured on your liking. Underneath are one of the most options I take advantage of on on a regular basis initiatives:
- internet accessibility audits
- unit, interplay and snapshot checking out
- record element capability for engineers and stakeholders
- simple publishing and webhosting
- integration with Chromatic for visible regression checking out (VRT)
This newsletter explores putting in and configuring Storybook in a pattern Create React App challenge, putting in add-ons, writing tales, producing automatic documentation and publishing your Storybook to the Internet.
Environment Up and Configuring Storybook
Let’s first have a look at set up.
Putting in Storybook
Storybook used to be evolved to suit right into a plethora of various challenge kinds. Among the finest method to get began with Storybook is to put in it right into a pre-existing utility and run a easy command on the root of your challenge:
npx storybook@newest init
The above command will have a look at your challenge dependencies and resolve probably the most suitable method to set up Storybook.
If you wish to have assist figuring out whether or not your challenge would fortify Storybook, learn during the Frameworks web page within the documentation.
Be aware: you’ll be able to set up Storybook manually, however this typically ends up in mistakes and mismanaged dependencies, which will purpose issues.
Configuring Storybook
Probably the most extra advanced facets of Storybook is configuring it to align with applied sciences provide on your utility. Additional customization might be required to verify Storybook behaves in a fashion aligned together with your utility’s era stack.
Configuring Storybook is basically performed during the primary.js document. You’ll be able to specify the whole thing right here — from how documentation is gifted, to extending Storybook’s UI with add-ons. You’ll be able to even prolong Webpack.
Storybook helps TypeScript out of the field, however you will have to arrange your CSS structure. Many flavors of CSS are supported. You’ll be able to in finding additional info within the Styling and CSS documentation.
Let’s spin up a Create React App example:
npx create-react-app my-scalable-component-library
The above command will bootstrap a elementary React utility. We’ll be the usage of Create React App for this text, even though different frameworks also are supported. Let’s be sure that your utility is operating accurately through working npm run get started. You must see one thing very similar to what’s pictured underneath.

Let’s set up Storybook subsequent. Run the next line within the root of your utility:
npx storybook@newest init
The script will do somewhat of pondering after which recommended you to substantiate a couple of main points. Storybook makes sense sufficient to locate that we’re the usage of Create React App (CRA), and it’s going to most probably wish to replace a couple of dependencies to paintings seamlessly together with your challenge. Hit Y while you see the recommended pictured underneath.

If all is going in step with plan, Storybook will release on your browser, and also you’ll see what’s pictured underneath.

At this level, it’s value taking a look at what’s modified in our challenge. Storybook added a .storybook folder the place your configuration information are living. You’ll additionally realize a tales folder added to the src listing. There are typically 3 comparable information for every “tale”. We’ll discover that during extra element somewhat later.
Each the equipment.json and package-lock.json had been up to date. Updates to those information pertain basically to dependencies, however equipment.json additionally has two new scripts:
"storybook": "storybook dev -p 6006",
"build-storybook": "storybook construct"
Run npm run storybook to spin up a dev setting and npm run build-storybook while you’re able to put up your first Storybook.
Let’s run npm run build-storybook. The output is a folder referred to as storybook-static: this can be a “printed” Storybook that may be made publicly available.
At this level, Storybook and CRA are fully arrange. You might need to upload the storybook-static folder on your .gitignore if you happen to don’t plan to trace the static information.
It’s additionally value noting {that a} handful of elements had been added on your listing. You’ll be able to take away them if want be. Alternatively, I like to recommend preserving them for reference, if for not anything else. Earlier than we transfer on, let’s in short check out primary.js:
const config = {
  tales: ["../src/**/*.mdx", "../src/**/*.stories.@(js|jsx|mjs|ts|tsx)"],
  addons: [
    "@storybook/addon-links",
    "@storybook/addon-essentials",
    "@storybook/preset-create-react-app",
    "@storybook/addon-onboarding",
    "@storybook/addon-interactions",
  ],
  framework: {
    identify: "@storybook/react-webpack5",
    choices: {},
  },
  doctors: {
    autodocs: "tag",
  },
  statistics: ["../public"],
};
export default config;
There are a couple of crucial portions to this document. In the beginning, the tales key tells the Storybook the place to search for element tales. As you replace your document/folder structure in CRA, replace those paths to keep away from dropping your tales in Storybook.
framework is typically other for every challenge kind. doctors tells Storybook to record elements mechanically.
I might extremely suggest studying the Configure web page within the Storybook doctors for more info about what will also be treated via primary.js.
Selecting Storybook Upload-ons
You’ll be able to bring to mind Storybook add-ons as “plugins”. They’re pre-written programs that stretch the core Storybook APIs and carry out duties like integrating JS/CSS frameworks or improving the default habits of Storybook.
What add-ons you put in depends upon your challenge and your staff’s targets. There are successfully two varieties of add-ons: UI-based and preset-based. “UI-based” add-ons customise the useful look of Storybook. “Preset-based” add-ons will let you combine with different applied sciences like TypeScript or Tailwind. You’ll be able to discover a number of all add-ons at the Integrations web page.
Be aware: some add-ons are maintained through the Storybook staff, whilst others are community-driven. Group-driven add-ons would possibly yield surprising effects or will not be appropriate with the most recent model of Storybook.
Earlier than you move at the hunt for a number of add-ons you’re feeling might be highest to combine, you’ll want to check out what Storybook installs through default:
addons: [
    "@storybook/addon-links",
    "@storybook/addon-essentials",
    "@storybook/preset-create-react-app",
    "@storybook/addon-onboarding",
    "@storybook/addon-interactions",
  ],
@storybook/addon-linkspermits you to hyperlink Tales to construct prototypes.@storybook/addon-essentialscome with all add-ons situated right here: https://storybook.js.org/integrations/tag/necessities/.@storybook/preset-create-react-appis a preset-based add-on that complements the combination with CRA.@storybook/addon-onboardingsupplies a guided excursion of Storybook options.@storybook/addon-interactionslets you debug the interplay state of your elements. If you happen to’re , you’ll be able to learn extra about Interplay checks.
Let’s say you need so as to add any other add-on on your configuration. Let’s set up the Accessibility add-on:
npm set up @Storybook/addon-a11y
Subsequent, we wish to inform Storybook to initialize the add-on. This will also be performed through including the add-on to the addons key in primary.js:
addons: [
    "@storybook/addon-links",
    "@storybook/addon-essentials",
    "@storybook/preset-create-react-app",
    "@storybook/addon-onboarding",
    "@storybook/addon-interactions",
    "@storybook/addon-a11y",
  ],
Save primary.js, after which let’s boot up Storybook once more through working npm run storybook.
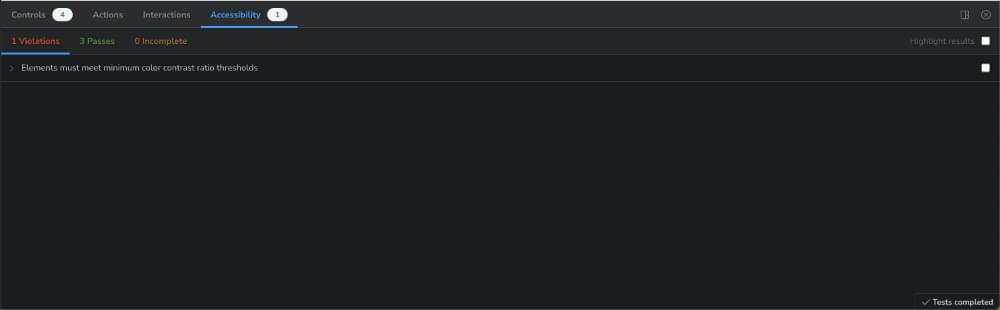
You’ll be able to see now that the “Accessibility” tab has been added to all tale circumstances and is already flagging issues of a11y in our elements. “UI-based” add-ons handiest require somewhat configuration. “Preset-based” will also be extra advanced. The cause of that is that “preset-based” add-ons incessantly want additional configuration, reminiscent of:
- putting configuration information on the root of your challenge
- configuring choices / Webpack configurations that will have to align together with your CRA utility settings
This may purpose a large number of friction, and remediation can rely at the framework of selection. Use warning when extending Storybook with “preset-based” add-ons and make sure parity together with your utility.
Writing and Documenting Part Tales
It’s now time to write down tales. A tale in Storybook is generally tied to an element and its diversifications. Tales are extremely dynamic information written in React, Markdown, or a mixture of each applied sciences. Tales are handed parameters that align with props the React element accepts.
Those props will also be configured to output diversifications of every element. This permits engineers to have interaction with prop values inside the Storybook UI. Let’s evaluation our Button tale that used to be added via our bootstrapping of Storybook:
import { Button } from './Button';

export default {
  name: 'Instance/Button',
  element: Button,
  parameters: {
    format: 'focused',
  },
  tags: ['autodocs'],
  argTypes: {
    background-color: { keep watch over: 'colour' },
  },
};

export const Number one = {
  args: {
    number one: true,
    label: 'Button',
  },
};

export const Secondary = {
  args: {
    label: 'Button',
  },
};

export const Huge = {
  args: {
    measurement: 'massive',
    label: 'Button',
  },
};

export const Small = {
  args: {
    measurement: 'small',
    label: 'Button',
  },
};
The above illustrates the layout you’ll be able to observe when making a Tale. There will have to at all times be a default export. That is the principle element. It’s the place crucial settings are configured. Maximum of them are self-explanatory. Alternatively, I wish to name out the next:
- Parameters are a collection of static, named metadata a few tale, usually used to keep watch over the habits of Storybook options and add-ons.
- Tags will auto-generate documentation for every element tale. Learn extra about AutoDocs.
- argTypes specify the habits of
argsor annotate args. Learn extra aboutarchetypes.
Any named export after the preliminary default export is a variation. Each and every variation is an object with an args key. args on this context must align with the props handed on your element. Each and every variation might be output in Storybook beneath the Button element, and you’ll be able to engage with them as wanted.
Working out Decorators is going some distance if you happen to plan on construction extra advanced tales. A decorator supplies a method to wrap tales in additional context and capability. Tales will also be handed to a decorator through surroundings the decorator key within the tale parameters:
decorators: [
    (Story) => (
      <div style={{ margin: '3em' }}>
        {}
        <Story />
      </div>
    ),
  ],
Within the instance above, we upload a <div> that wraps our element, and we assign it 3em of margin.
Tales too can eat elements from different Tales. Simply remember that this will likely depend on how your element renders and what sort of element you intend on including on your utility general.
Within the Storybook doctors, you’ll be able to examine Sub Parts intimately.
Writing a Tale for our utility
Let’s put this all to the check. We’re going so as to add an element to our utility referred to as Footer. This may occasionally require 3 information:
Footer.jsxFooter.tales.jsfooter.css
Create the ones information within the src/tales folder. Our Footer.jsx goes to be easy:
import React from 'react';
import PropTypes from 'prop-types';

export const Footer = ({ siteOwner, showCopyRight }) => (
  <footer>
    <div className="footer">
      {showCopyRight && (
        <div>
          <span>
            <span function="img" aria-label="reproduction">©️</span> 2018 {siteOwner}.
          </span>
        </div>
      )}
    </div>
  </footer>
);

Footer.propTypes = {
  siteOwner: PropTypes.string.isRequired,
  showCopyRight: PropTypes.bool,
};

Footer.defaultProps = {
  showCopyRight: true,
};
It takes two props: siteOwner and showCopyRight. Subsequent up, let’s write a tale for the Footer:
import { Footer } from './Footer';

export default {
  name: 'Instance/Footer',
  element: Footer,
  tags: ['autodocs'],
  parameters: {
    format: 'fullscreen',
  },
};

export const WithSiteOwner = {
  args: {
    siteOwner: 'Jane Doe',
    showCopyRight: true,
  },
};

export const WithOutCopyRight = {
  args: {
    siteOwner: 'Jane Doe',
    showCopyRight: false,
  },
};
This can be a somewhat contrived instance, but it surely illustrates how simple it’s so as to add a tale. Upload the above to Footer.tales.js. The outcome might be an auto-documented, multi-variant tale that permits customers to have interaction with the element’s props.
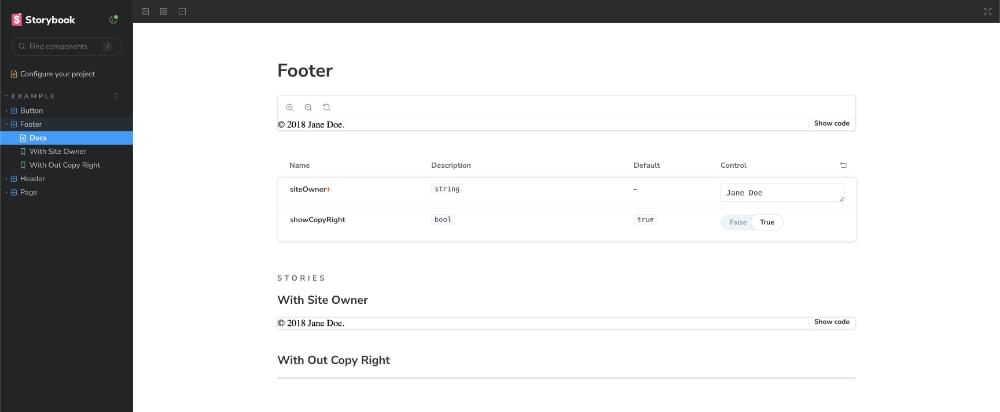
Take a look at updating the siteOwner worth immediately within the tale controls. If you wish to taste the Footer, import footer.css into Footer.jsx and reference the category names. If you happen to’re focused on seeing how the element behaves on your React utility, import it:
import { Footer } from './tales/Footer';
...
<Footer siteOwner='Daine Mawer' showCopyRight />
Great! You’ve simply created your element and a corresponding tale! Subsequent, we’ll speak about publishing your storybook at the Internet.
Publishing Your Storybook
Engineers can simply view and expand in the neighborhood on Storybook, because the configuration is tracked via your most popular model keep watch over gadget. Alternatively, a URL to get admission to the broadcast Storybook could be way more manageable for non-technical stakeholders.
While you run a manufacturing construct of Storybook, its output is a number of static information which can be outputted right into a construct folder. Fortunately, the Storybook staff has made this somewhat simple to reach. All you wish to have to do is administered this:
npm run build-storybook
The construct will terminate if it comes throughout any construct mistakes, so there’s no method of publishing a damaged Storybook. Now that we have got a manufacturing construct, we want someplace to host it.
There are a number of tactics to try this: GitHub Pages, Netlify, and AWS S3. A few of these choices require extra configuration than others.
If you happen to don’t plan on putting in Chromatic (really helpful), I like to recommend working with GitHub Pages, as you’ll be able to upload a GitHub Motion to make brief paintings of the configuration and setup.
Environment Up Chromatic for VRT
Chromatic is an impressive software that lives along Storybook. The Storybook staff maintains Chromatic, so integrating the software into your pre-existing utility and CI calls for minimum effort.
By means of integrating Chromatic, you’ll be able to make certain that visible regressions, even interplay insects, don’t make it on your manufacturing setting. The applying permits for seamless collaboration inside groups and is going a protracted method to making sure insects are stuck early and incessantly.
What’s extra, Chromatic is unfastened — with barriers, after all.
Let’s say we need to combine Chromatic with our printed Storybook. Join a Chromatic account and snatch a Undertaking Token. Subsequent, you’ll wish to set up the Chromatic npm equipment into your challenge:
npm set up --save-dev chromatic
Then upload a chromatic script on your equipment.json:
"scripts": {
    "chromatic": "chromatic"
}
You’ll then wish to make sure that you’ve gotten a .env document with the next setting variable outlined: CHROMATIC_PROJECT_TOKEN. You’ll be able to upload the Undertaking Token out of your Chromatic account as the price.
Run npm run chromatic. This may occasionally put up your Storybook on your Chromatic challenge. You’ll be able to then get admission to an excellent UI to study elements and their adjustments. The issue with this setup is that you just’ll wish to run Chromatic every time you exchange elements.
This can be k for smaller initiatives, however committing adjustments on your utility and having a CI pipeline care for this difficult paintings is much better. Chromatic CI integrates immediately into pull requests.
If you happen to’re the usage of GitHub, you’ll be able to briefly rise up and working with GitHub Movements through including a workflows folder on your .github listing. Apply the stairs in Chromatic Doctors defined at Automate Chromatic with GitHub Movements to rise up and working.
You’ve gotten now printed an element library that runs UI Exams and Evaluations every time you dedicate adjustments on your elements.
Conclusion and Takeaways
Storybook and Chromatic equipment will empower your staff to ship higher-quality code. Use Storybook to automate and iterate for your shared element libraries.
Above all else, those two equipment will be certain your engineering staff can expand in self assurance, send options and insect fixes extra successfully and make sure that your product is at all times well-documented, scalable and extensible.
[ad_2]