
[ad_1]
In nowadays’s fast moving virtual panorama, accumulating precious insights out of your target market is the most important for making knowledgeable choices. Conventional surveys have obstacles, steadily inflicting respondents to drop out because of long paperwork or slow-loading pages. That is the place async survey gear come to the rescue. Those cutting edge gear leverage asynchronous verbal exchange to create a extra attractive and environment friendly survey-taking enjoy. On this weblog publish, we’re going to discover the sector of async survey gear, dropping mild on what they’re and why you will have to imagine development one.
Why Construct an Async Survey Software?
Asynchronous survey gear be offering a refreshing knowledge assortment method, revolutionizing how we have interaction with respondents. Listed here are some compelling the explanation why you will have to imagine embarking at the adventure of establishing your very personal async survey device:
- Enhanced person enjoy: Conventional surveys will also be tedious, resulting in survey fatigue and dropouts. Async survey gear permit respondents to respond to questions independently, decreasing survey abandonment charges and making sure a good person enjoy.
- Larger reaction charges: Through accommodating respondents’ schedules and permitting them to take part when handy, async surveys are much more likely to garner larger reaction charges than their synchronous opposite numbers.
- World achieve: Async surveys go beyond time zones and geographical barriers. They empower you to assemble knowledge from a various world target market, making it superb for analysis with broader demographics.
- Information high quality: Respondents may give well-thought-out responses with asynchronous surveys, resulting in higher-quality knowledge. That is particularly precious when engaging in in-depth analysis or accumulating detailed comments.
- Flexibility and customization: Construction your async survey device offers you whole keep watch over over the design, construction, and lines. You’ll be able to tailor it to satisfy the precise wishes of your analysis, making sure it aligns completely together with your goals.
- Seamless integration: Integrating your async survey device with different knowledge assortment and research gear is easier than ever, enabling you to streamline your analysis procedure.
- Aggressive merit: In a global the place innovation is necessary, having your async survey device units you aside from competition. It demonstrates your dedication to handing over a awesome person enjoy and accumulating correct knowledge.
Within the following sections of this weblog publish, we’re going to delve deeper into the technical facets of establishing an asynchronous survey device, exploring key options, design concerns, and highest practices to verify luck to your survey endeavors.
Prior to You Get started
- This information is written assuming you’ve gotten fundamental HTML, CSS, and JS wisdom, in conjunction with React.
- You’re going to want an API Key and Organisation ID from dev.dyte.io to accomplish operations with Dyte’s REST APIs. Take a look at its documentation at doctors.dyte.io/api. To understand extra about getting began and studying fundamental ideas about Dyte, learn this information: doctors.dyte.io/getting-started.
Utility Glide
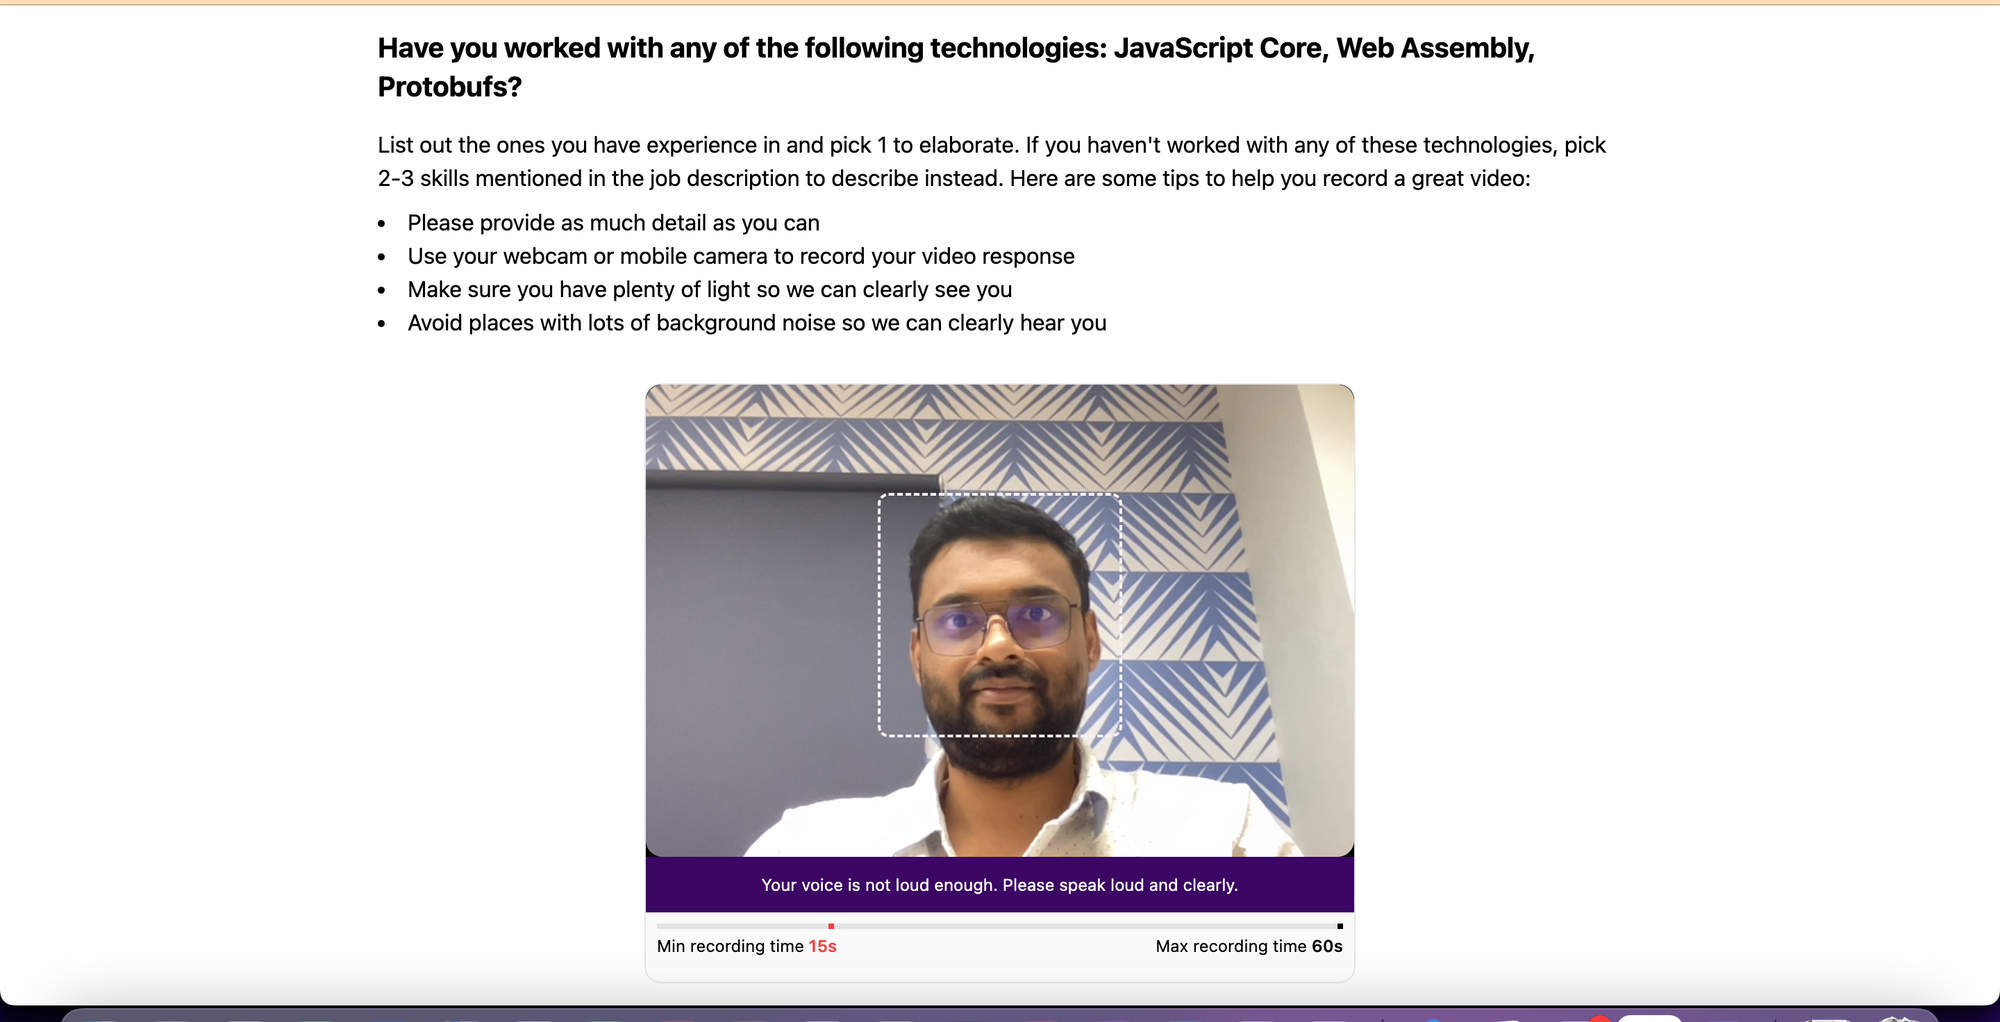
Person is taken to a display the place they’re requested a query. To respond to, they have got to start out the recording. A minimal length of 15 seconds can be required for the recording and a most of 60 seconds, and then the recording will prevent mechanically, and the survey might be finished. The person might be proven visible tips to middle their face within the video and advised to talk up if their quantity is low.
Figuring out the Code
Observe in conjunction with the code walkthrough as you learn throughout the supply right here.
Within the supply, we have arrange a React app with Vite, and that is the principle <App /> element that mechanically initializes and joins a Dyte assembly.
export default serve as Assembly() {
  const [meeting, initMeeting] = useDyteClient();

  useEffect(() => {
      // use "mild" theme
    provideDyteDesignSystem(report.frame, {
      theme: 'mild',
    });

    const searchParams = new URLSearchParams(window.location.seek);
      // for trying out we get authToken from URL seek params
      // however in prod, you could get this as a reaction
      // from one among your backend APIs
    const authToken = searchParams.get('authToken');

    if (!authToken) {
      alert(
        "An authToken wasn't handed, please go an authToken within the URL question to enroll in a gathering.",
      );
      go back;
    }

    initClient({
      authToken,
    }).then((assembly) => {
      // mechanically sign up for room
      assembly?.joinRoom();
    });
  }, []);

  go back (
    <DyteProvider
      worth={assembly}
      fallback={
        <div className="w-full h-full flex flex-col gap-4 place-items-center justify-center">
          <DyteSpinner className="w-14 h-14 text-blue-500" />
          <p className="text-xl font-semibold">Beginning Dyte Video Survey</p>
        </div>
      }
    >
      <Recorder />
    </DyteProvider>
  );
}
We are the usage of the useDyteClient() hook to initialize a assembly object by way of the initClient() means. It accepts the authToken worth returned by means of the Upload Player API.
We then use the <DyteProvider /> element and go the assembly object to it that may be ate up by means of customized hooks. We additionally supplied a fallback UI to render till the assembly object is initialized.
In case you are unfamiliar with producing the authToken, take a look at our ‘Getting Began’ information.
Now, let’s transfer directly to the principle common sense within the <Recorder /> element.
serve as Recorder() {
  const { assembly } = useDyteMeeting();

  // timestamp worth from `assembly` object is saved
  const [timestamp, setTimestamp] = useState<Date>();
  // world states values emitted from parts is saved
  const [UIStates, setUIStates] = useState<any>({});

  // derived from `timestamp` worth
  const [duration, setDuration] = useState(0);
  // state to disable recording button as according to common sense
  const [recordingDisabled, setRecordingDisabled] = useState(false);

  // error comments states to be proven to the person
  const [errors, dispatchError] = useReducer(errorReducer, []);
  // customized hook to calculate brightness and silence from
  // video and audio tracks
  useBrightnessAndSilenceDetector(dispatchError);

  useEffect(() => {
    // calculate length from recording timestamp
    if (timestamp) {
      const period = setInterval(() => {
        const length = getElapsedDuration(timestamp);
        setDuration(length);
      }, 500);
      go back () => {
        clearInterval(period);
      };
    }
  }, [timestamp]);

  useEffect(() => {
    const onRecordingUpdate = (state: string) => {
      transfer (state) {
        case 'RECORDING':
          setTimestamp(new Date());
          damage;
        case 'STOPPING':
          setTimestamp(undefined);
          damage;
      }
    };

    assembly.recording.addListener('recordingUpdate', onRecordingUpdate);
    go back () => {
      assembly.recording.removeListener('recordingUpdate', onRecordingUpdate);
    };
  }, []);

  useEffect(() => {
    // prevent recording whilst you achieve max length of 60 seconds
    if (length >= 60) {
      assembly.recording.prevent();
      setRecordingDisabled(false);
    }
  }, [duration]);

  go back (
    <div className="w-full h-full flex place-items-center justify-center p-4 flex-col">
      <div className="max-w-4xl pb-8">
        <h3 className="text-xl font-bold mb-4">
          Have you ever labored with any of the next applied sciences: JavaScript
          Core, Internet Meeting, Protobufs?{' '}
        </h3>
        <div className="mb-2">
          Record out those you've gotten enjoy in and pick out 1 to elaborate. If
          you have not labored with any of those applied sciences, pick out 2-3 abilities
          discussed within the activity description to explain as a substitute. Listed here are some
          pointers that can assist you document a really perfect video:
        </div>
        <li>Please supply as a lot element as you'll</li>
        <li>Use your webcam or cell digital camera to document your video reaction</li>
        <li>You should definitely have a number of mild so we will obviously see you</li>
        <li>
          Keep away from puts with a variety of background noise so we will obviously pay attention you
        </li>
      </div>
      <div className="flex flex-col w-full max-w-lg border rounded-xl overflow-clip">
        <div className="relative">
          <DyteParticipantTile
            player={assembly.self}
            className="w-full h-auto rounded-none aspect-[3/2] bg-zinc-300"
          />
          <p className="text-white bg-purple-950 p-3 text-xs text-center">
            {/* Display k message, or final error message */}
            {mistakes.period === 0
              ? messages['ok']
              : messages[errors[errors.length - 1]]}
          </p>
          {/* Display placement container best when recording hasn't began */}
          {!timestamp && (
            <div className="absolute w-44 z-50 left-1/2 -translate-x-1/2 top-1/2 -translate-y-28 aspect-square border-2 border-dashed border-pink-50 rounded-lg" />
          )}
        </div>
        {/* Length indicator */}
        <Length length={length} />

        <div className="flex items-center justify-center p-2">
          <DyteRecordingToggle
            assembly={assembly}
            disabled=
          />
          <DyteSettingsToggle
            onDyteStateUpdate={(e) => setUIStates(e.element)}
          />
        </div>
      </div>

      <DyteDialogManager
        states={UIStates}
        assembly={assembly}
        onDyteStateUpdate={(e) => setUIStates(e.element)}
      />
    </div>
  );
}
Breaking Down the Code
- The
timestampstate worth is ready from theassemblyrecording API in auseEffectcontaining therecordingUpdatematch listeners. UIStatesstate worth will get up to date on every occasion parts like<DyteDialogManager />or<DyteSettingsToggle />emit world UI state updates.- We derive the
lengthfrom thetimestampworth in auseEffect. - The state
recordingDisabledis ready as according to the common sense we explained sooner than. - To render the UI, we use the
DyteParticipantTile,DyteSettingsToggle,DyteRecordingToggleandDyteDialogManagerparts from Dyte’s React UI Package. Be aware thatDyteSettingsToggleemits a state on every occasion you toggle it, and theDyteDialogManagerdisplays theDyteSettingselement accordingly. - Be aware how we disable the
DyteRecordingTogglebutton as according to thelengthstate. - We additionally render a customized
Lengthelement appearing the development of the recording length in conjunction with our constraints. - The
useBrightnessAndSilenceDetector()hook updates themistakesstate that will get proven to the person.
The messages object accommodates a pre-defined checklist of strings for every error state:
const messages = {
  adequate: 'Be certain your head and shoulders are in shot. Hit document if you end up able.',
  not_bright:
    'You appear to be in a gloomy room, please check out turning at the lighting fixtures.',
  not_loud: 'Your voice isn't loud sufficient. Please talk loud and obviously.',
};
Coming to the brightness and silence detector hook useBrightnessAndSilenceDetector(). Its code seems like this:
serve as useBrightnessAndSilenceDetector(
  dispatchError: Dispatch<Parameters<typeof errorReducer>[1]>,
) {
  const { assembly } = useDyteMeeting();
  const videoEnabled = useDyteSelector((m) => m.self.videoEnabled);
  const audioEnabled = useDyteSelector((m) => m.self.audioEnabled);

  useEffect(() => {
    const { audioTrack } = assembly.self;
    if (!audioTrack || !audioEnabled) go back;

    const flow = new MediaStream();
    flow.addTrack(audioTrack);
    const audioContext = new AudioContext();
    audioContext.resume();
    const analyserNode = audioContext.createAnalyser();
    analyserNode.fftSize = 2048;
    const micSource = audioContext.createMediaStreamSource(flow);
    micSource.attach(analyserNode);
    const bufferLength = 2048;
    const dataArray = new Float32Array(bufferLength);
    const silenceThreshold = 0.05;
    const segmentLength = 1024;

    serve as getRMS(
      dataArray: Float32Array,
      startIndex: quantity,
      endIndex: quantity,
    ) {
      let sum = 0;
      for (let i = startIndex; i < endIndex; i++) {
        sum += dataArray[i] * dataArray[i];
      }
      const imply = sum / (endIndex - startIndex);
      const rms = Math.sqrt(imply);
      go back rms;
    }

    serve as detectSilence() {
      analyserNode.getFloatTimeDomainData(dataArray);
      const numSegments = Math.flooring(bufferLength / segmentLength);
      for (let i = 0; i < numSegments; i++) {
        const startIndex = i * segmentLength;
        const endIndex = (i + 1) * segmentLength;
        const rms = getRMS(dataArray, startIndex, endIndex);
        if (rms > silenceThreshold) {
          // Detected non-silence on this phase
          go back false;
        }
      }
      // Detected silence
      go back true;
    }

    const period = setInterval(() => {
      const isSilent = detectSilence();

      if (isSilent) {
        dispatchError({ sort: 'upload', error: 'not_loud' });
      } else {
        dispatchError({ sort: 'take away', error: 'not_loud' });
      }
    }, 1000);

    go back () => {
      clearInterval(period);
      dispatchError({ sort: 'take away', error: 'not_loud' });
    };
  }, [audioEnabled]);

  useEffect(() => {
    if (!videoEnabled) go back;

    const { videoTrack } = assembly.self;
    if (!videoTrack) go back;
    const videoStream = new MediaStream();
    videoStream.addTrack(videoTrack);
    const video = report.createElement('video');
    video.taste.width="240px";
    video.taste.peak="180px";
    video.muted = true;
    video.srcObject = videoStream;
    video.play();
    const canvas = report.createElement('canvas');
    canvas.width = 240;
    canvas.peak = 180;
    const ctx = canvas.getContext('2nd', { willReadFrequently: true })!;

    const period = setInterval(() => {
      const brightness = getBrightness(video, canvas, ctx);
      if (brightness < 0.4) {
        dispatchError({ sort: 'upload', error: 'not_bright' });
      } else {
        dispatchError({ sort: 'take away', error: 'not_bright' });
      }
    }, 1000);

    go back () => {
      clearInterval(period);
      dispatchError({ sort: 'take away', error: 'not_bright' });
    };
  }, [videoEnabled]);

  go back null;
}
It takes the audioTrack and videoTrack items from the assembly object after which processes it to come across silence/low quantity and coffee brightness, respectively, and dispatch the mistakes for our UI to turn.
In spite of everything, let’s check out the Length element and the ProgressBar element.
serve as ProgressBar({
  worth,
  max,
}) {
  go back (
    <div className="h-1 w-full bg-zinc-200 relative">
      <div
        className="max-w-[25%] h-full bg-red-500 z-10 absolute left-0 top-0"
        taste={{
          width: Math.min((worth / max) * 100, 25) + '%',
          transition: 'all 0.3s',
        }}
      ></div>
      <div
        className="max-w-full h-full z-0 bg-black absolute left-0 top-0"
        taste={{
          width: Math.min((worth / max) * 100, 100) + '%',
          transition: 'all 0.3s',
        }}
      ></div>
    </div>
  );
}

serve as Length({ length }) {
  go back (
    <div className="flex flex-col gap-1 bg-zinc-50 p-2 text-center">
      <div className="relative">
        <ProgressBar worth={length} max={60} />
        <div className="z-10 bg-red-500 absolute left-1/4 h-full w-1 top-0"></div>
        <div className="z-10 bg-black absolute right-0 h-full w-1 top-0"></div>
      </div>
      <div className="text-xs flex items-center justify-between">
        <div>
          Min recording time{' '}
          <span className="font-semibold text-red-500">15s</span>
        </div>
        <div>
          Max recording time <span className="font-semibold">60s</span>
        </div>
      </div>
    </div>
  );
}
We wrote a customized UI with the assistance of TailwindCSS to render the Length and ProgressBar UI that appears like this.
Now, the person can get started answering the query after hitting the document.
Conclusion
With this, we now have constructed an async survey device, converting your knowledge assortment method and modernizing your interactions with respondents. We’ve got damaged down the code, carefully examined it, and fine-tuned the interface to verify user-friendliness, making it high and polished for deployment. So, now you’ll get on and lift your survey-taking enjoy.
When you have any ideas or comments, please get involved with me on LinkedIn and Twitter. Keep tuned for extra similar weblog posts one day!
[ad_2]