
[ad_1]
With many advances to Photoshop during the last a number of years, casting off the background from a picture hasn’t ever been more uncomplicated or faster. This text will display you all of the other ways of the way to take away the background of an image in Photoshop.
Understanding the most productive means to make use of for the kind of symbol you’re running with is essential to getting the most productive effects with the most productive methodology to be had.
Listed here are seven tactics to take away backgrounds out of your pictures the use of Adobe Photoshop Inventive Cloud and when to make use of each and every methodology to reach the most productive effects.
New to Photoshop in 2023 are a number of improvements to this system due to AI. A kind of improvements is their new Take away Device, which as you’ll be able to inform through the title, is helping you get rid of issues out of your pictures.
This instrument is very similar to Photoshop’s Object Variety Device (mentioned underneath), whilst taking it a step additional to reach precisely what you’re in search of, which is to take away the background.
Relying on what you’re taking a look to take away, you’ll be able to both get rid of gadgets, or in our case, get rid of the background totally.
Should you’re taking a look to take away the background in a picture in Photoshop the use of simply a few clicks, the use of the Take away Device and harnessing its AI energy is a straightforward approach to reach the end result you need.
Take away Device Steps
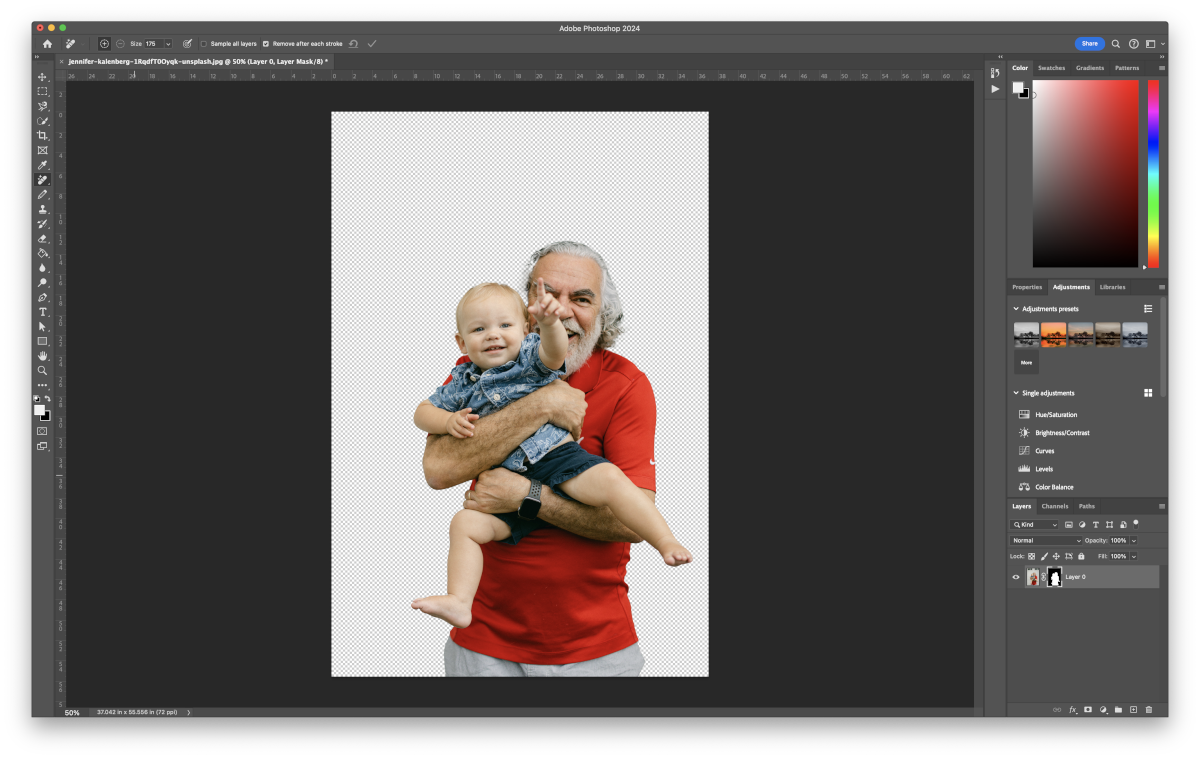
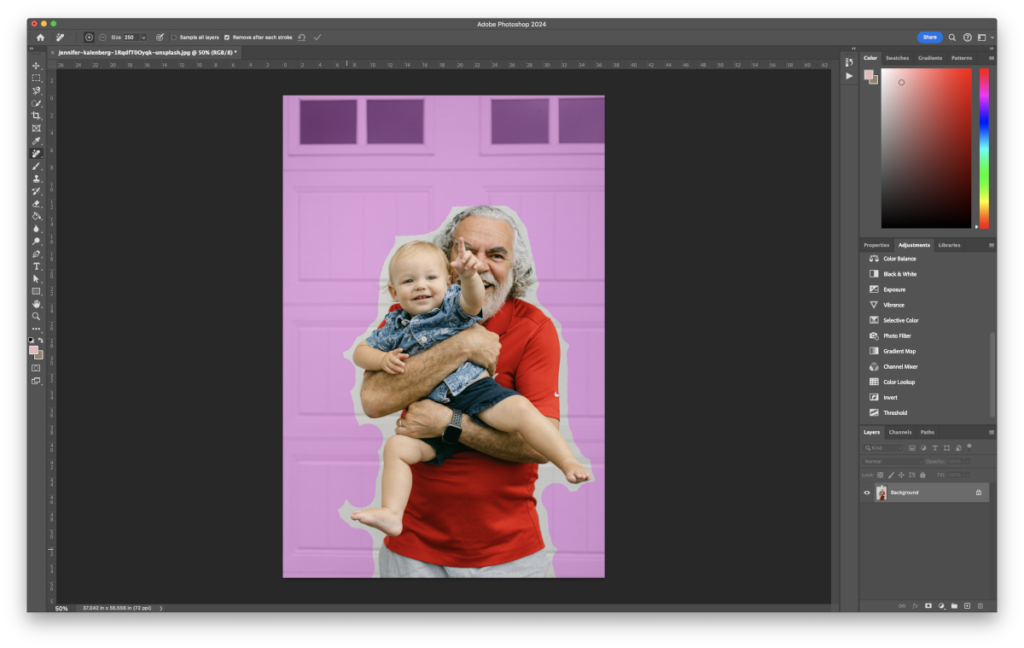
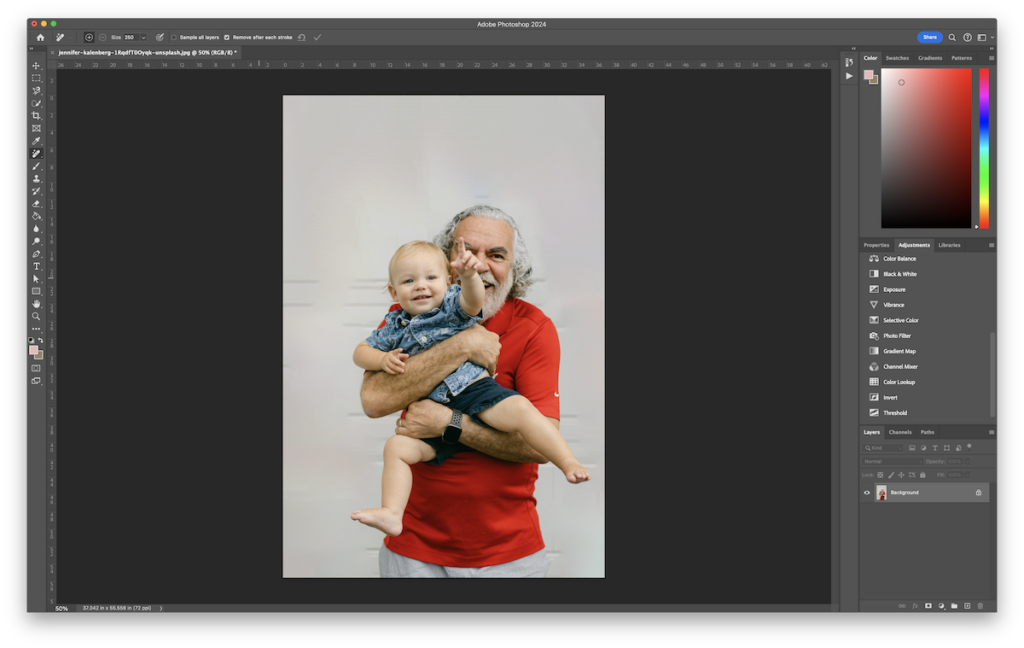
We’re going to take away the background from this symbol:
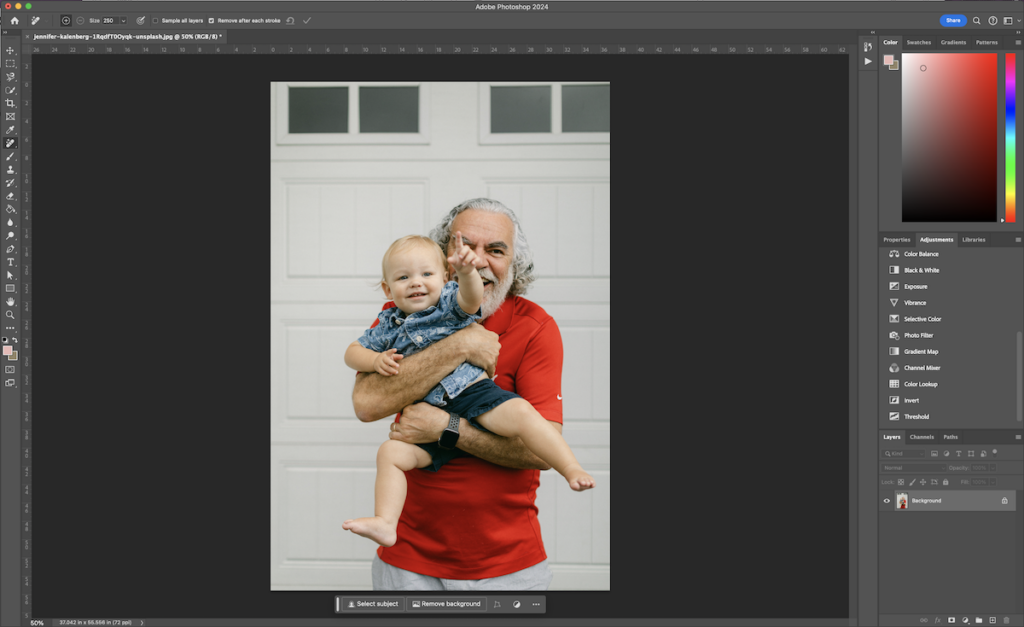
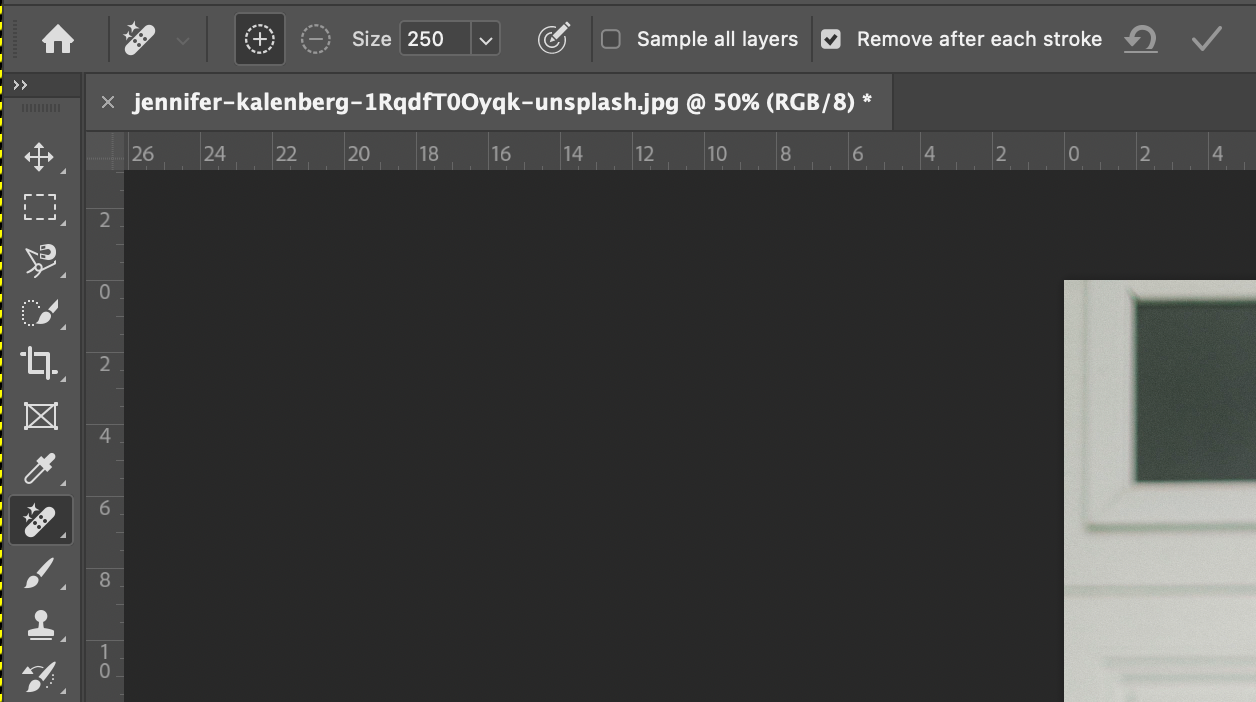
- Make a selection the “Take away Device” (discovered within the instrument drawer with the Spot Therapeutic Brush).
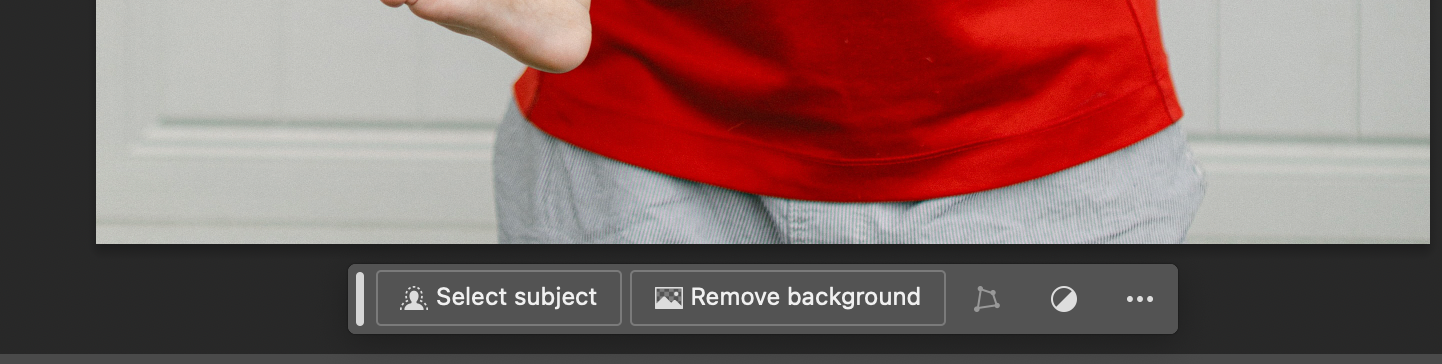
- Under your symbol, you’ll see a field seem with a few buttons. With out the rest decided on for your symbol, choose “Take away Background.”
- You’ll now see the background has been got rid of out of your symbol.
- To refine the sides, you’ll be able to change between the “Subtract from Masks” and “Upload to Masks” choices underneath the picture. Subtract from Masks must be used to take away any final background that can be left at the back of. Upload to Masks must be used so as to add again any of your topic that can had been by accident got rid of.
Be aware: If you wish to do that in a non-destructive way, make sure you reproduction your background layer so that you could use the Take away Device at the reproduction layer and no longer the unique background layer.
The Take away Device is at hand to take away your background out of your symbol the use of AI with only one click on of a button. On the other hand, it does have the option so that you can “paint” what you need got rid of and the instrument makes a decision what you intended through that.
For instance, within the symbol above I “painted” the background multi function stroke, with out letting move. Once I let move, Photoshop then calculated from there on how to take away the background.
The result’s that it kind of “smoothed” out the background (for essentially the most phase) as a substitute of casting off it totally, as proven above.
This will also be at hand in case you are running with a hectic background however don’t essentially need it utterly got rid of to transparency, however doing this technique does take time beyond regulation and paintings to color it, edit the end result, and get it to appear precisely the best way you need.
The Take away Device may be at hand for casting off gadgets as properly, no longer simply backgrounds. For more info on that, take a look at the Photoshop documentation article: https://helpx.adobe.com/photoshop/the use of/tool-techniques/remove-tool.html
Picture Credit score: Jennifer Kalenberg on Unsplash.
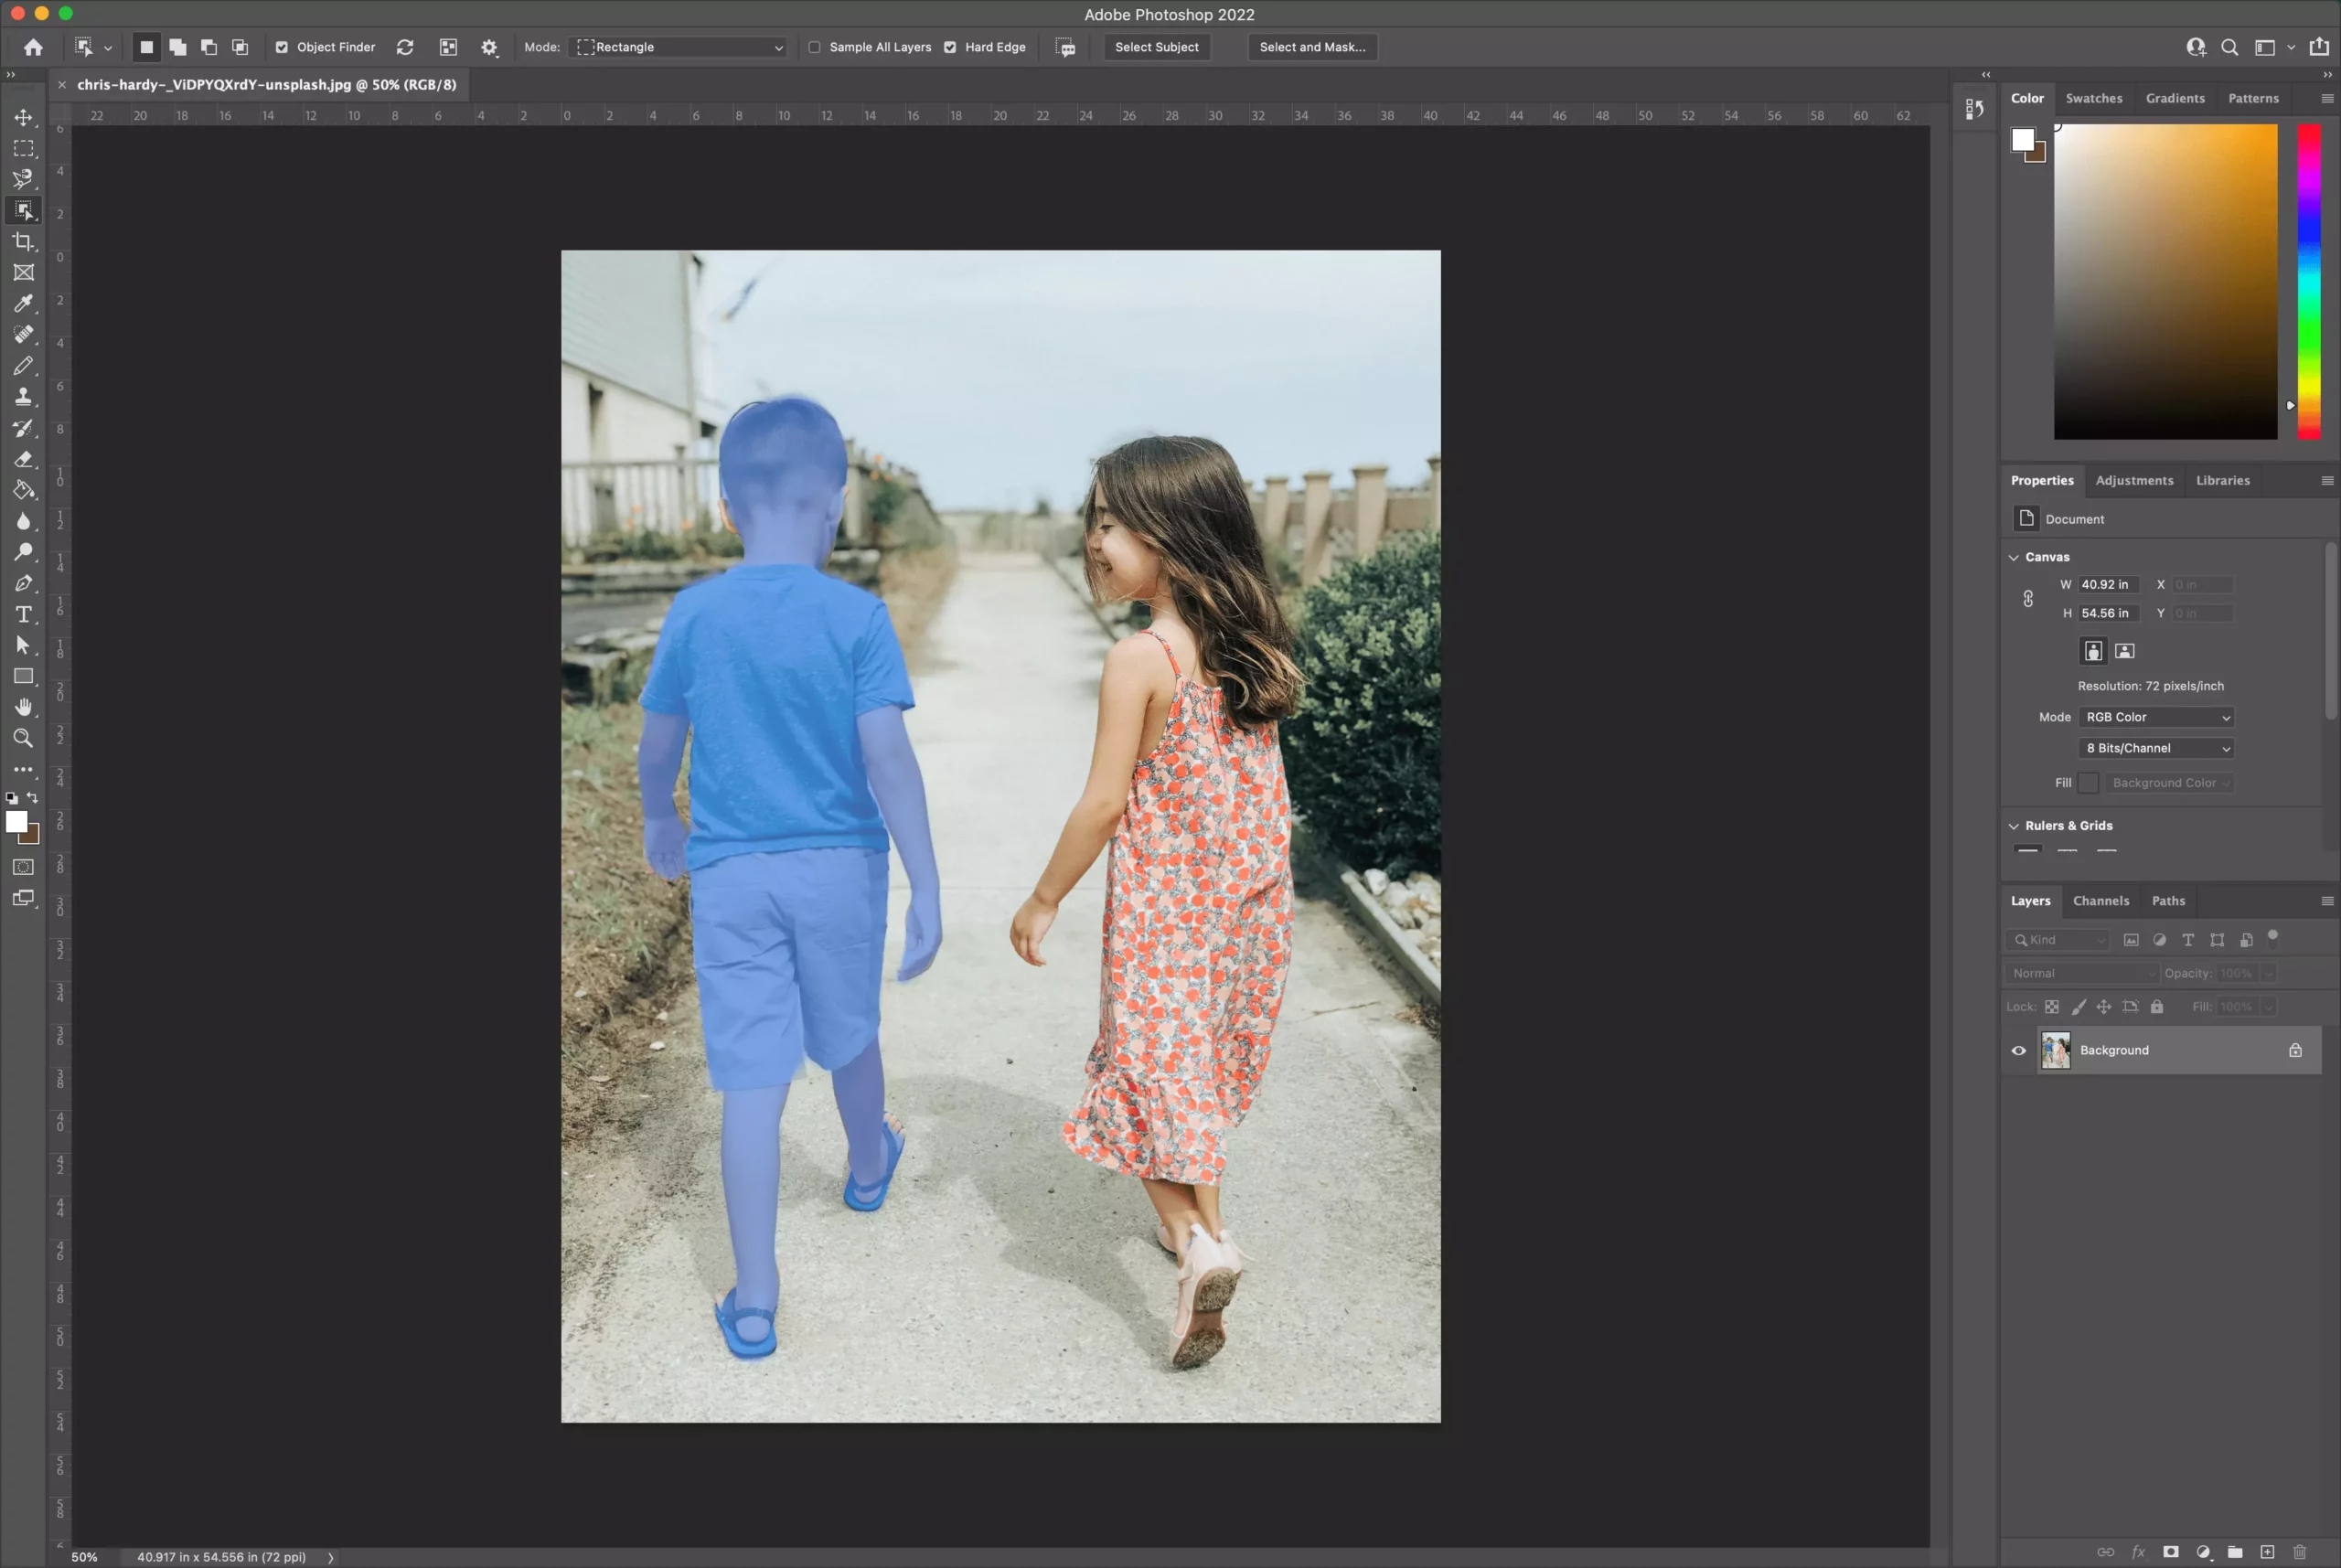
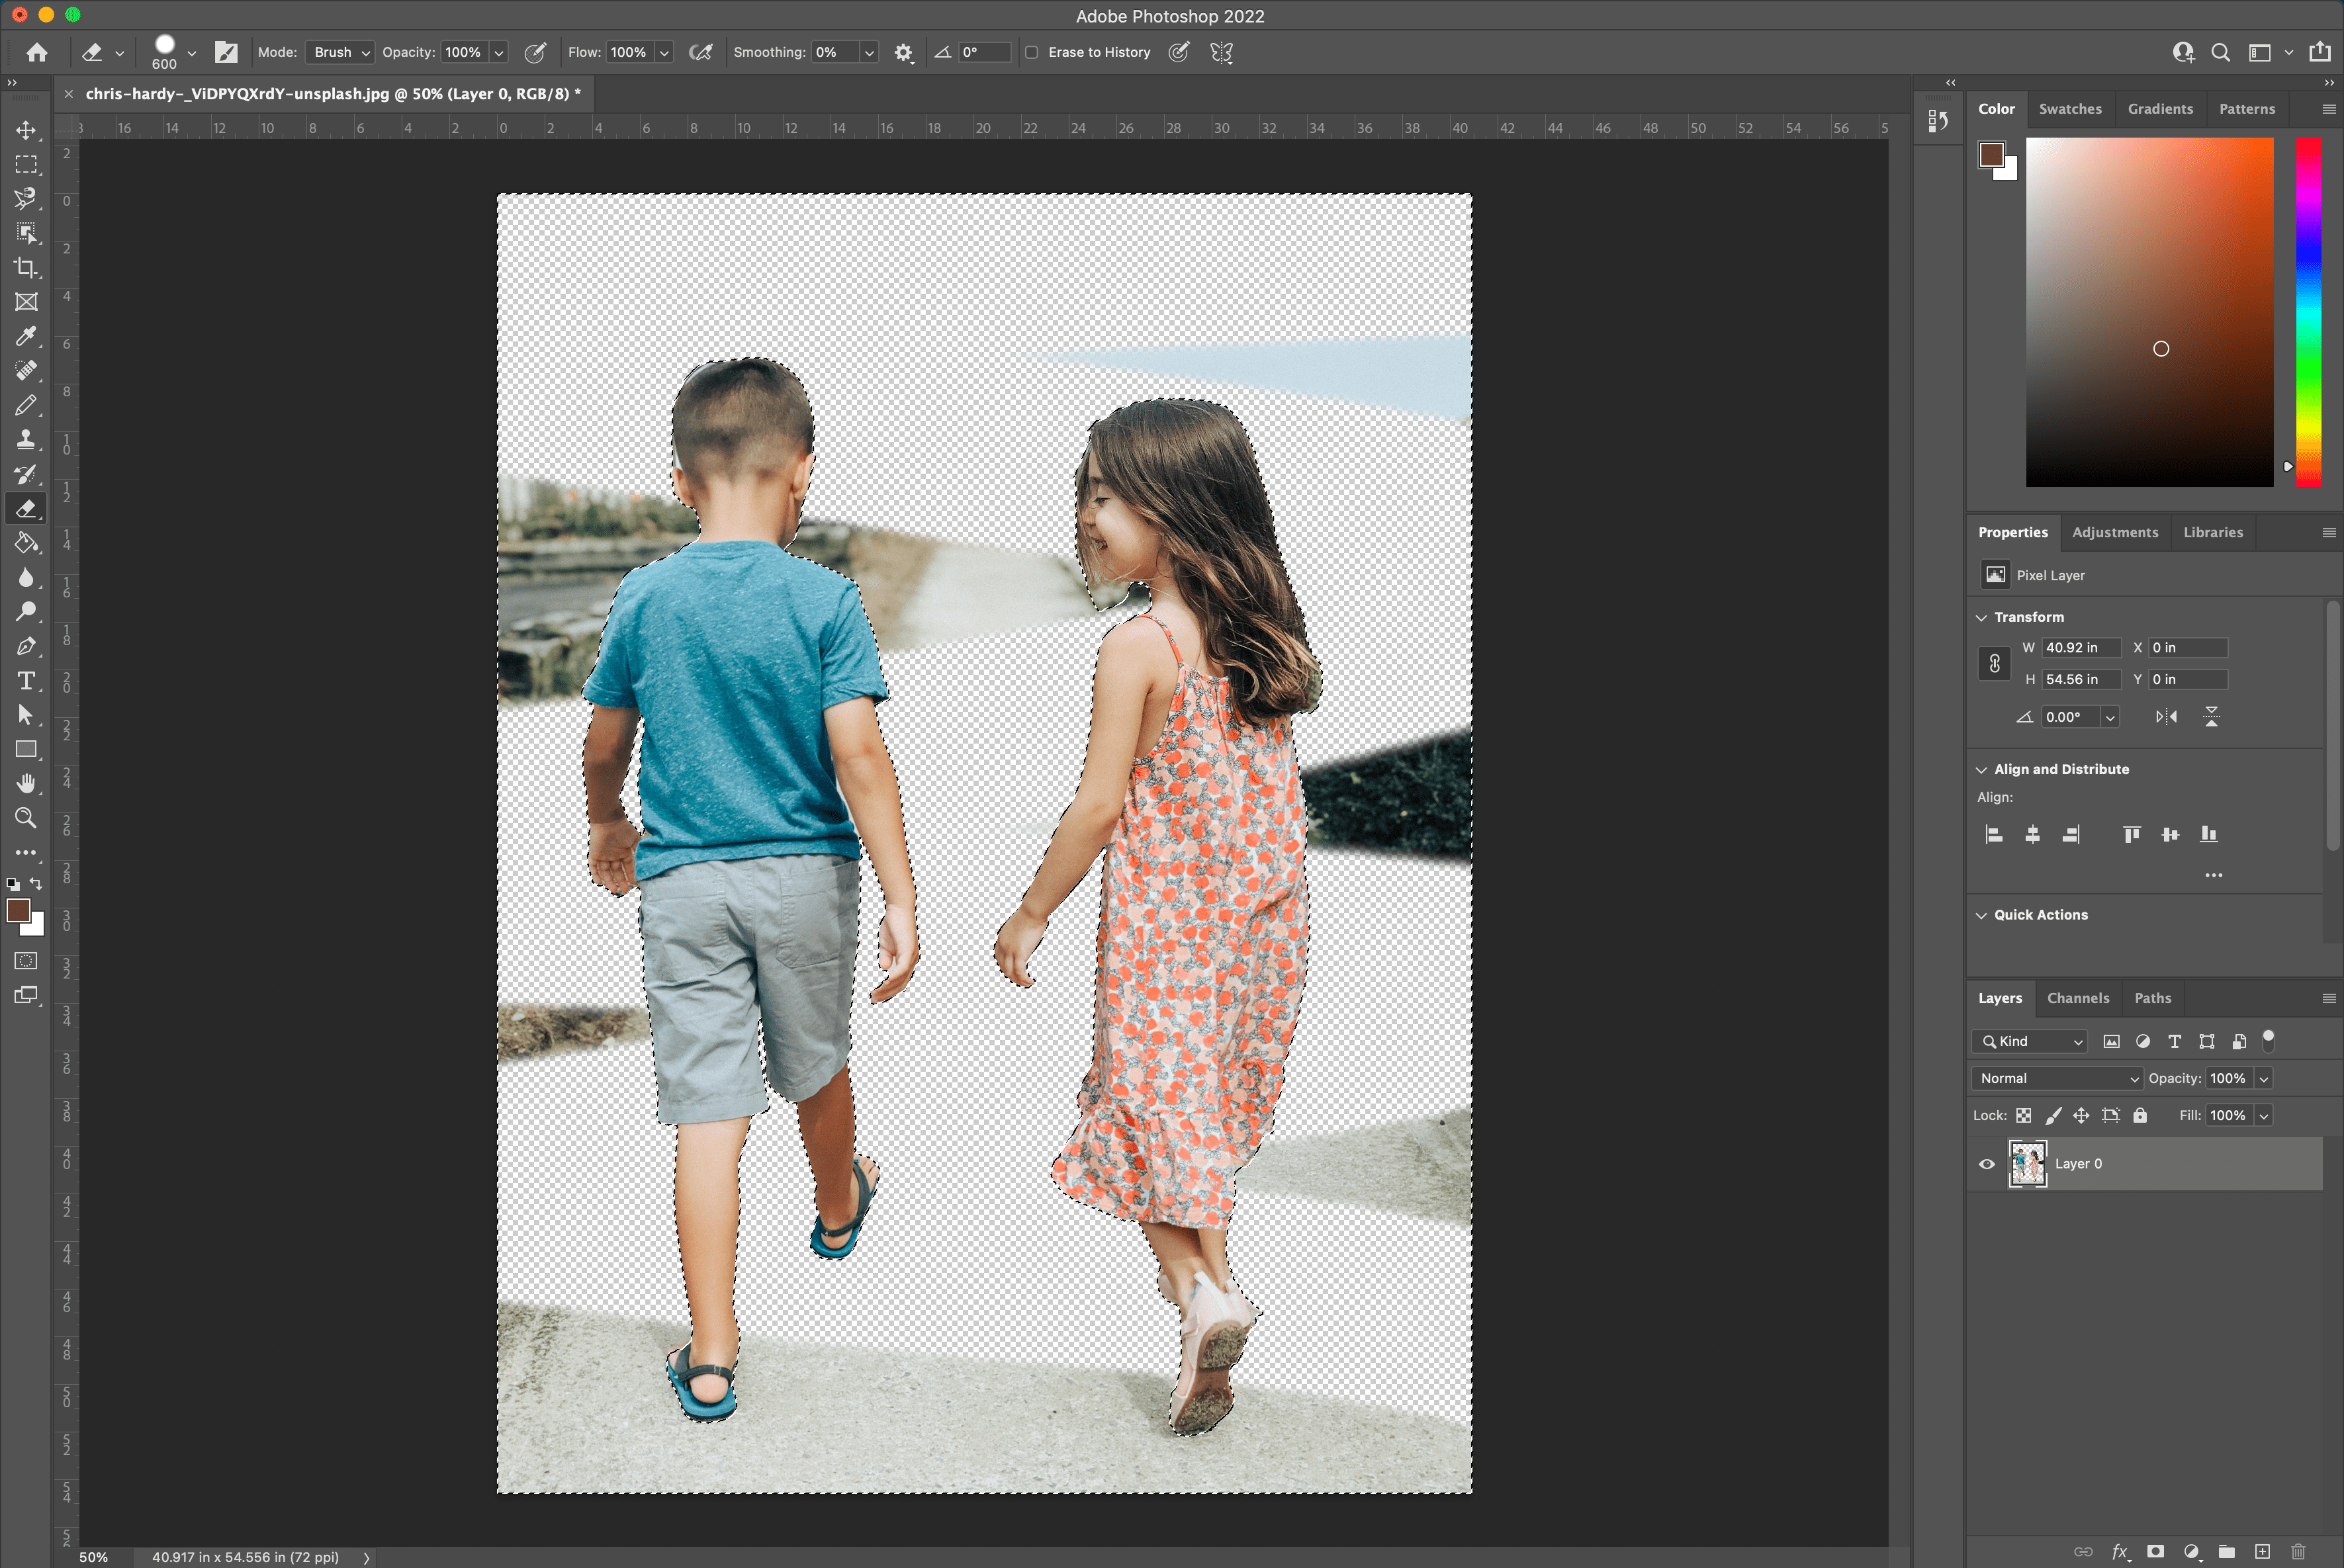
One of the crucial outstanding options to have come to Photoshop is the brand new Object Variety instrument, which is new to Photoshop 2022. The Object Variety instrument makes use of Adobe Sensi AI generation to do near to all of the be just right for you in deciding on the topic for your pictures.
Object Variety Device Steps
- Open your picture in Photoshop and choose the Object Variety instrument within the toolbar at the left (in the similar menu as Fast Variety Device).
- Now, hover your cursor over your topic and stay up for it to show blue. (Transfer your cursor in tiny circles if it doesn’t straight away flip blue.)
- Right away, your topic is able to be decided on.
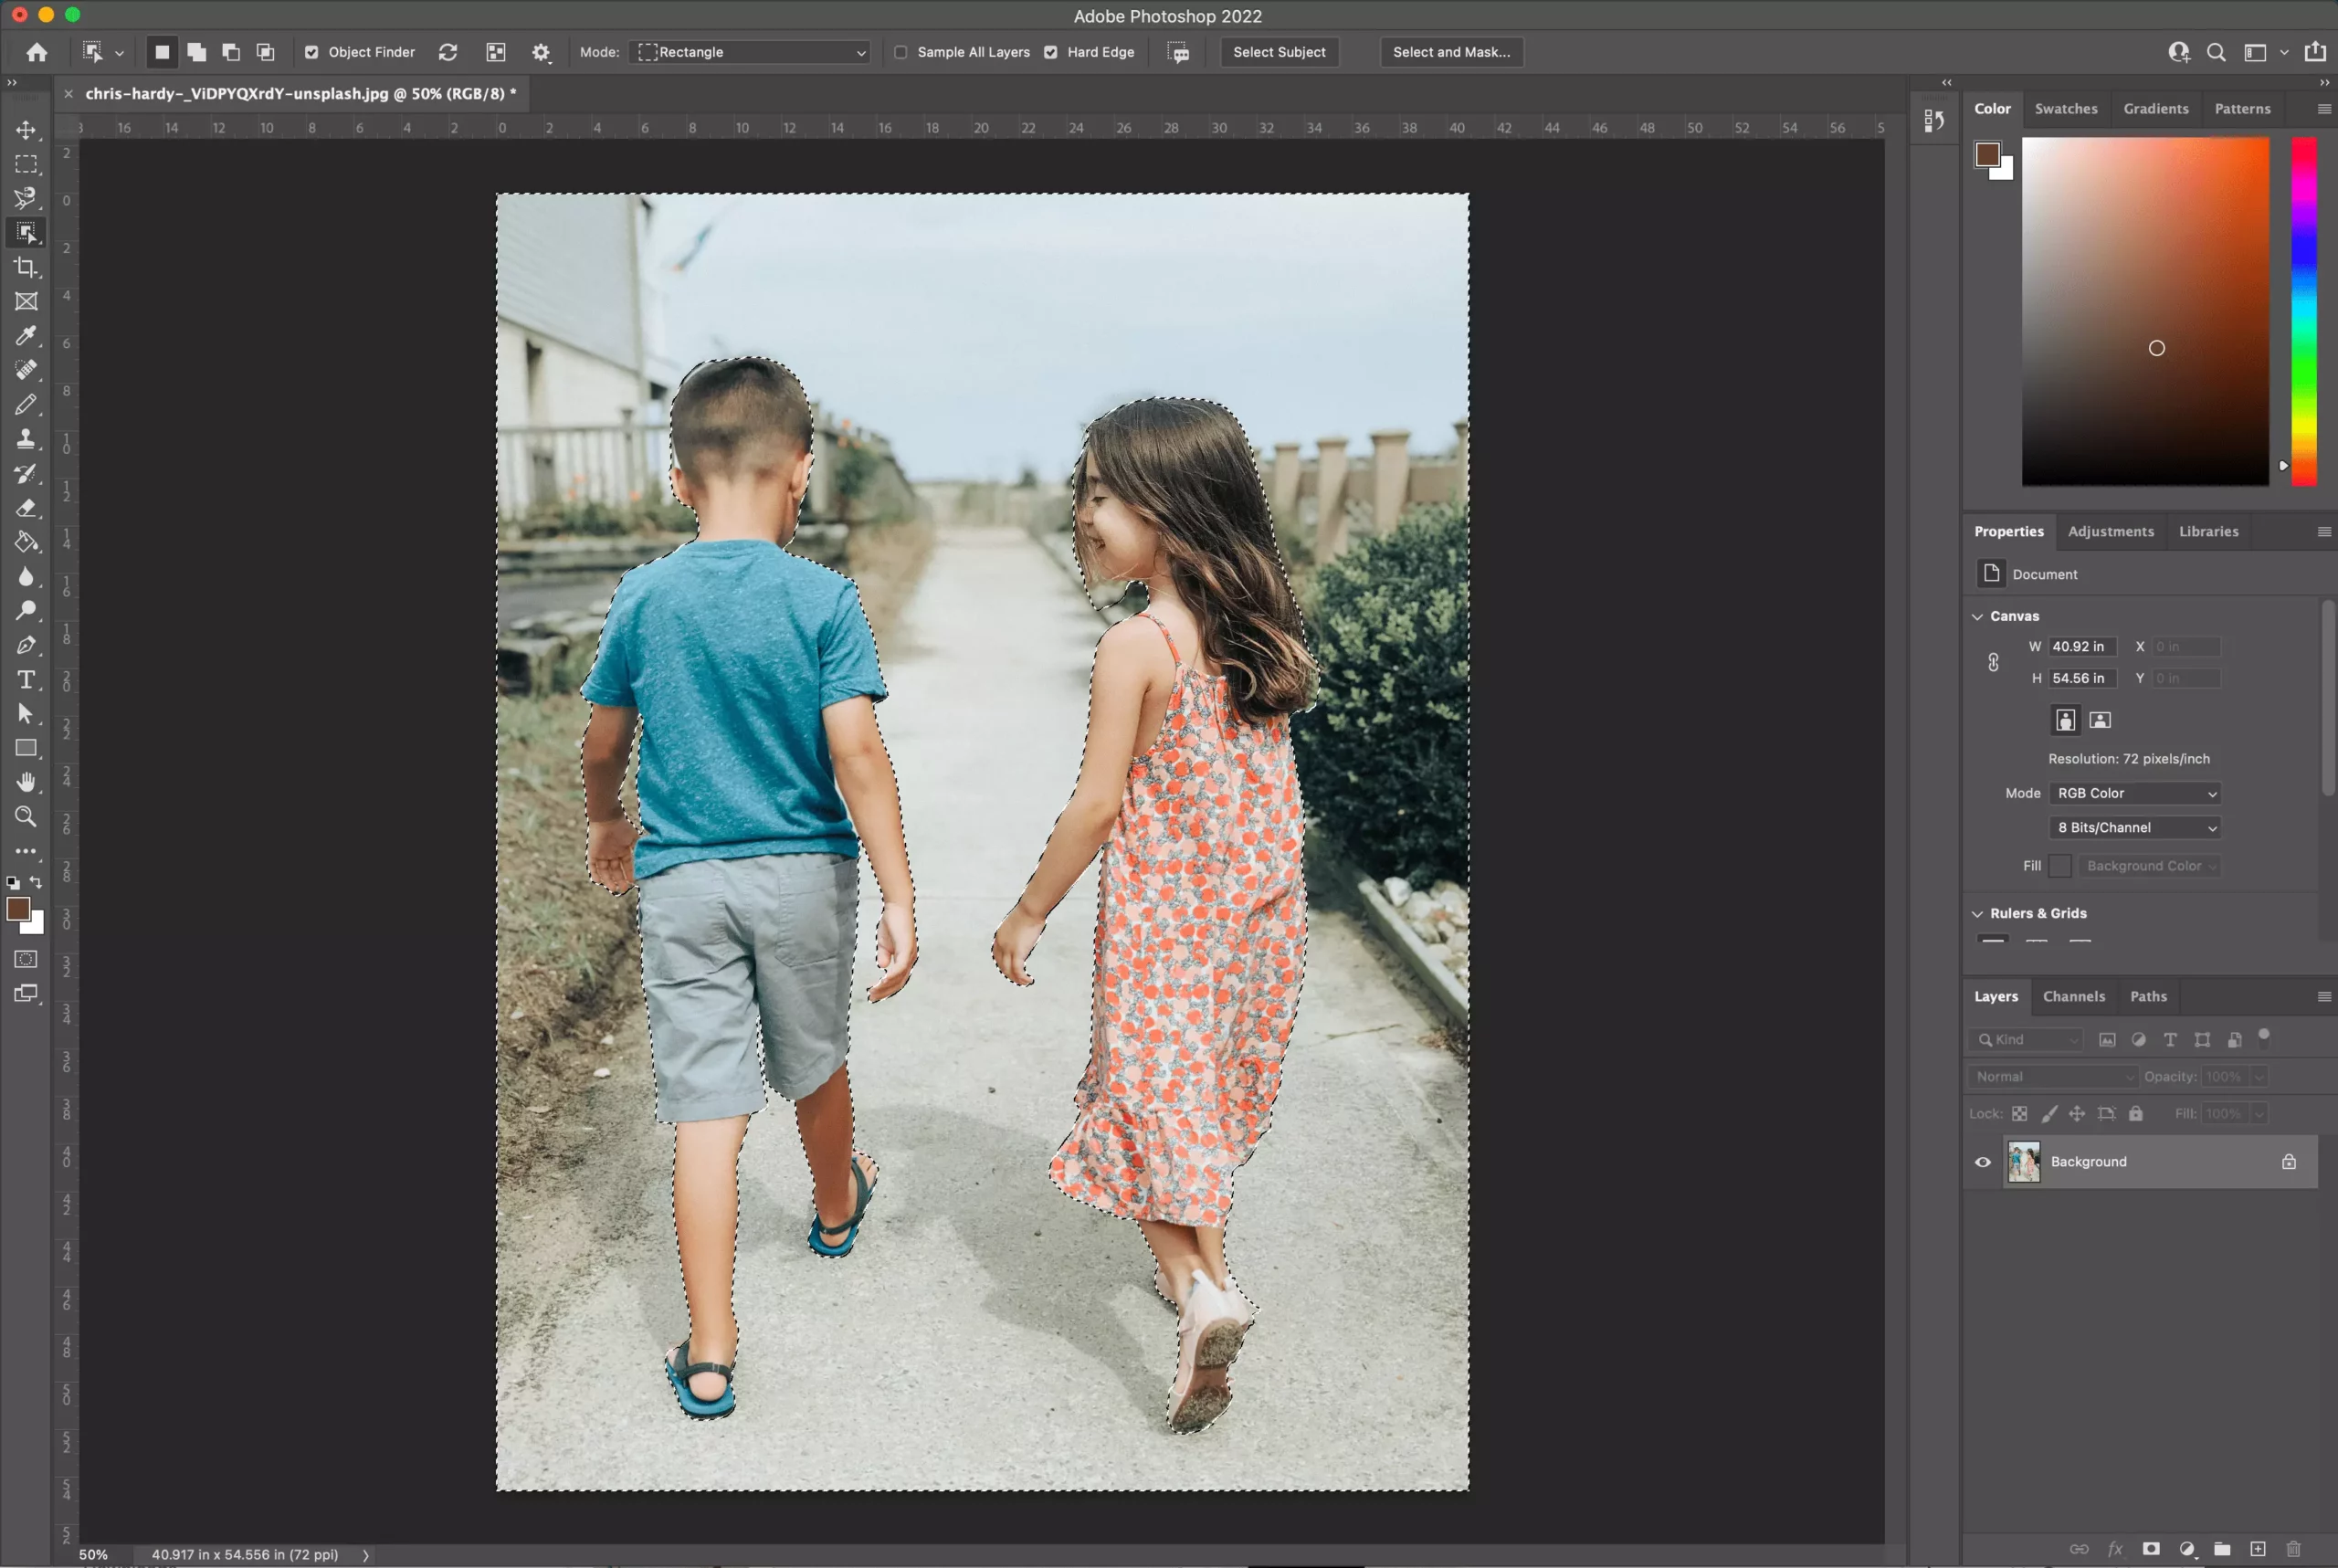
- To erase background subject matter from right here, press the shift key whilst deciding on all gadgets you’d love to stay within the picture. This shortcut will auto-select each and every object for you (appearing you the marching ants round each and every entity).
- Subsequent, move to Make a selection > Inverse to invert the choice (which means that your background is now decided on as a substitute of your gadgets).
- Relying on what you need the background to be (in my case, I would like it to be clear), you’ll most likely wish to free up your symbol, so it’s not thought to be a background.
- Subsequent, click on the lock at the appropriate aspect of your symbol’s layer to free up it. The layer title will trade to “Layer 0” if you haven’t any different layers. To take away the background, click on the Eraser Device (ensuring your brush is big) and get started erasing the background.
You don’t have to fret about Photoshop dropping the decisions. Should you ever wish to reselect your gadgets, choose the Object Variety instrument and hover over your gadgets once more.
You’ll be able to discover ways to edit the ensuing masks created through the Object Variety instrument (if it didn’t get the whole lot within the preliminary variety).
Picture credit score: Chris Hardy on Unsplash
3. Take away Background in Photoshop with Fast Motion
This instrument is goo to make use of when you wish to have it rapid, and also you’re no longer essentially in search of perfection. It’s best possible to make use of with pictures with top distinction between topic and background, and when the topic has somewhat simplistic traces.
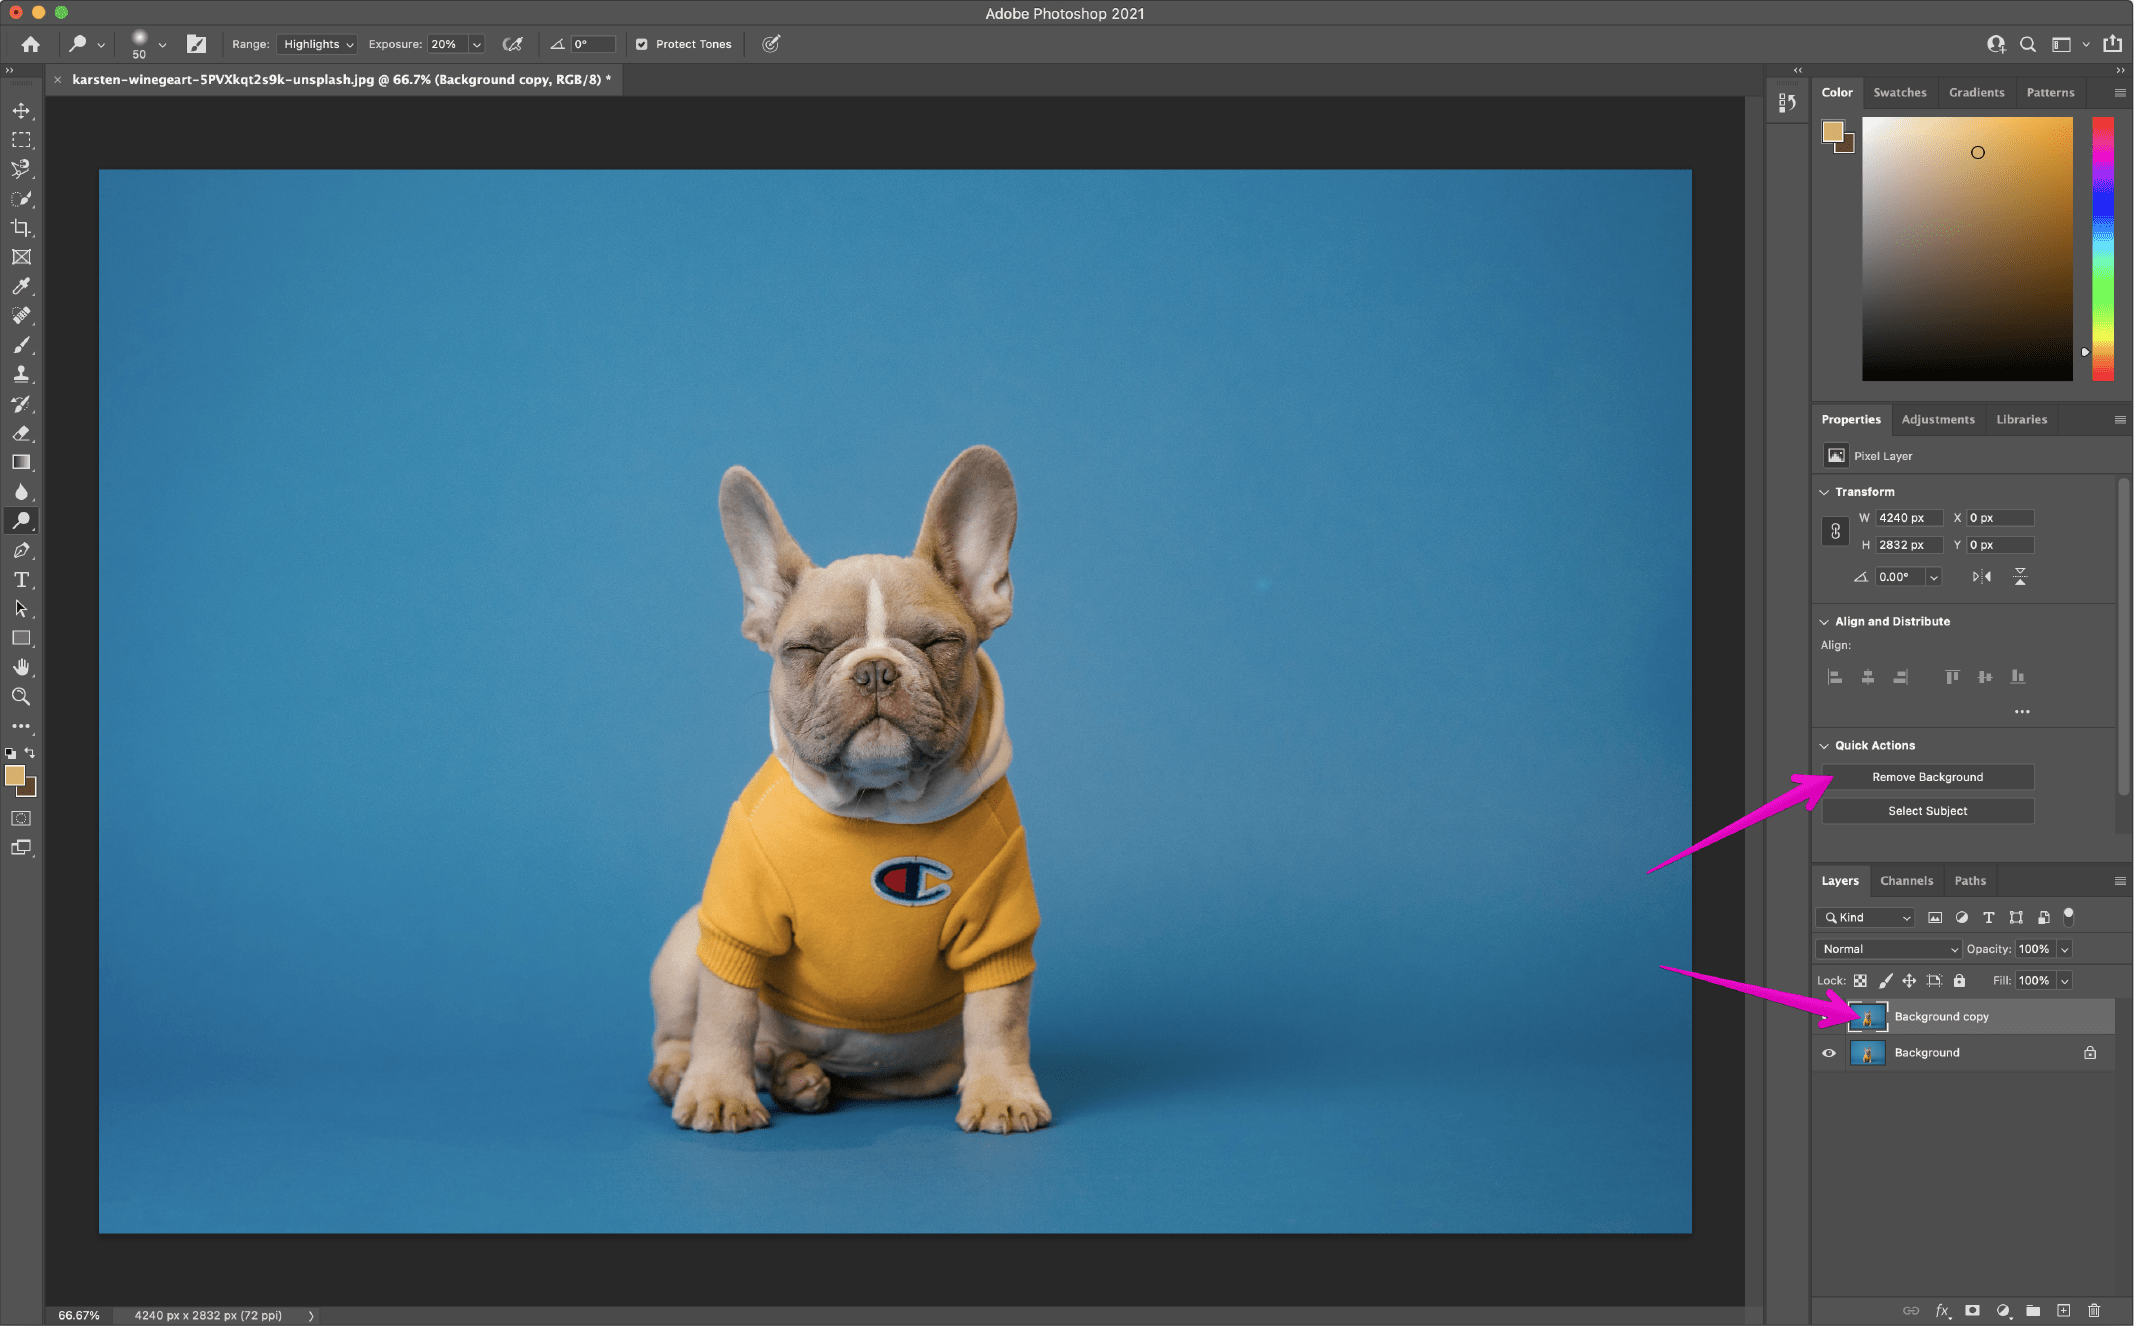
Through a long way, the fastest means mentioned this is the integrated Photoshop Fast Motion for casting off backgrounds in Photoshop. It used to be offered in Photoshop 2021 (within the Inventive Cloud subscription) and offers an Adobe background remover that’s efficient and simple to make use of.
With velocity, alternatively, comes much less accuracy. The usage of Photoshop Fast Motion will do lots of the be just right for you, however the effects might fall in need of your expectancies, relying for your symbol. If that’s the case, you’ll be able to use any strategies described right here to shine up the end result.
Fast Motion Steps
- Along with your symbol open in Photoshop, appropriate click on your Background layer and click on Replica Layer. Within the conversation field that pops up, title your layer (calling it no matter you prefer) and click on OK. Click on the attention icon to the left of the unique layer to show that layer off.
- Ensure your Houses panel is open through going to Window > Houses. (If it used to be already checked, there’s no wish to click on it; if it isn’t checked, click on it to open it up at the right-hand aspect through default.)
- For your Layers panel, click on your new layer. Within the Houses panel (through default this must be above your Layers panel), click on the Take away Background button below Fast Motion.
- The short motion has now got rid of the background, leaving your layer with a masks across the topic.
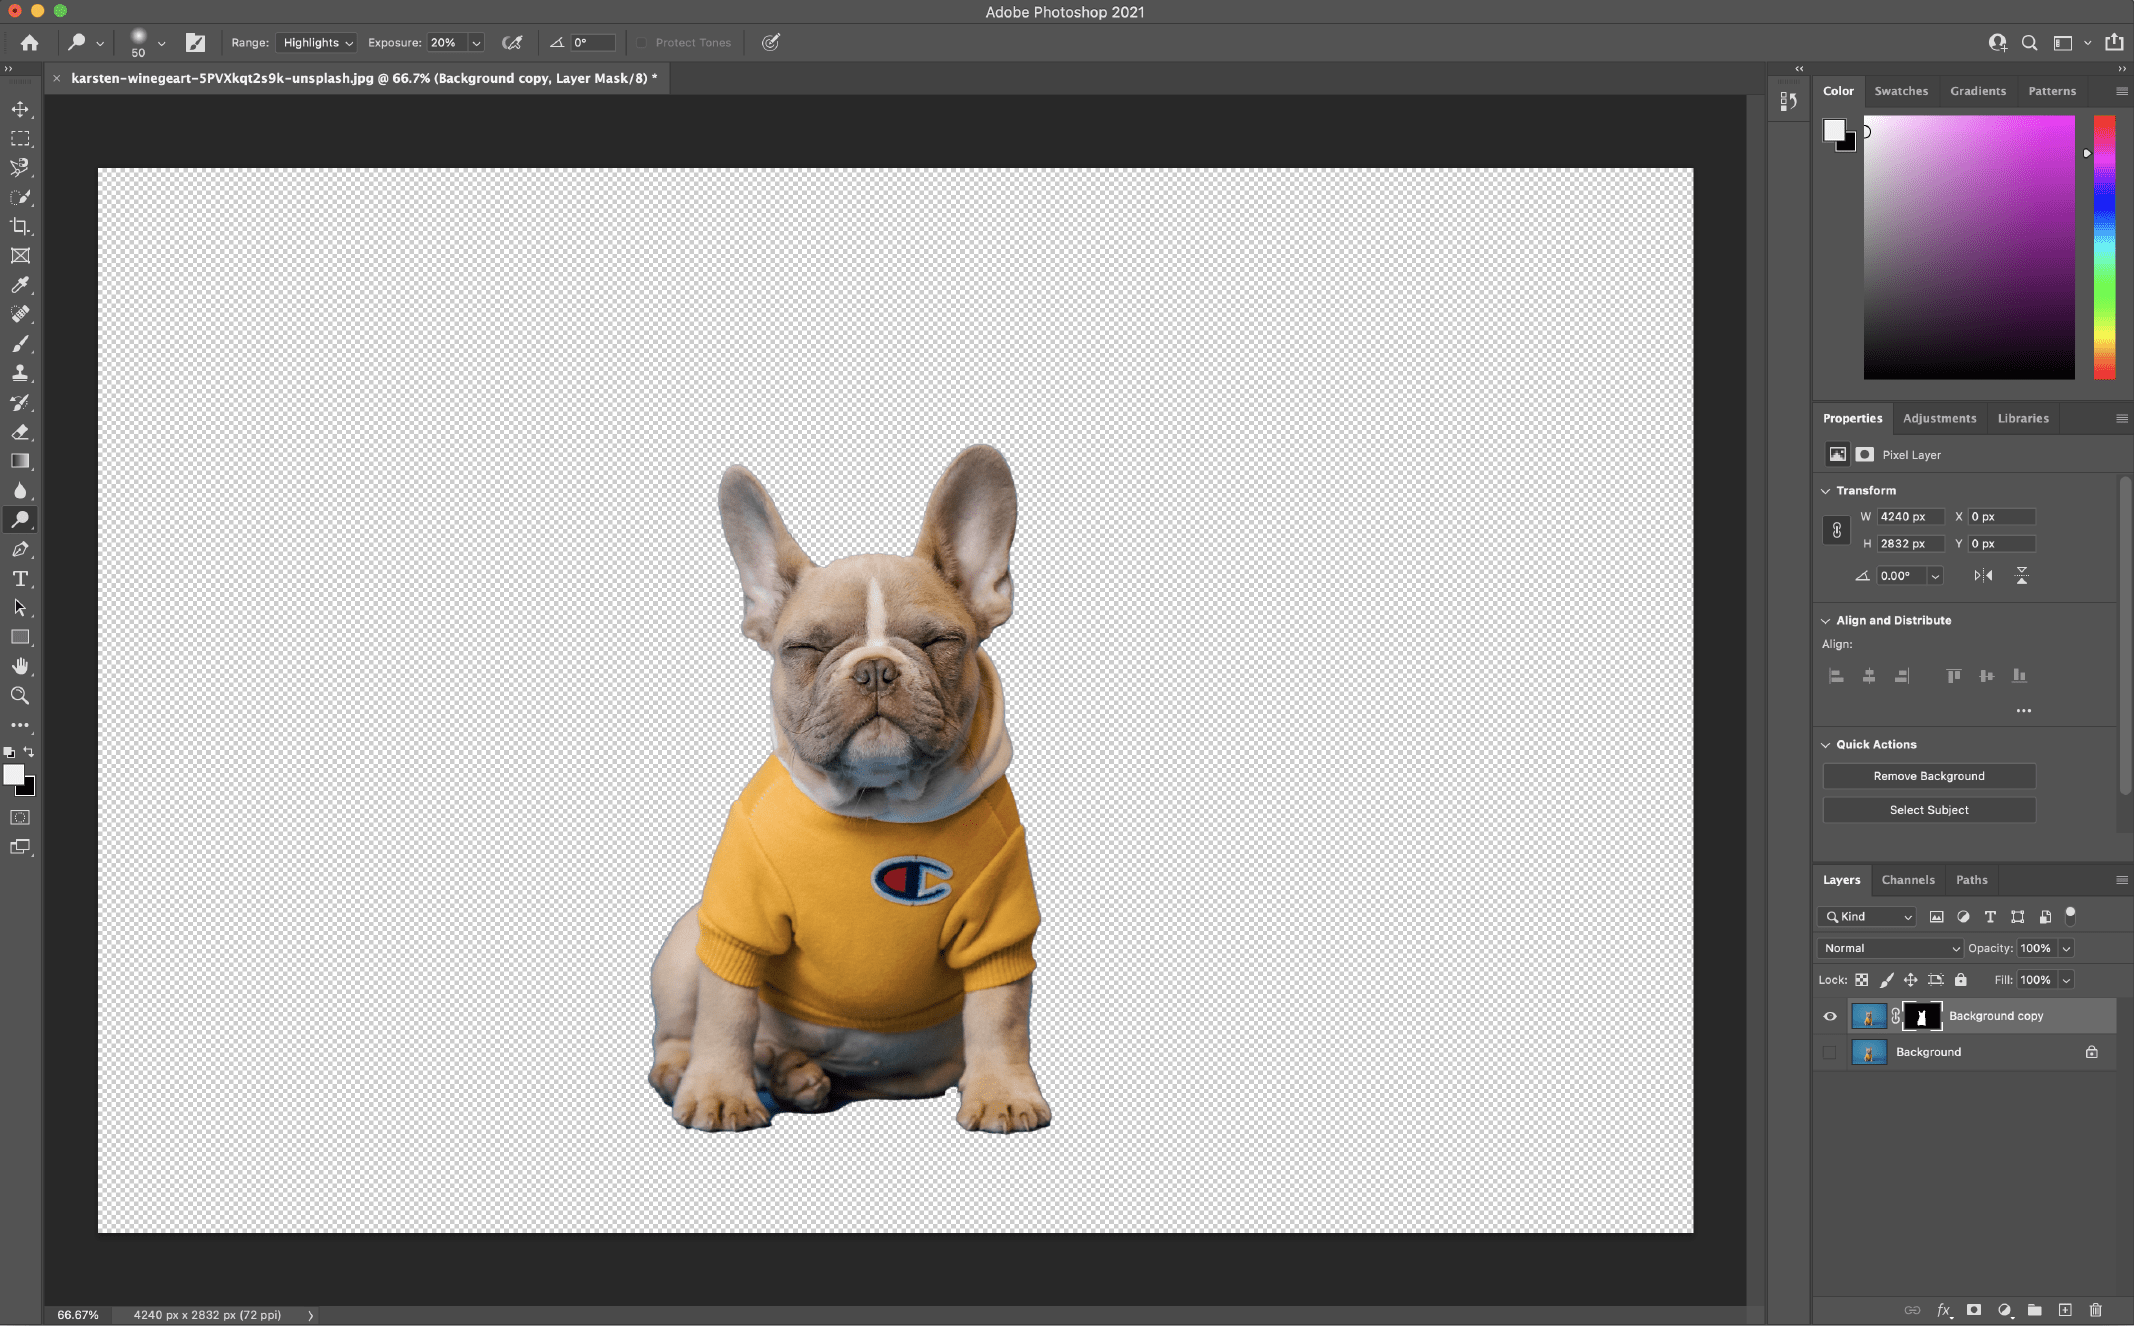
From right here, you’ll be able to make refinements through going into the masks and adjusting as wanted (reminiscent of across the canine’s ft on the backside left of the picture). Whilst out of doors the scope of this newsletter, if you wish to have lend a hand with running with mask, take a look at this Adobe instructional.
Picture credit score: Karsten Wingert on Unsplash
This instrument is just right to make use of when running with top distinction pictures, even if it takes a good bit of effort and time to provide a just right consequence.
The Background Eraser instrument is superb if you wish to have extra keep an eye on over casting off a background in Photoshop however nonetheless need Photoshop to do one of the heavy lifting for you. For extra keep an eye on, you’ll must sacrifice a while to get the specified end result. Relying for your picture, the use of the Background Eraser instrument may well be extremely efficient and a time saver and get you nearer for your desired consequence with a while concerned.
Background Eraser Device Steps
- Along with your symbol open in Photoshop, appropriate click on your Background layer and click on Replica Layer. Within the conversation field that pops up, title your layer (calling it no matter you prefer), and click on OK. Click on the attention icon to the left of the unique layer to show that layer off.
- Make a selection the Background Eraser instrument from the toolbox at the left-hand aspect. This instrument could also be hidden underneath the Eraser instrument. Click on and preserve the Eraser instrument to expose extra choices to and choose the Background Eraser instrument.
- Within the instrument choices bar on the most sensible of the display, click on the comb icon to expose the comb panel.
Exchange the hardness in order that it’s close to or at 100%.
The dimensions will also be no matter you deem suitable for the picture you’re running with. On this case, I’m beginning with 50px.
You’ll be able to modify it as we move through the use of the sq. brackets ([ and ]) to lower and building up the scale of the comb.
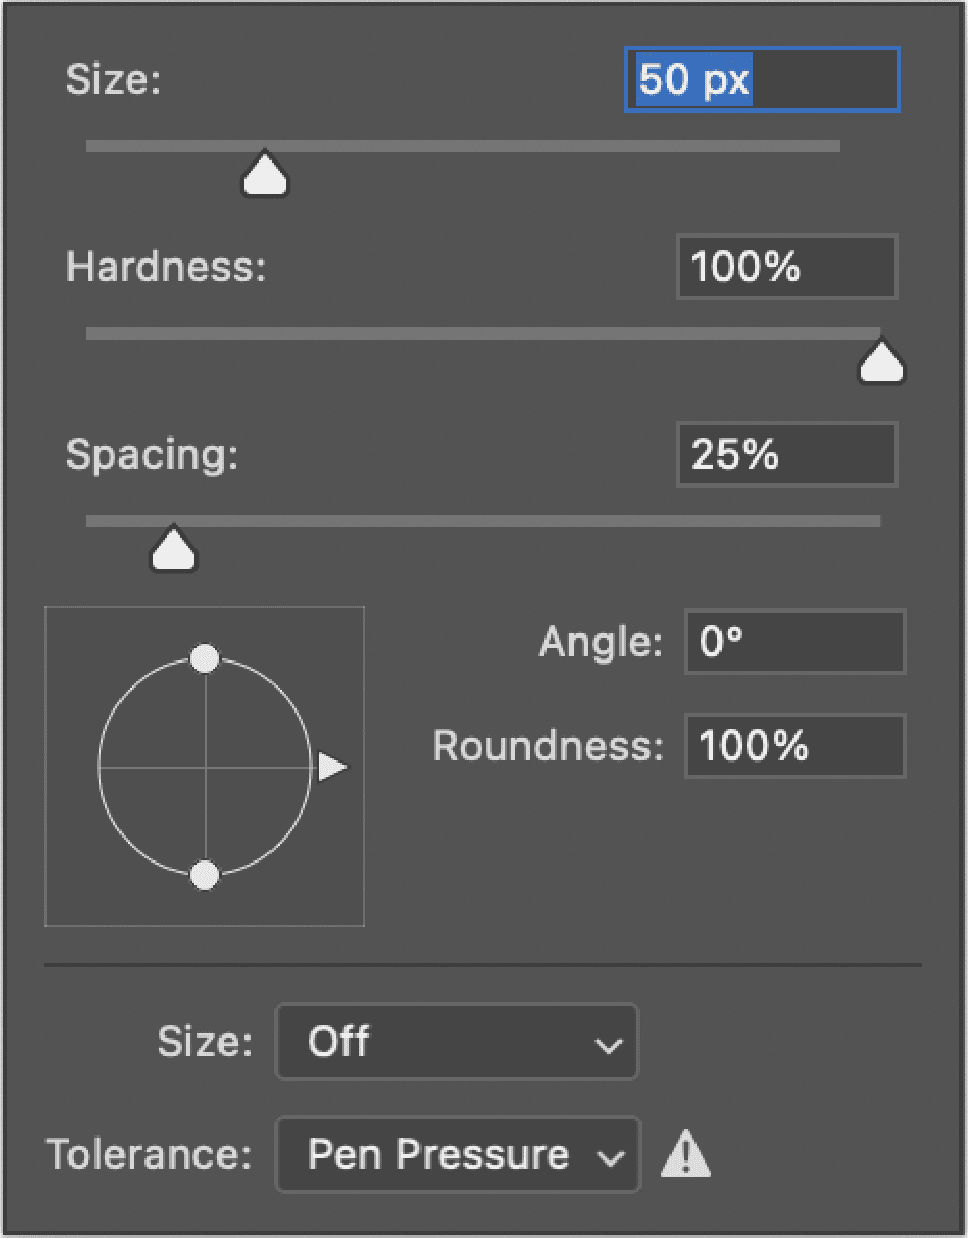
- Nonetheless within the instrument choices bar on the most sensible, set the Sampling to be Steady. It’s the primary of 3 icons after the comb measurement choice. Subsequent, set the Limits to In finding Edges and the Tolerance to be someplace within the vary of 20–25%.
Be aware that the decrease the tolerance, the less colour diversifications it’ll select up. Conversely, the upper the tolerance, the extra colours the instrument will choose.

- Get started erasing the background round your topic the use of the Background Eraser instrument through clicking and preserving whilst shifting the comb. The function this is to stay the crosshairs within the instrument from touching your topic. Zoom in at the symbol if you wish to have to peer extra shut main points.
I like to recommend you do quick strokes with the comb (remembering to let move of the mouse every so often) so that you could all the time Undo if the comb is going too a long way.
Within the harder spaces, it’s possible you’ll to find that you wish to have to regulate the scale of your brush as you move. You’ll be able to do that through revisiting the gear choice bar on the most sensible, or the use of [ and ] to regulate down and up the scale of your brush.
If resizing the comb doesn’t paintings and it’s erasing your topic, first undo your motion. After that, move into the instrument choices bar on the most sensible and modify the Sampling to As soon as (the center icon within the set of 3), the Limits to Discontiguous, and Tolerance to round 10%. On account of those settings, the comb will handiest use the colour below the crosshairs in that second and no longer resample as you move alongside.
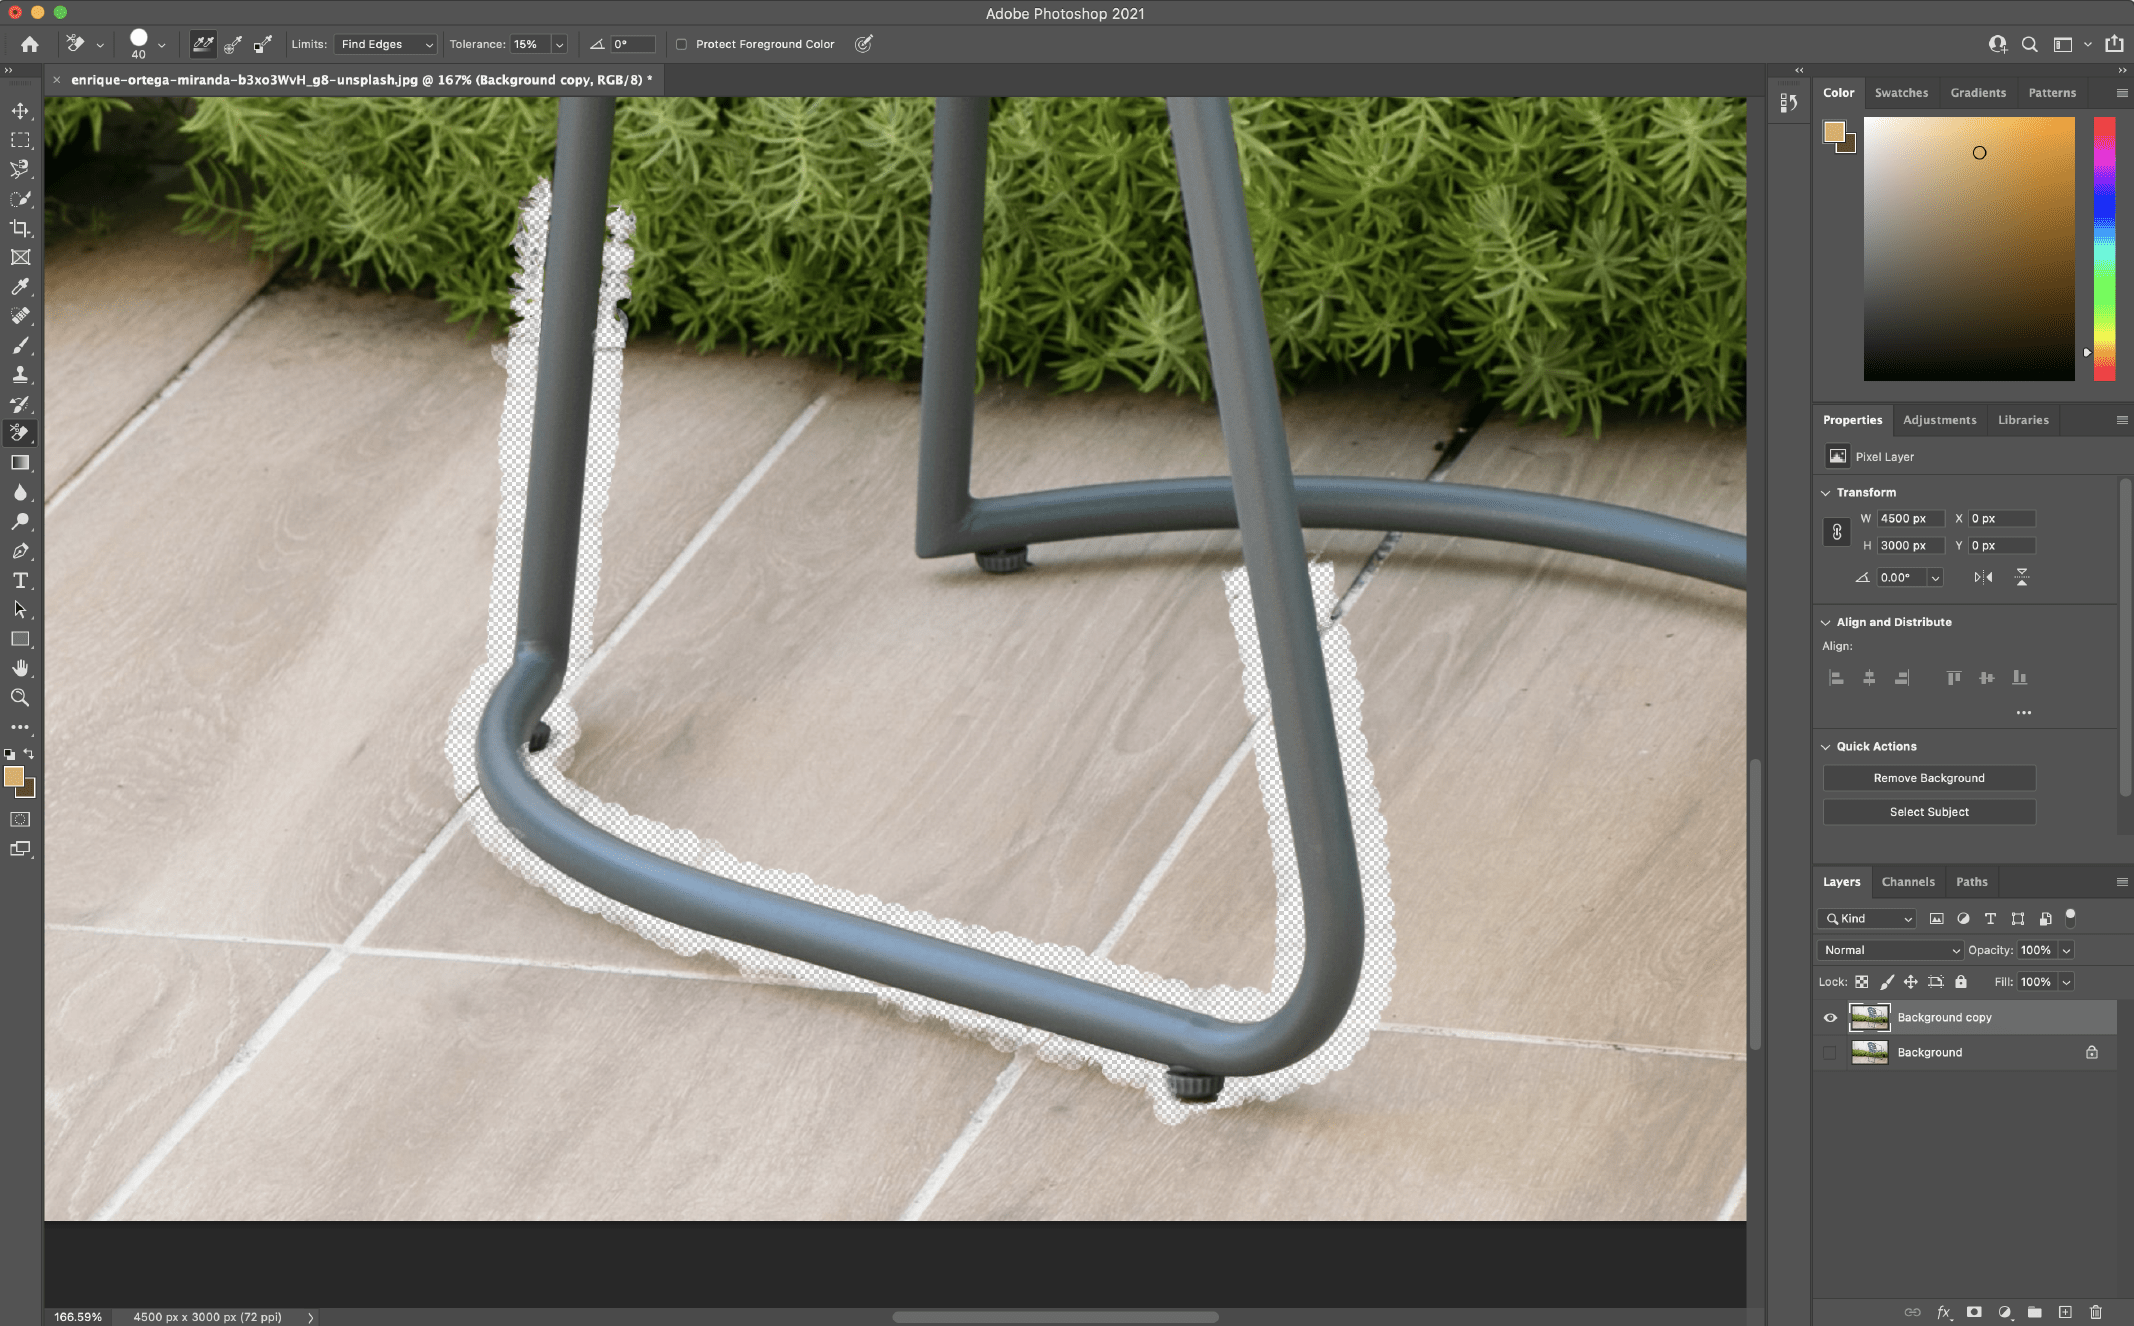
Whilst this procedure will also be fast or tedious relying for your symbol, it supplies just right end result. You’re in keep an eye on of figuring out what the topic is and what isn’t. If this doesn’t whole the task, different strategies discussed right here may just let you get nearer for your desired end result.
Take a look at this Adobe instructional for extra detailed information at the Background Eraser instrument.
Picture credit score: Enrique Ortega Miranda on Unsplash
This instrument is just right to make use of when the topic and background aren’t extremely contrasted or when different gear such because the Fast Motion or Background Eraser instrument discussed above aren’t generating desired effects. It will provide you with essentially the most keep an eye on out of all of the strategies indexed here.
The Pen instrument is likely one of the maximum attempted and true tactics to take away backgrounds from pictures in Photoshop. It will provide you with essentially the most keep an eye on over the end result. On the other hand, as it will provide you with essentially the most keep an eye on, it may also be essentially the most time-consuming. The Pen instrument calls for persistence.
Pen Device Steps
- Along with your symbol open in Photoshop, appropriate click on your Background layer and click on Replica Layer. Within the conversation field that pops up, title your layer (no matter you’d like), and click on OK. Click on the attention icon to the left of the unique layer to show that layer off.
- Make a selection the Pen instrument from the toolbox at the left-hand aspect (above the Textual content instrument). Zoom in to a space of your symbol to start out. Get started on the fringe of your topic (or an acceptable place to begin) and click on to start out the primary anchor. Then get started running your approach round your topic, including further anchors to start out outlining your topic.
If you wish to have to make a curved line, click-hold-drag to provide a curved line, shifting the mouse to regulate the curve as wanted.
To regulate an anchor level or directional traces for superb tuning, use the Direct Variety instrument (hidden below the Trail Variety instrument) within the toolbox.
To undo an anchor, move to Report > Undo or use your keyboard shortcut (Command + Z for macOS, Keep an eye on + Z for Home windows).
For more information concerning the Pen instrument and dealing with paths in Photoshop, learn this Adobe instructional.
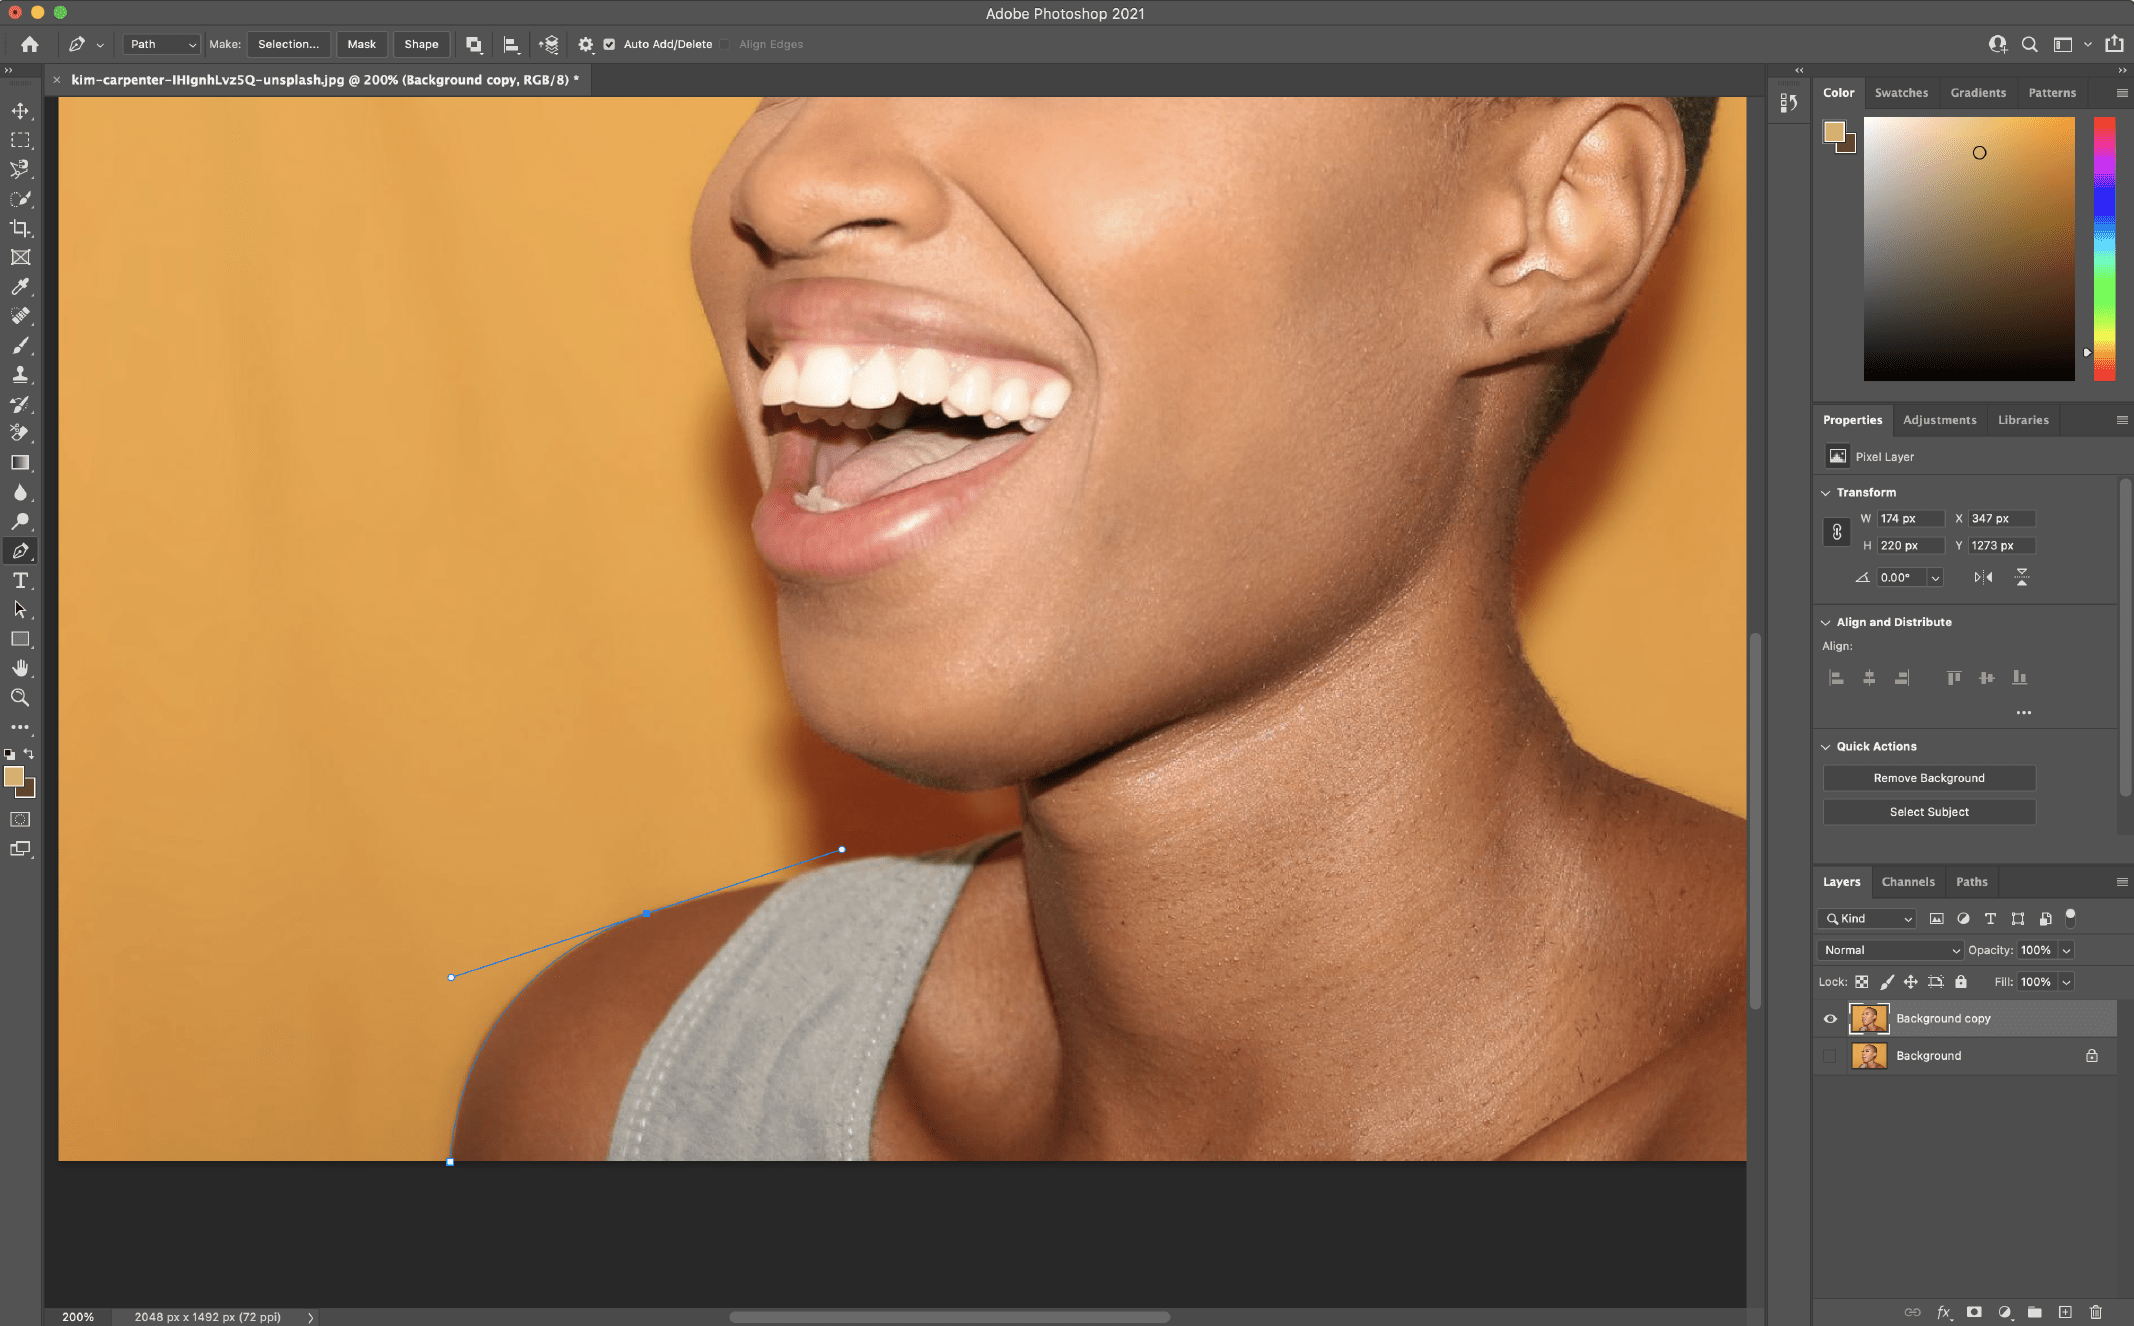
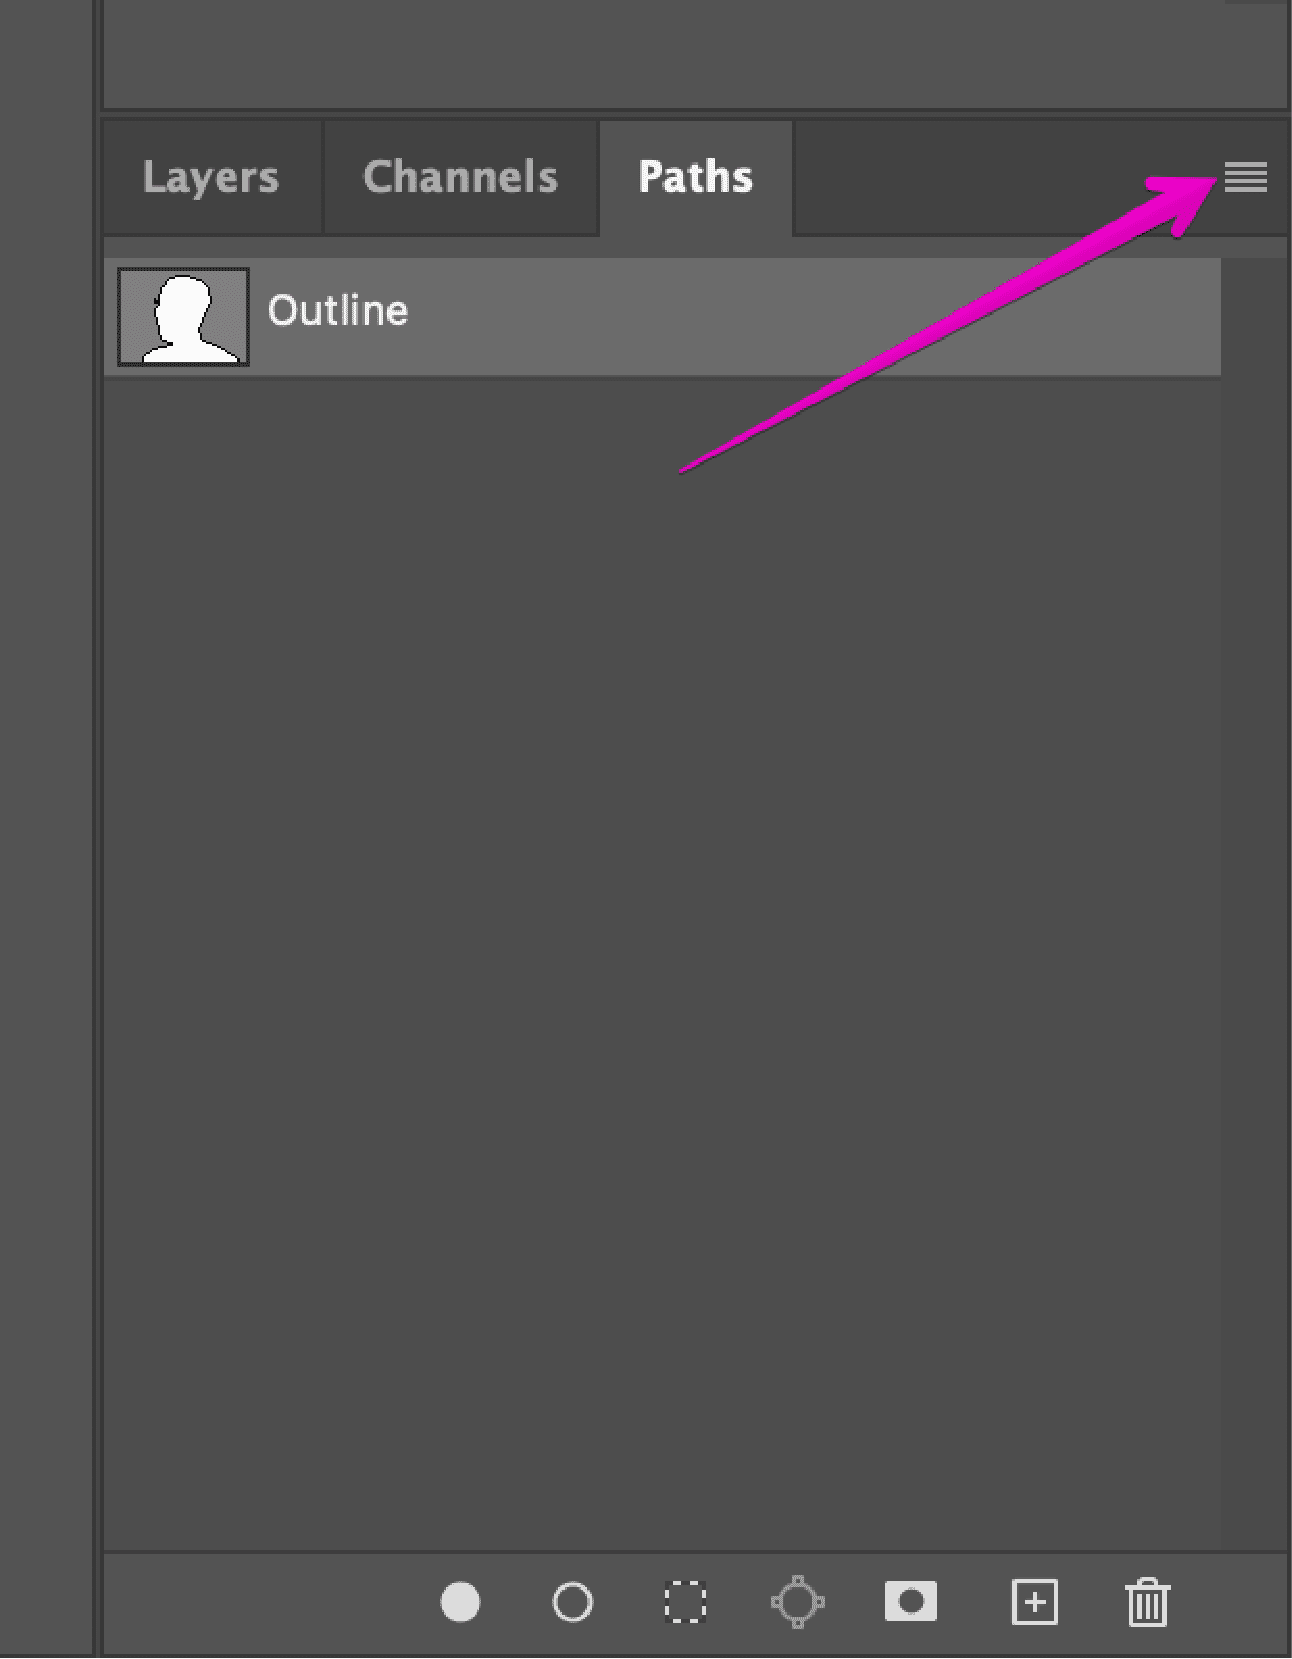
- Be sure you whole the trail while you’re carried out through assembly up along with your first level. Whenever you’ve finished the trail and also you’re proud of the effects, you’ll wish to save the trail. Pass to Window > Paths to expose the Paths panel (it must seem at the right-hand aspect through default). Click on the 3 bar menu on the appropriate and click on New Trail, and title your trail. Now your trail is stored within the Paths panel.
- Subsequent, appropriate click on your new trail within the Paths panel and choose Make Variety, then click on OK within the conversation field (depart all defaults for now). This provides you with the marching ants define the place your trail used to be.
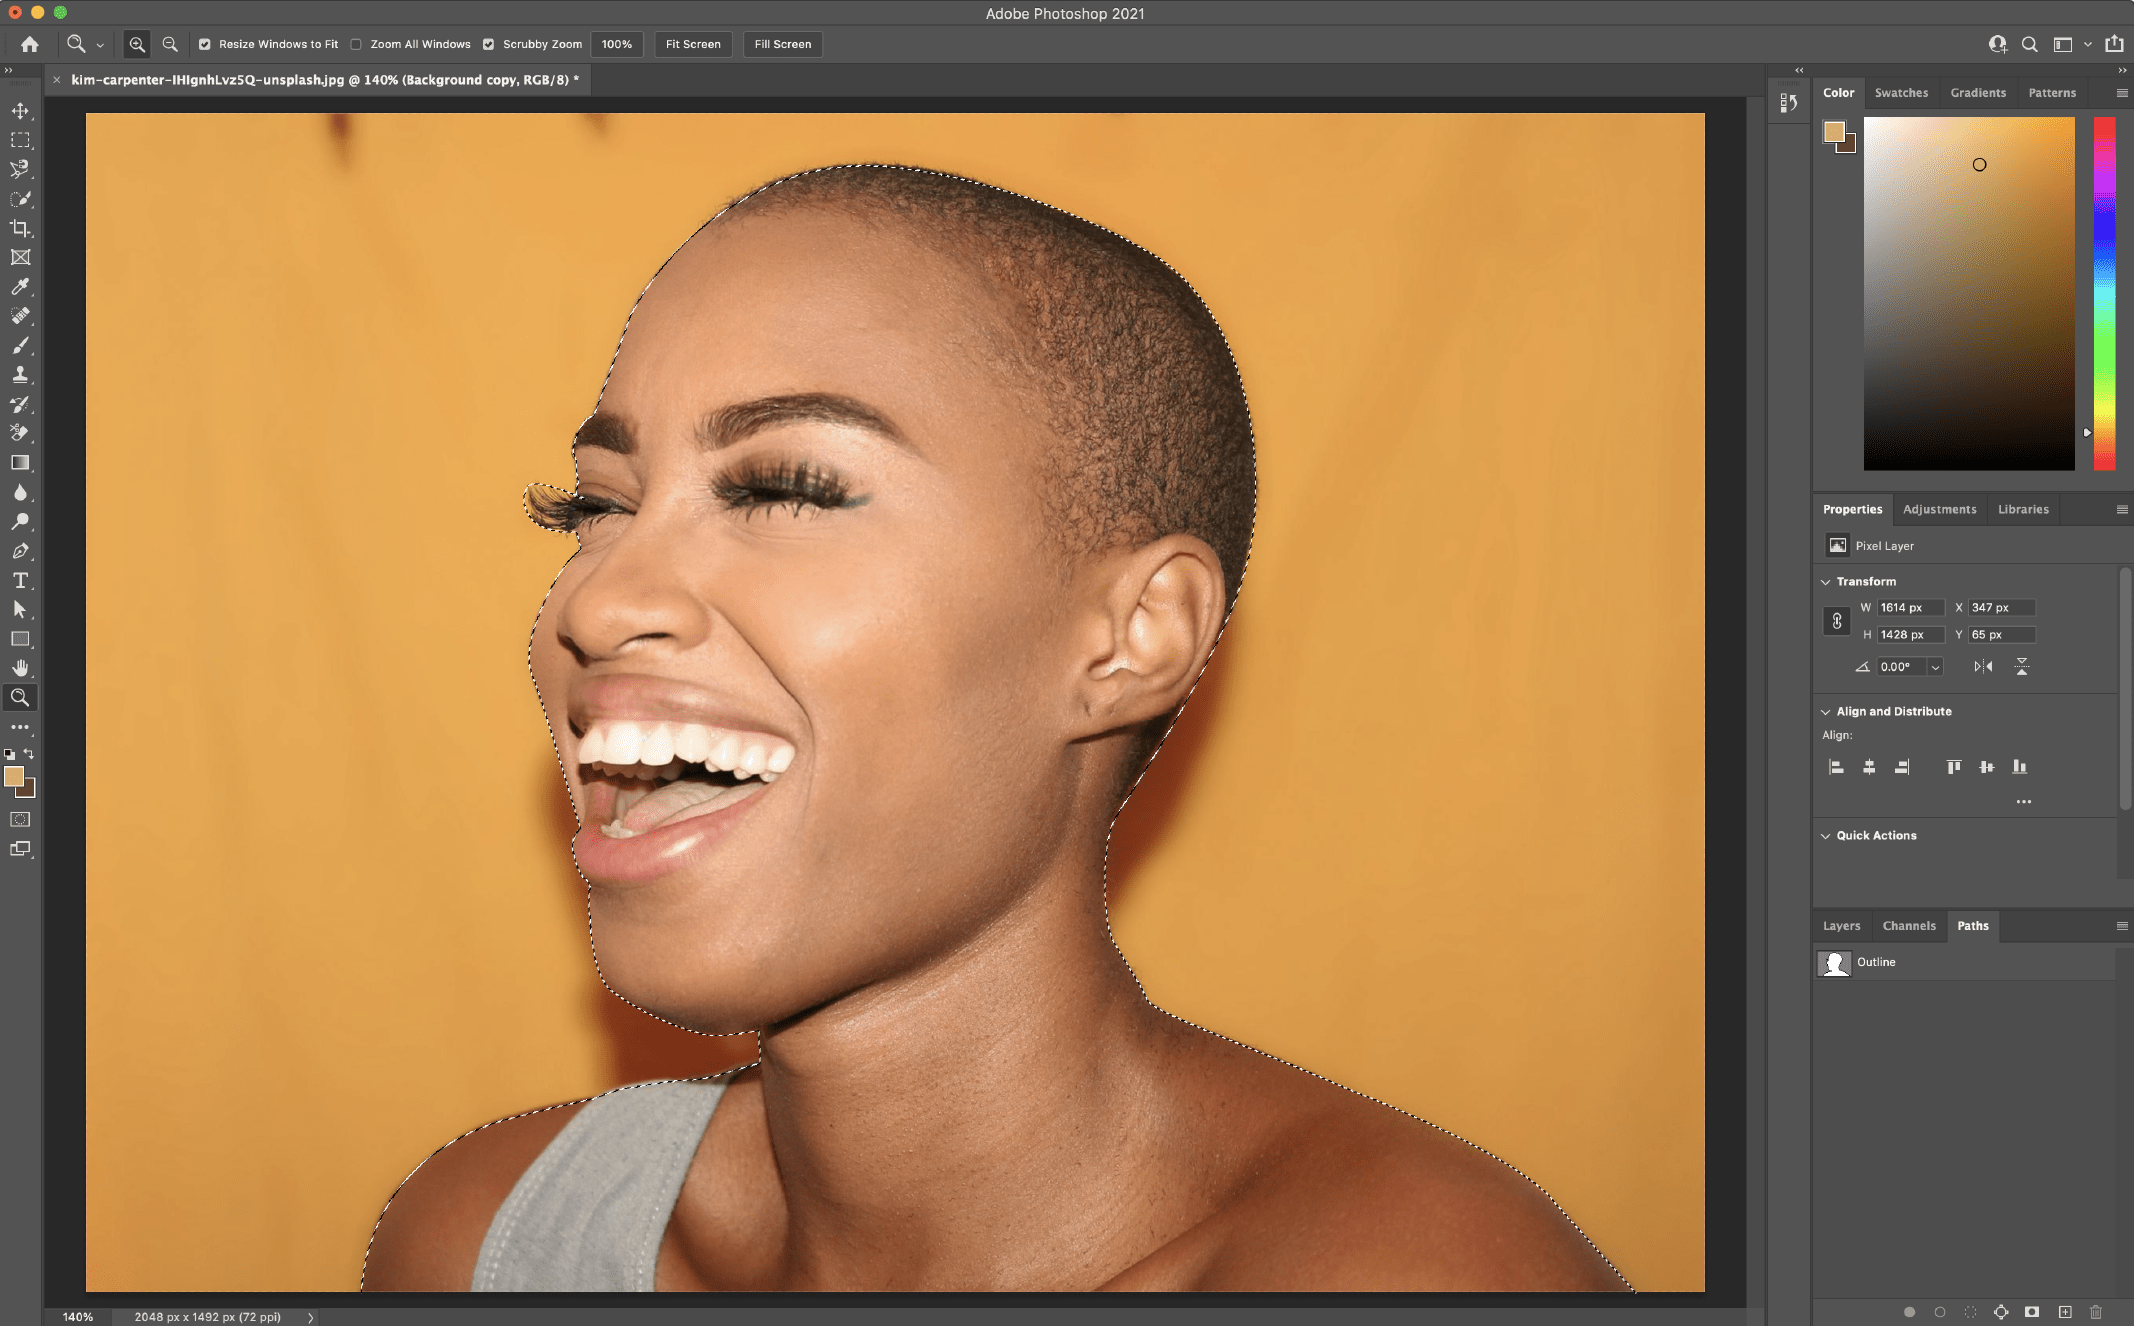
- Since we don’t wish to delete what’s within the variety, we’ll wish to trade the choice to be the whole lot with the exception of the topic. Pass to Make a selection > Inverse. You’ll see the marching ants are actually round all of the symbol and the topic, necessarily deciding on the background.
- To delete the background, press Delete. You must now see the white/grey checkered background as a substitute of your earlier background.
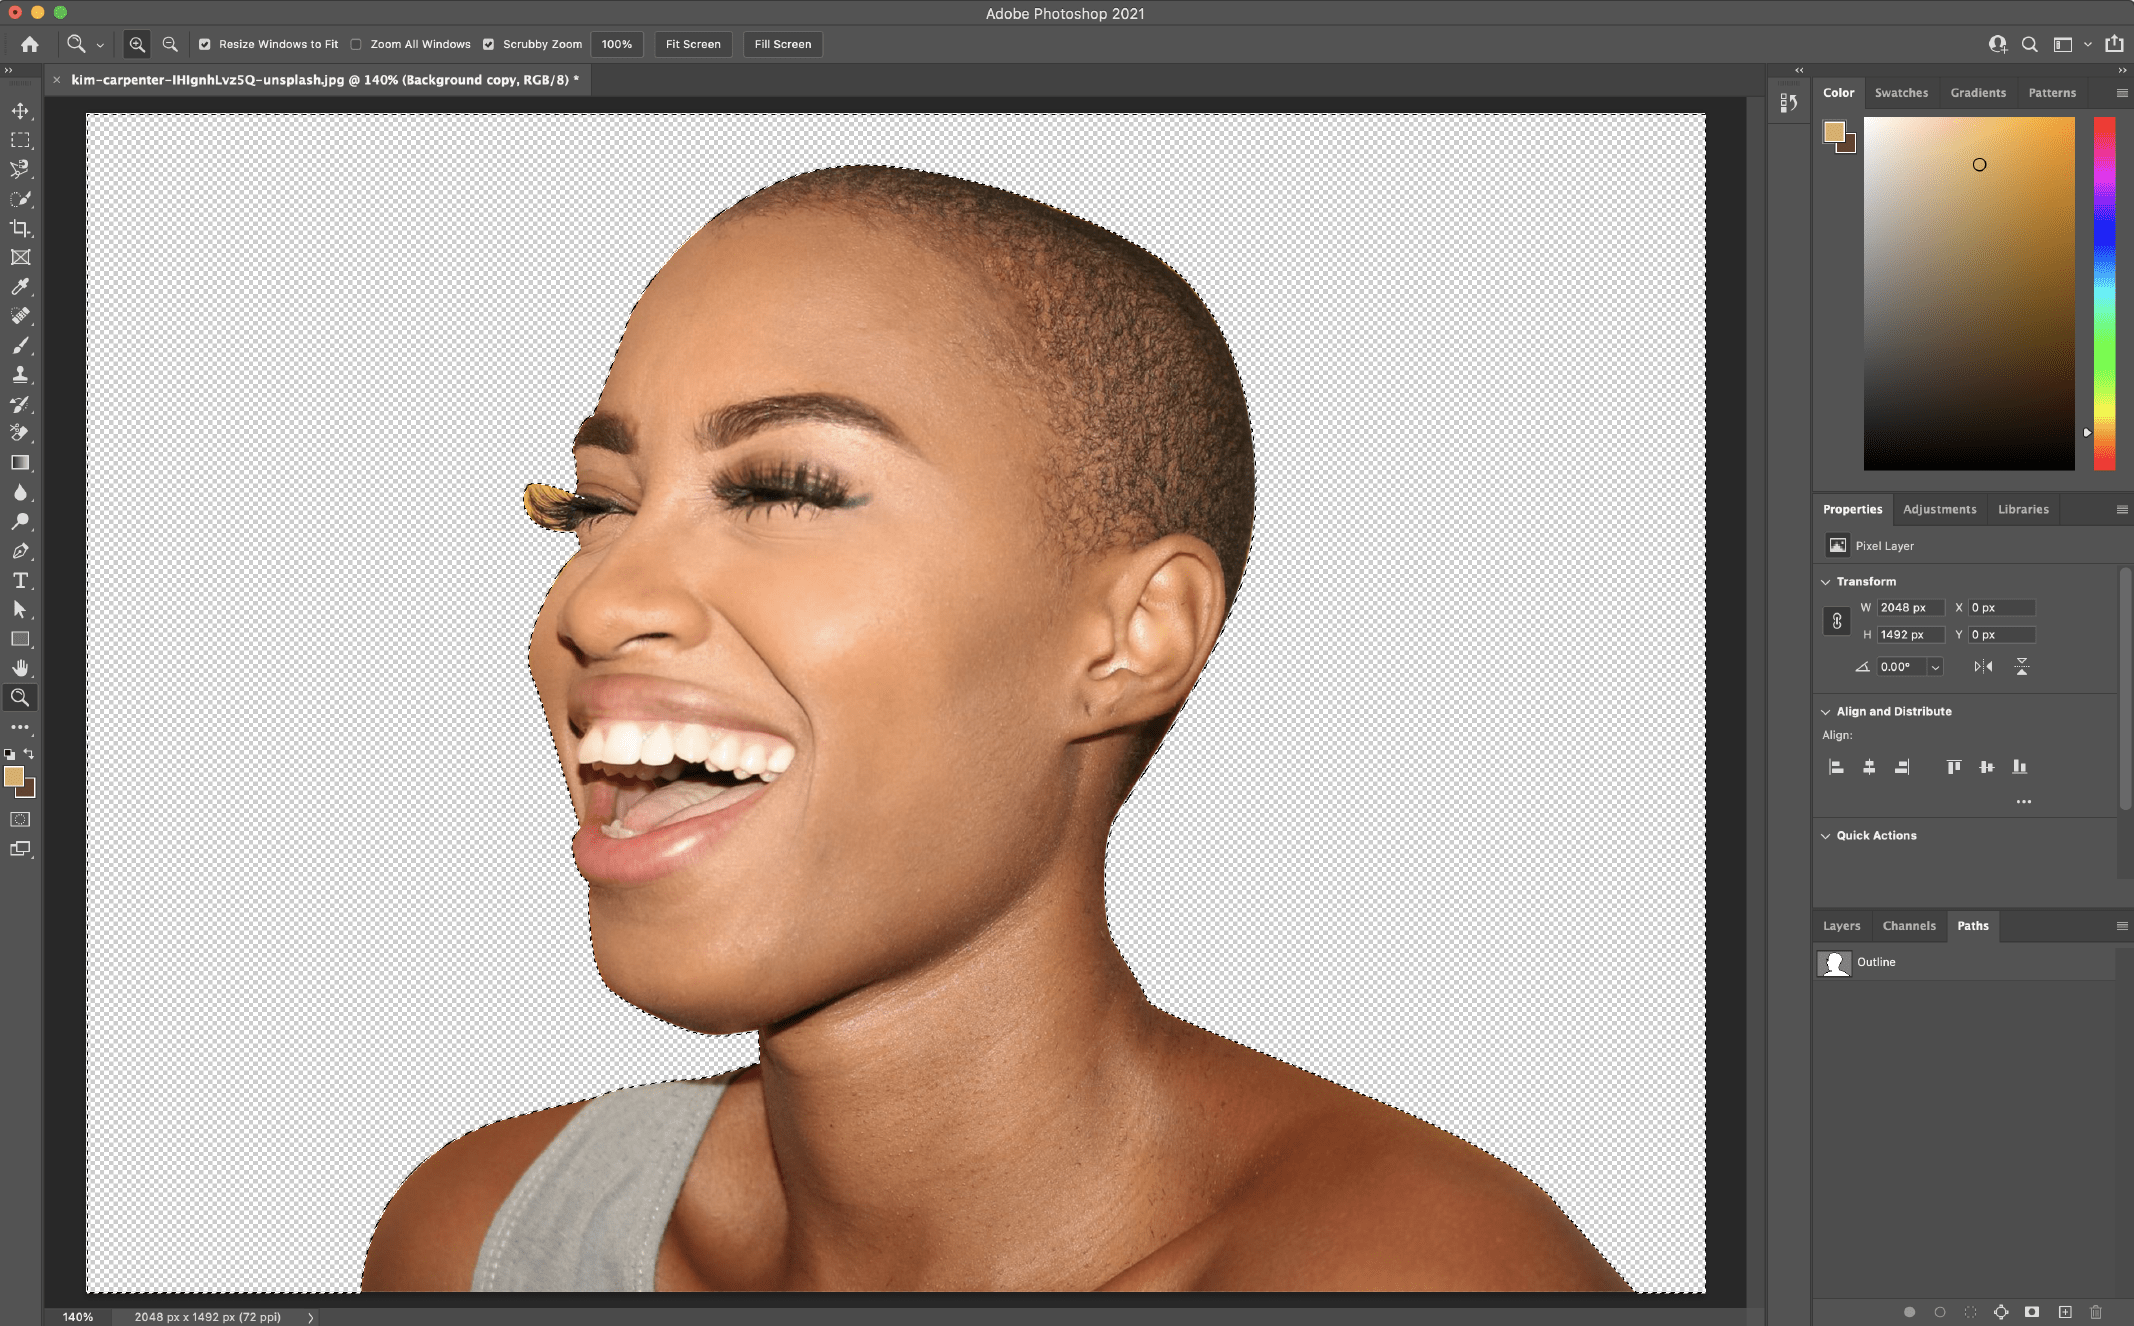
As with the opposite strategies indexed, it’s possible you’ll to find that this doesn’t get you to 100%. The usage of a mixture of the Pen instrument and different strategies right here will let you get nearer for your desired end result. (For example, I’d use a unique approach to lend a hand refine the lady’s eyelash space on this specific picture.)
For extra detailed information at the Pen instrument, take a look at this Adobe instructional.
Picture credit score: Kim Wood worker on Unsplash
This instrument is just right to make use of when the topic is most commonly top contrasted from the background and with advanced edges, and the place you need to save lots of time and feature Photoshop hit upon the trail for you.
If the Pen instrument is just too labor-intensive, otherwise you don’t need to make the effort to attract out your topic, the Magnetic Lasso instrument could also be a just right place to begin for briefly getting you the place you wish to have to be so you’ll be able to spend your time refining the main points.
Magnetic Lasso Device Steps
- Along with your symbol open in Photoshop, appropriate click on your Background layer and click on Replica Layer. Within the conversation field that pops up, title your layer (no matter you’d like), and click on OK. Click on the attention icon to the left of the unique layer to show that layer off.
- Make a selection the Magic Lasso instrument from the toolbox at the left. Get started drawing alongside the threshold of your topic with the instrument. You’ll see it’ll get started drawing the trail for you as you progress your cursor. Persistence is essential right here, as you’ll wish to be gradual, stable, and planned along with your strikes.

- Whenever you’ve began the instrument, you’ll wish to move round your topic utterly and fasten for your place to begin. Whenever you’ve made it again round to the start, click on the start line. The choice will then grow to be marching ants round your variety.
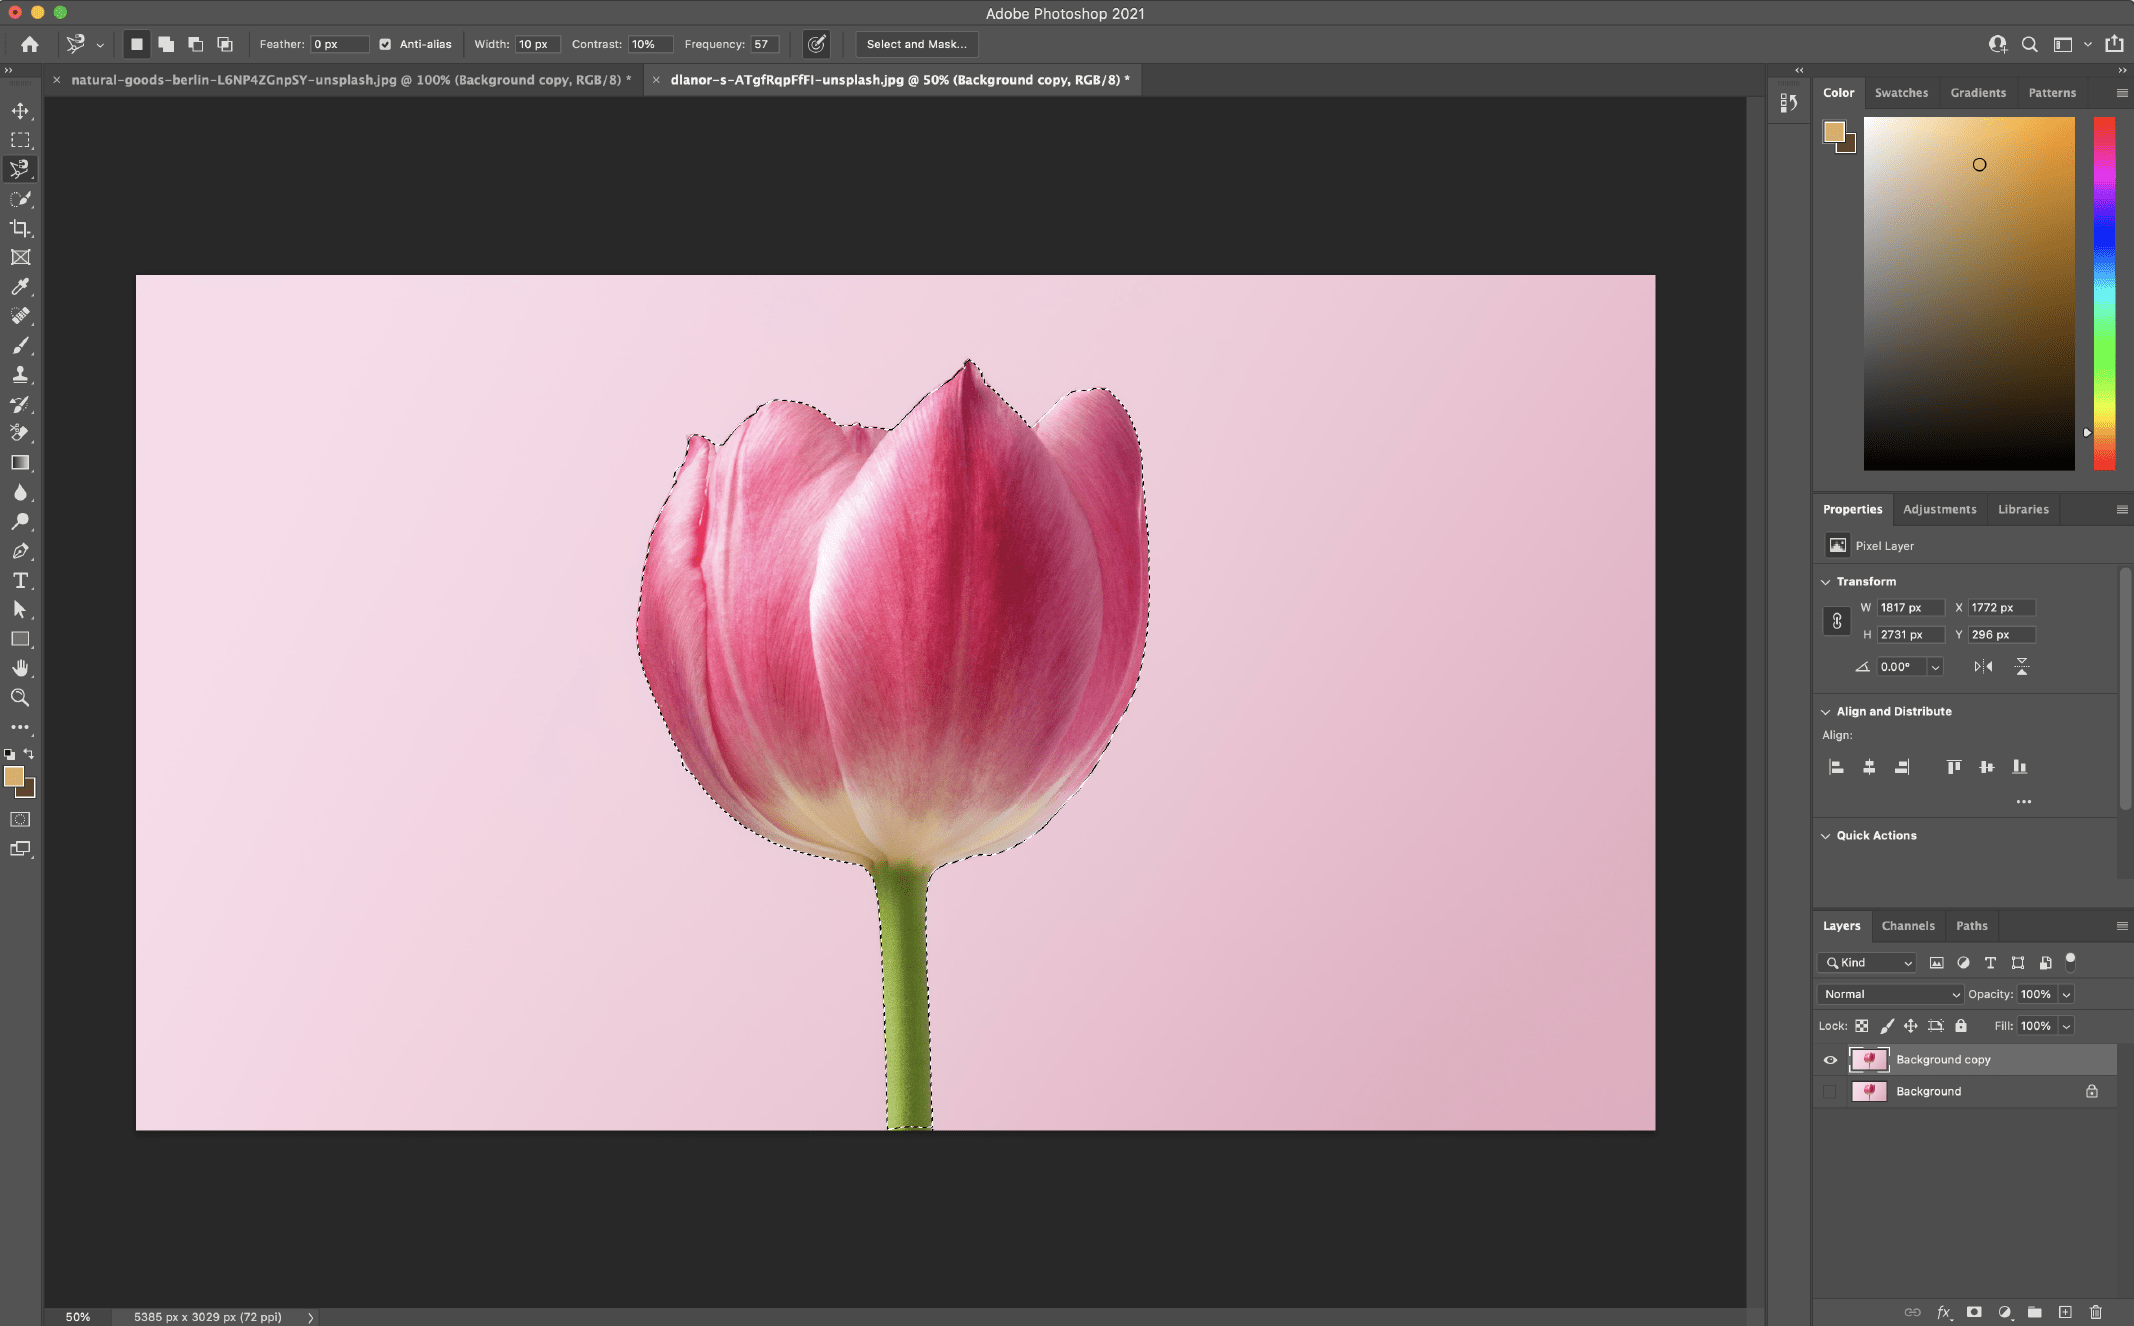
- Save your variety through going to Variety > Save Variety and giving it a reputation.
- To delete the background, move to Make a selection > Inverse to invert the marching ants (they must now be operating across the fringe of the picture and your topic). Click on delete. You must now see the white/grey checkered background as a substitute of your earlier background.
If you are feeling you wish to have to make changes to the choice, you’ll be able to back off a few steps and redo them to recover effects, or use a mixture of different methods indexed on this article to get you nearer for your desired end result.
For extra detailed information about how the Magnetic Lasso instrument works, take a look at this Adobe instructional.
Picture credit score: Dlanor S on Unsplash
This instrument is just right to make use of hwne the topic is relatively contrasted and/or the picture has “wispy” or intricate main points, or when you need to save lots of time and want respectable accuracy and the power to briefly refine.
The Fast Variety instrument is possibly my favourite means right here as it’s the quickest approach to make a choice a topic and permits for faster refinements. It additionally can be utilized on a wider vary of imaginable pictures than different strategies indexed right here, as a result of it really works through detecting colour adjustments to decide the place the choice must be.
Fast Variety Device Steps
Getting rid of a Background Symbol with the Fast Variety Device
- Replica the picture layer
Along with your symbol open in Photoshop, right-click your Background layer and click on Replica Layer. Within the conversation field that pops up, title your layer (no matter you’d like), and click on OK. Click on the attention icon to the left of the unique layer to show that layer off.
- Make a selection the Fast Variety instrument
Make a selection the Fast Variety instrument from the toolbox at the left (could also be hidden below the Object Variety instrument).
- Paint the topic of the picture
The usage of the instrument, get started portray your topic. You’ll see the marching ants get started showing whilst you paint. To regulate your instrument measurement, use the [ or ] keys to lower or building up the scale.
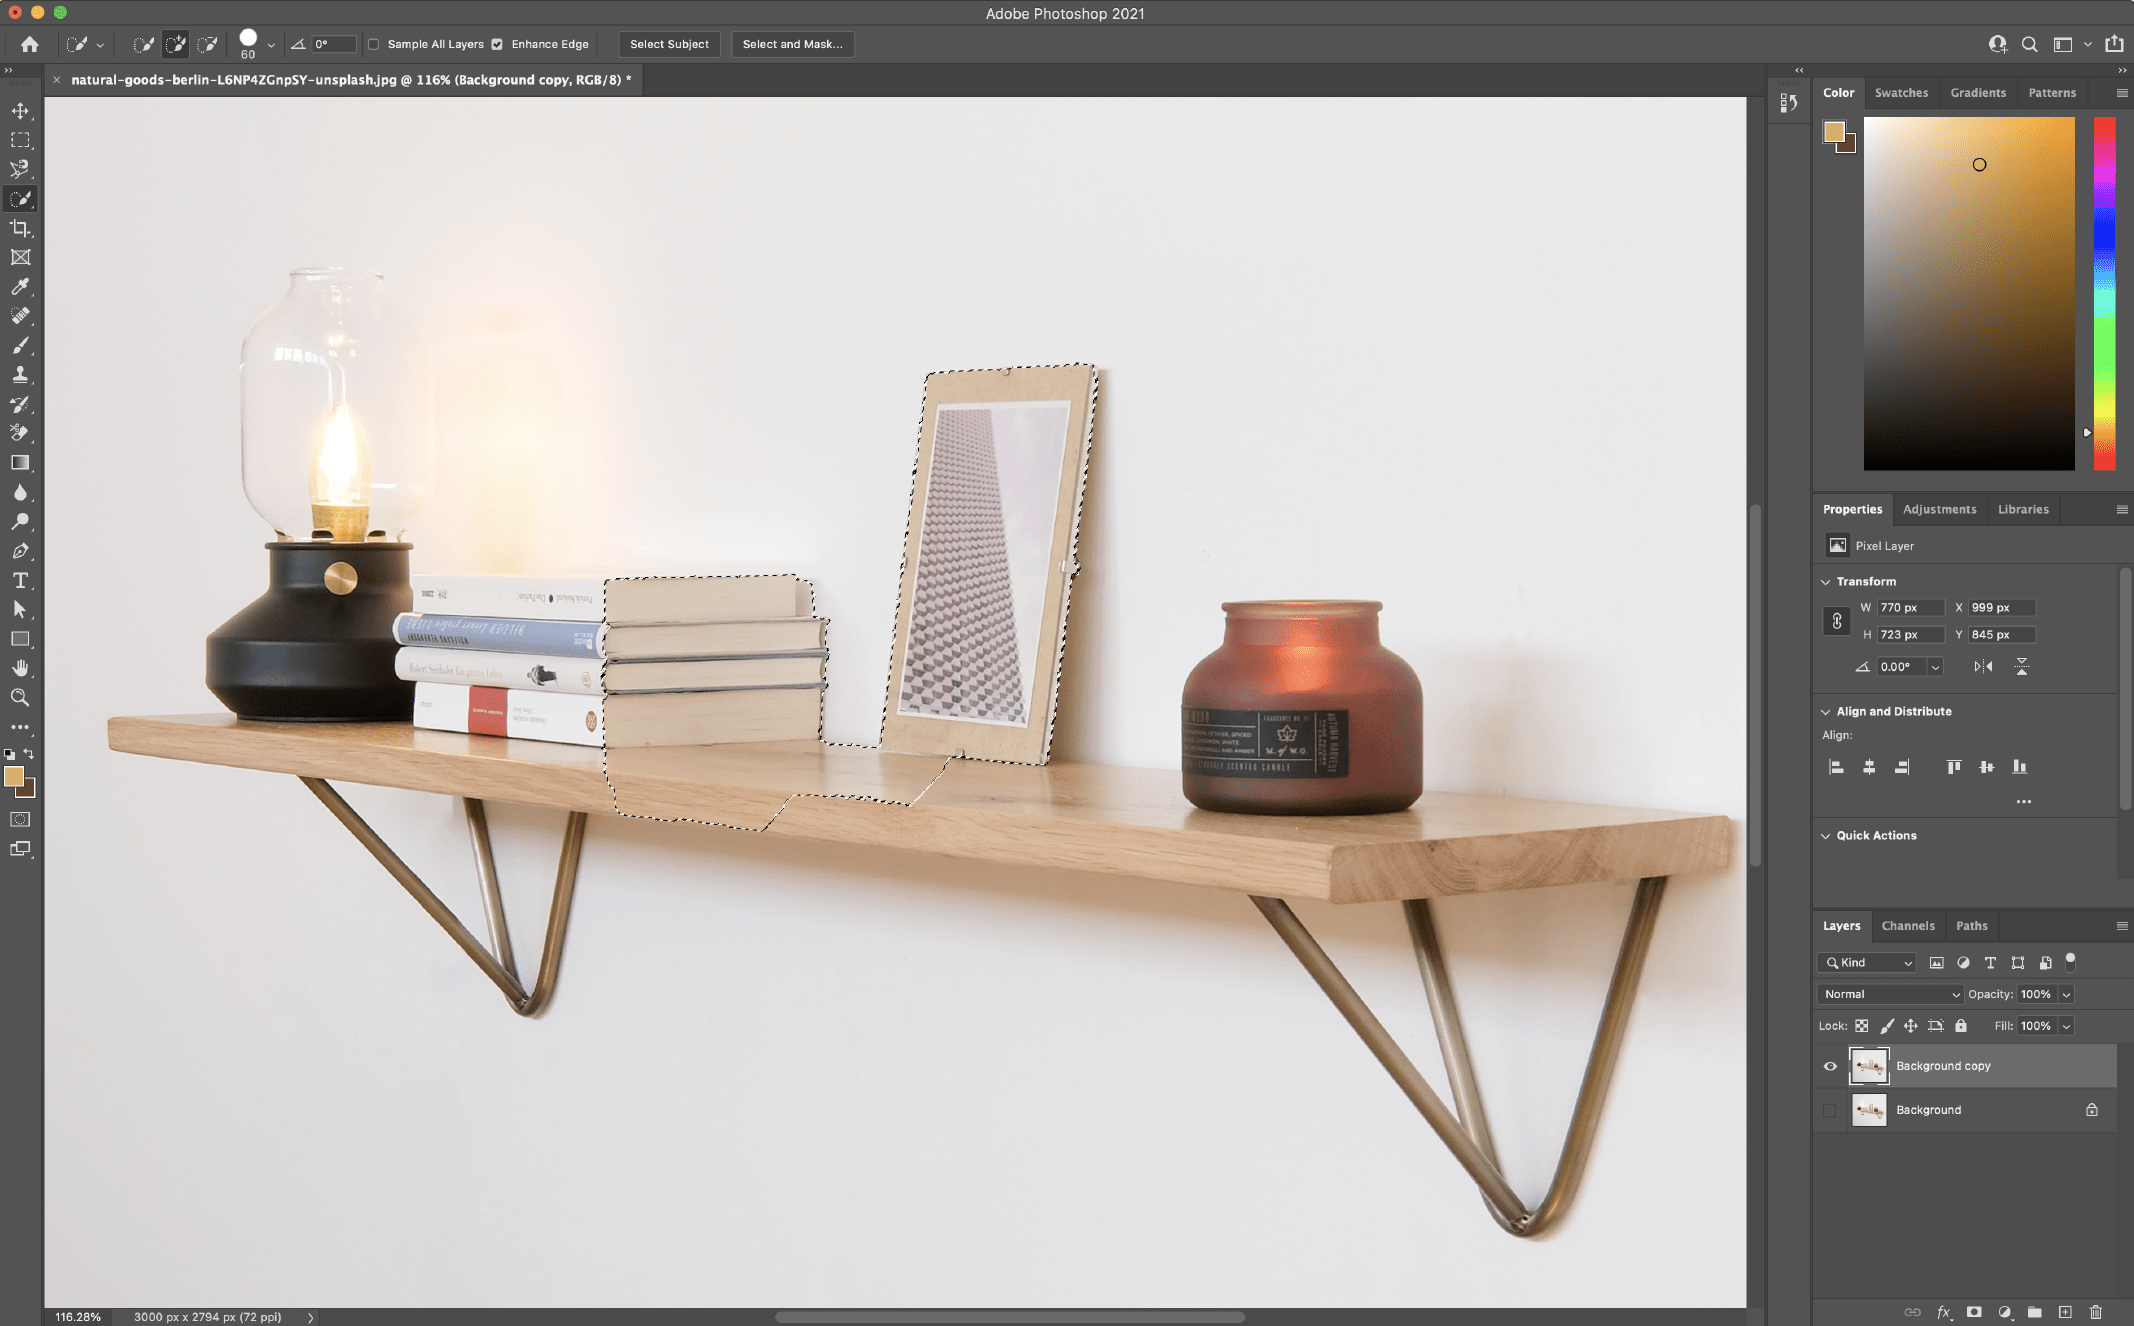
- Blank up the choice trail
Should you to find you’ve painted out of doors of the topic, click on and preserve the Choice key (macOS) or Alt key (Home windows) and also you’ll see the middle of the instrument flip from a
+image to a-image, indicating it’ll now remove from the choice. Paint at the a part of the choice you need to take away whilst preserving the Choice/Alt key.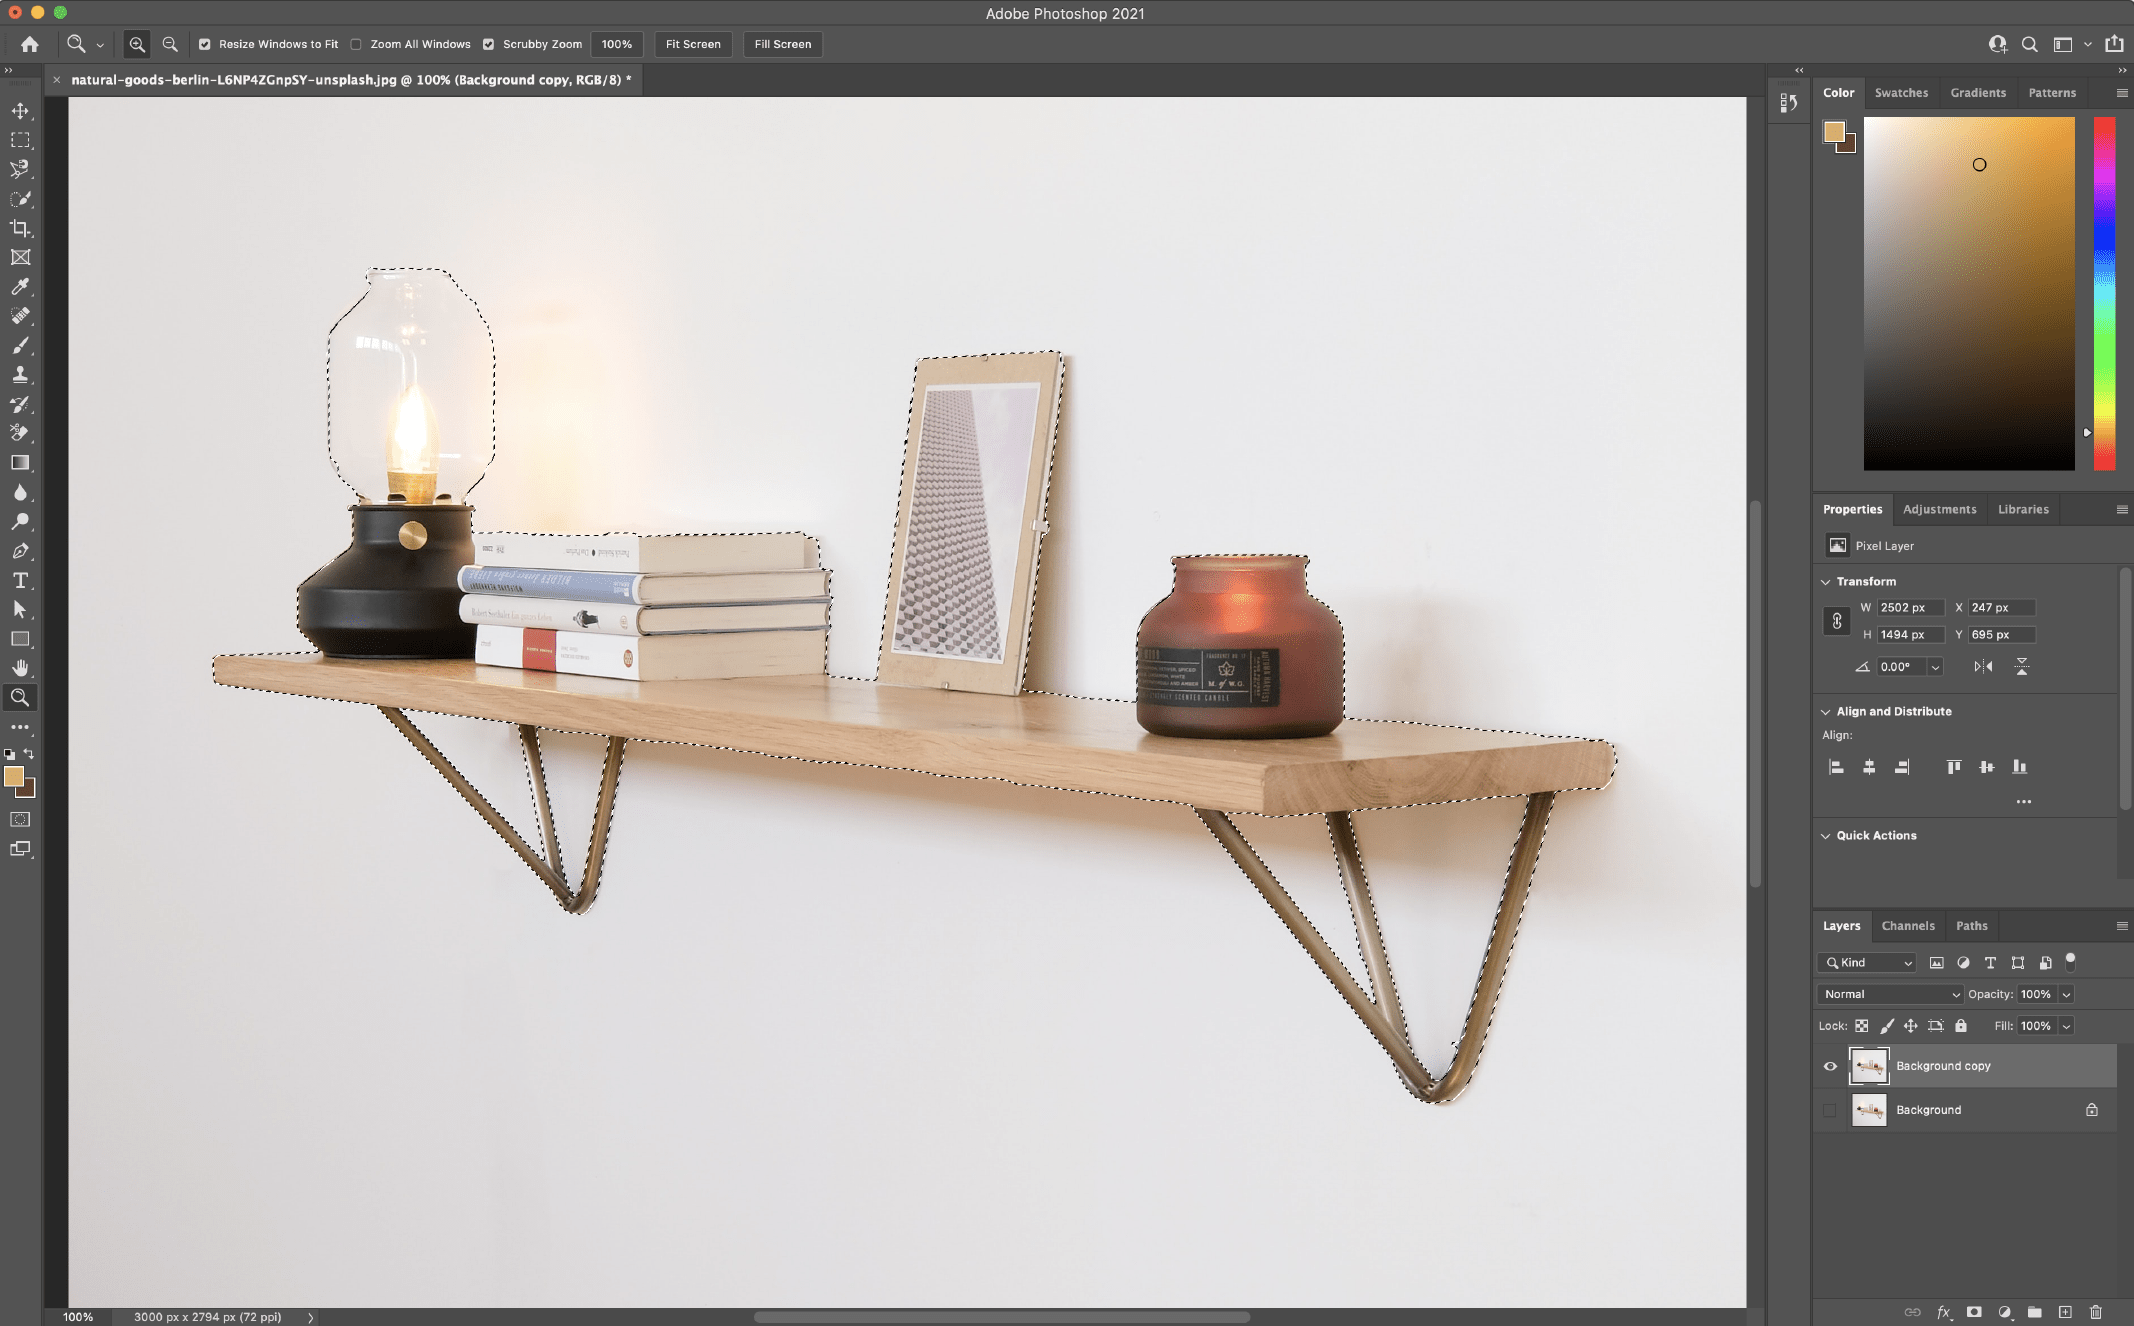
- Save your variety
Save the choice through going to Make a selection > Save Variety and giving it a reputation. That is in case you need to come back again and make changes.
- Delete the background
To delete the background, move to Make a selection > Inverse to invert the marching ants (they must now be operating across the fringe of the picture and your topic). Click on delete.
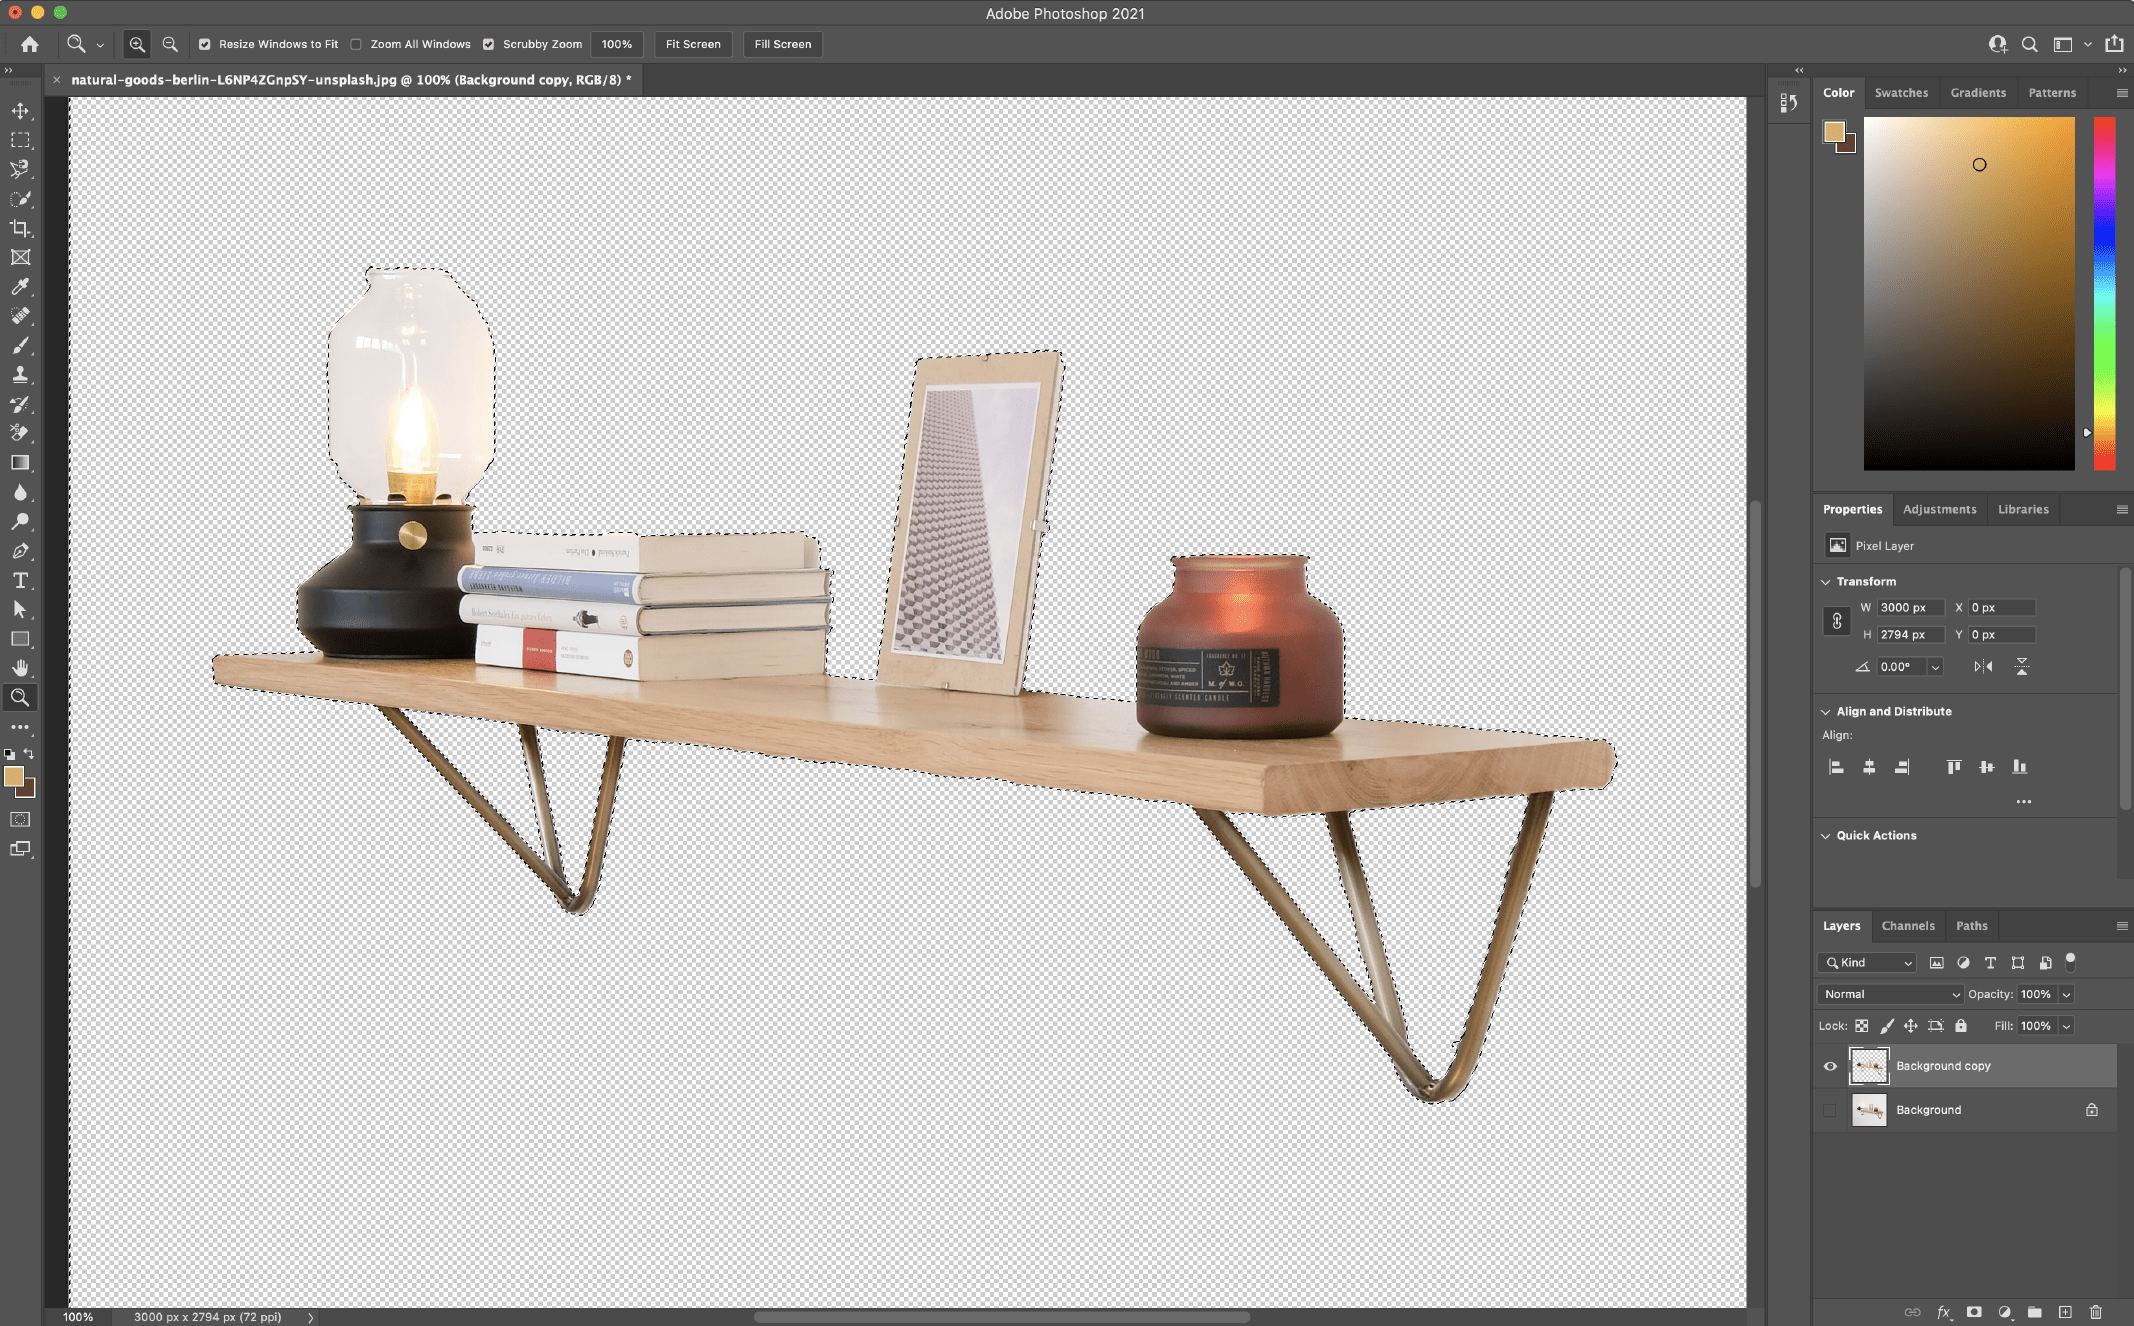
Should you to find you’ve overlooked a place or want additional refinements, you’ll be able to back off a few steps to do the refinement and resave your variety and check out once more.
For extra detailed data on how the Fast Variety instrument works, take a look at this Adobe instructional.
Picture credit score: Herbal Items Berlin on Unsplash
Getting rid of a Background in Photoshop Has By no means Been More uncomplicated
Via those strategies in Photoshop, it hasn’t ever been more uncomplicated to take away a background from a picture. Whether or not you’re in search of a handy guide a rough and simple solution to pull a topic out of a photograph, or you wish to have a solution to substitute the background of a extra detailed symbol, the strategies above will let you get for your finish end result a lot faster and with higher effects.
Understanding which means to make use of and when won’t handiest make your workflow move a lot faster, however you’ll additionally finally end up with a a lot better ultimate symbol.
In any case, relying for your final use case, if you wish to have to save lots of your symbol with out the background, don’t omit to reserve it as a clear PNG so that you could use it in different packages and deal with your new background-free symbol.
FAQs About Getting rid of Backgrounds in Photoshop
To take away the background from a picture in Photoshop, practice those steps:
Open Your Symbol: Release Photoshop and open the picture from which you need to take away the background.
Make a selection the Background: Use the choice instrument of your selection to make a choice the background you need to take away. The “Magic Wand” instrument or the “Fast Variety” instrument can paintings properly for easy backgrounds, whilst extra advanced backgrounds may require the “Pen Device” for exact variety.
Refine the Variety: After deciding on the background, refine the choice the use of the “Make a selection and Masks” choice or the “Refine Edge” instrument. This is helping to clean out edges and make the choice extra correct.
Take away the Background: As soon as your background is chosen, press the Delete key (or Backspace on a Home windows PC). This may occasionally get rid of the chosen background.
Upload a New Background (Non-compulsory): You’ll be able to both depart the background clear or upload a brand new one. So as to add a brand new background, create a brand new layer and position it underneath the picture layer. Then, fill the brand new layer along with your desired background colour or symbol.
Ultimate Touches: To make the sides of the topic mix seamlessly with the brand new background, it’s possible you’ll wish to use the eraser instrument or layer mask to additional refine the sides.
Save Your Symbol: After you’re glad with the end result, save your symbol in a structure that helps transparency (e.g., PNG) to maintain the got rid of background.
Those are the fundamental steps to take away a background in Photoshop. The particular gear and methods you utilize might range relying at the complexity of the picture and your enhancing personal tastes.
In Photoshop, you’ll be able to use the Take away Device to take away backgrouns, as defined in teh article above. Or you’ll be able to use a mixture of variety gear to manually isolate the background, after which delete or masks it. The number of variety instrument depends upon the complexity of the picture and the character of the background. Some frequently used variety gear come with:
Magic Wand Device: This instrument selects pixels of identical colour with a unmarried click on. It really works properly for easy backgrounds with distinct distinction between the topic and background.
Fast Variety Device: This instrument lets you paint over the realm you need to make a choice, and it robotically detects the sides of the topic. It’s helpful for pictures with extra advanced backgrounds.
Pen Device: The Pen Device is an actual choice for growing paths across the topic. It’s specifically helpful for intricate picks and topics with well-defined edges.
Lasso Device: The Lasso Device means that you can draw a freehand variety across the topic. It’s useful for irregularly formed topics.
Make a selection and Masks (or Refine Edge): After making a ramification, you’ll be able to use the “Make a selection and Masks” choice (or “Refine Edge” in older variations of Photoshop) to fine-tune the choice and refine the sides, making the transition between the topic and the background smoother.
After the use of those variety gear to isolate the background, you’ll be able to delete it or upload a layer masks to cover it. The particular means you utilize depends upon your required end result. So, there isn’t a unmarried instrument for background elimination, however reasonably a mixture of gear and methods to reach the specified impact.
To take away the background from a symbol in Photoshop, practice those steps:
Open Your Symbol: Release Photoshop and open the picture containing the emblem.
Make a selection the Brand: Use one of the vital variety gear just like the Magic Wand, Fast Variety, or the Pen Device to make a choice the brand. Make certain that the brand is totally decided on, leaving the background unselected.
Refine the Variety: To make the brand variety extra exact, move to “Make a selection” > “Make a selection and Masks” (or “Refine Edge” in older variations). Modify the settings to clean out the sides and fortify the choice as wanted.
Invert the Variety: With the brand decided on, move to “Make a selection” and make a choice “Inverse.” This inverts the choice, so now the background is chosen as a substitute of the brand.
Delete the Background: Press the Delete key (or Backspace on Home windows) to take away the chosen background. The brand must now be on a transparent background.
Save the Brand: After you’ve got rid of the background, save the brand as a record structure that helps transparency, reminiscent of PNG, to maintain the clear background. To do that, move to “Report” > “Save As” and choose the specified structure
To take away a white background in Photoshop, practice those steps:
Open Your Symbol: Release Photoshop and open the picture with the white background that you need to take away.
Make a selection the Magic Wand Device: Click on at the “Magic Wand” instrument within the Photoshop toolbar.
Tolerance Surroundings: Modify the tolerance atmosphere within the choices bar on the most sensible. A decrease tolerance selects handiest very identical white tones, whilst the next tolerance selects a much wider vary of tones. Get started with a average tolerance atmosphere (e.g., 32).
Make a selection the White Background: Click on anyplace at the white background. The Magic Wand instrument will choose all hooked up spaces of identical colour. In case your symbol has anti-aliased edges or slight gradients, chances are you’ll wish to experiment with the tolerance atmosphere to verify all of the white background is chosen.
Refine the Variety (Non-compulsory): After deciding on the white background, you’ll be able to refine the choice through going to “Make a selection” > “Make a selection and Masks” (or “Refine Edge” in older variations). This lets you clean the sides and make any vital changes to the choice.
Delete the Background: Press the Delete key (or Backspace on a Home windows PC) to take away the chosen white background.
Take a look at for Residual White Spaces: After deletion, zoom in and take a look at for any final white fragments or edges. Use the Eraser instrument or the Brush instrument with a comfortable brush to clean up any undesirable white spaces.
Save Your Symbol: Save your symbol in a structure that helps transparency (e.g., PNG) to maintain the background elimination. To do that, move to “Report” > “Save As.”
[ad_2]