

")

")


[ad_1]
On this article, I’ll display you use trendy CSS tips to create fancy CSS ribbon shapes with minimum code. As an additional bonus, our ribbons can have hover animations!
CSS ribbons are all over, and you’ll be able to discover a ton of articles about them, however the ones we’ll create listed here are a little bit particular. We’re going to depend on a unmarried detail to create each and every of the shapes, and CSS variables to simply keep watch over them. We aren’t going to depend on fastened dimensions or magic numbers. The shapes will have compatibility their content material so that you don’t have to fret concerning the textual content within.
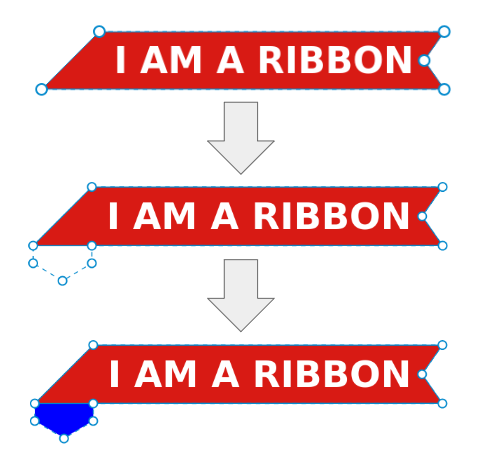
I’ve made a number of CSS ribbon shapes with numerous cool examples, and on this article, we’re going to check two forms of them, pictured under.
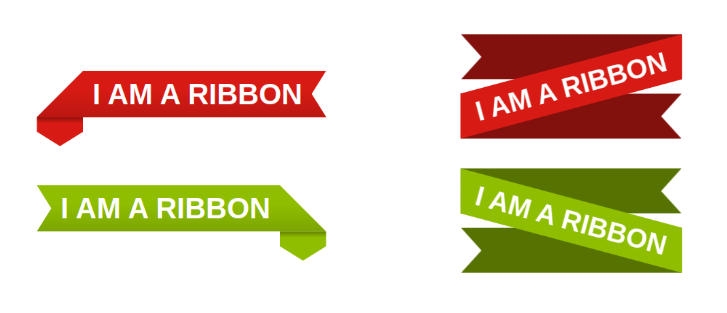
I’ll be calling the left one the “folded ribbon” and the fitting one the “turned around ribbon”.
Making a CSS Folded Ribbon Form
Step one in growing our folded CSS ribbon is to outline the variables of our form.
.ribbon {
  --r: 20px;
  --s: 20px;
  --c: #d81a14;
}
Two variables will keep watch over the form, and one variable will keep watch over the colour.
The usage of clip-path to create a CSS ribbon
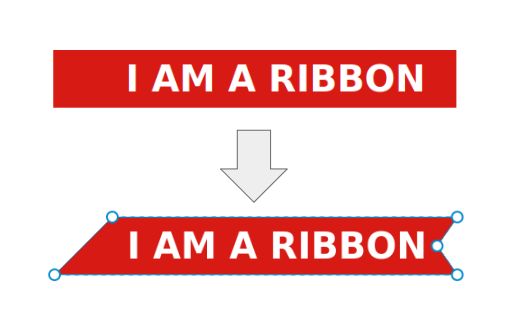
Now let’s transfer to the code. We’re principally going to depend on clip-path. The picture under illustrates the polygon form we’re going to make use of.
We upload some padding to steer clear of chopping the textual content, then we practice the clip-path:
.ribbon {
  --r: 20px;
  --s: 20px;
  --c: #d81a14;

  line-height: 1.6;
  padding-inline: 1.2lh calc(var(--r) + .2lh);
  background: var(--c);
  clip-path: polygon(1lh 0,100% 0,calc(100% - var(--r)) 50%,100% 100%,100% 100%, 0 100%,0 100%);
}
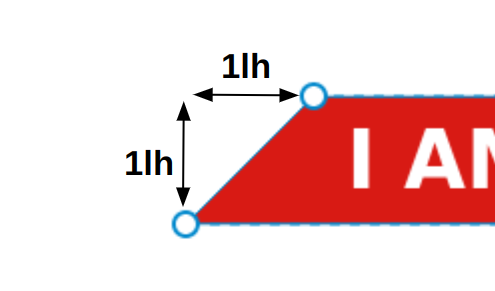
The usage of the CSS lh unit
You will be questioning what’s occurring with the lh unit. It’s a brand new unit that corresponds to the line-height worth. Since we’re the use of one line of textual content, the line-height surroundings is what controls the peak, so 1lh is identical to the peak of the detail, which is tremendous helpful. (You’ll learn extra concerning the lh unit in An Assessment of CSS Sizing Gadgets.)
In clip-path, I wish to lower the form of an isosceles triangle, and to do that I wish to know the peak of the detail. 1lh is the same as that peak.
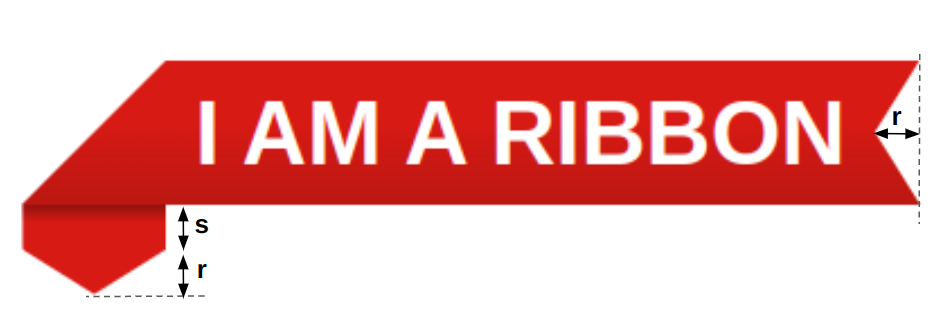
Making a CSS fold with clip-path
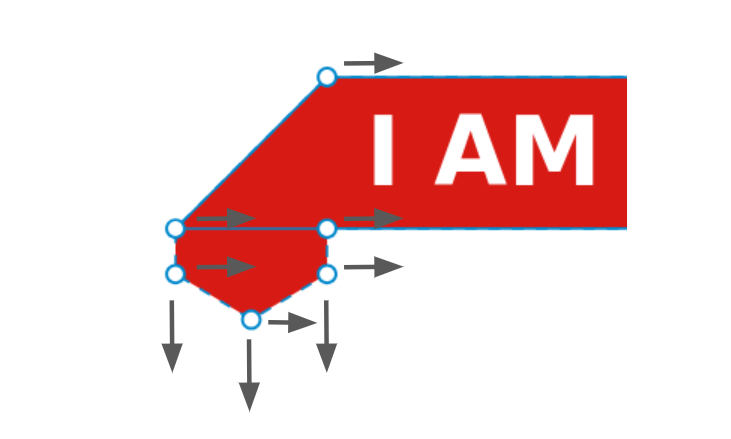
Now, to create the folded section, we’re nonetheless going to make use of clip-path and replace the former polygon. The cool factor about clip-path is that it might lower “outdoor” the bounds of the detail. It’s going to sound sudden or perhaps needless, for the reason that we’ve not anything outdoor, nevertheless it way we will come with such things as box-shadow, define, pseudo-elements, and so forth.
In our case, we’ll depend on box-shadow. The picture under illustrates the trick.
Notice how I’m updating the clip-path to incorporate 4 new issues, 3 of that are outdoor the detail. For the reason that section we’re chopping is outdoor, it’s now not visual, but when we upload a large box-shadow we make if visual. I’ve used a blue colour for example the speculation above, however within the code we’ll use the similar colour because the background:
.ribbon {
  --r: 20px;
  --s: 20px;
  --c: #d81a14;

  line-height: 1.6;
  padding-inline: 1.2lh calc(var(--r) + .2lh);
  background: var(--c);
  clip-path: polygon(1lh 0,100% 0,calc(100% - var(--r)) 50%,100% 100%,1lh 100%,1lh calc(100% + var(--s)),.5lh calc(100% + var(--s) + var(--r)),0 calc(100% + var(--s)),0 100%);
  box-shadow: 0 0 0 999px var(--c);
}
After all, we upload a marginally of shadow impact by means of introducing a gradient and any other box-shadow and we’re performed. Our CSS ribbon form is best possible!
Operating with polygons to invert our CSS ribbon
You’re most definitely questioning create the second one ribbon (the golf green one). We do the similar factor however with a distinct polygon. We take the primary polygon and we invert it.
A polygon may also be written like so:
clip-path: polygon(X1 Y1, X2 Y2, ..., Xn Yn)
To get the other form, you exchange all Xi by means of 100% - Xi. So simple as that! Ahead of checking my code, attempt to do it by myself the use of the polygon of the primary ribbon.
How you can animate our CSS ribbon
Within the demo above, hover the shapes to note a pleasing animation. To succeed in it, we wish to replace the polygon on hover by means of offsetting some issues. I received’t re-write the entire polygon on hover, however I will be able to outline a CSS variable that can keep watch over the offset.
Should you focal point at the animation, you’ll realize that we have got 3 issues transferring to the left and 3 issues transferring down and to the left as smartly.
We replace the Xi of the issues transferring to left with Xi + d and we replace the Yi of the issues transferring doing with Yi + d. Then we merely replace the variable d to keep watch over the motion:
.ribbon {
  --d: 0px;
  clip-path: polygon(calc(1lh + var(--d)) 0,100% 0,calc(100% - var(--r)) 50%,100% 100%,calc(1lh + var(--d)) 100%,calc(1lh + var(--d)) calc(100% + var(--s) + var(--d)),calc(.5lh + var(--d)) calc(100% + var(--s) + var(--r) + var(--d)),var(--d) calc(100% + var(--s) + var(--d)),var(--d) 100%);
}
.ribbon:hover {
  --d: .2lh;
}
Should you see this kind of polygon for the primary time, you will get at a loss for words, because it appears a little bit horrifying. However actually, it’s now not that complicated. We began with a easy polygon and we slowly added extra issues and extra calculations till we reached this complicated one.
Making a Turned around CSS Ribbon Form
Let’s take on the second one form. For this one, we’ll use the brand new trigonometric purposes in conjunction with CSS variables and calc() like the former one. To grasp the common sense in the back of this form, let’s rotate it and stay the textual content in a immediately line.
I’m including a little bit of transparency to peer the portions in the back of the primary detail. I’ll be the use of pseudo-elements to create them. I’ve additionally added the blue define for example the world of the detail. This form can be managed with two variables:
.ribbon {
  --r: 30px;
  --a: 15deg;
}
The r is doing the similar activity as with the former form. The a will keep watch over the rotation of the primary detail and numerous different issues.
Let’s get started with the primary detail. We will be able to see from the determine that we wish to lower it from each and every facet, so chances are you’ll logically take into consideration the use of clip-path, however now not this time. We’ll depend on a gradient shade, the place the section we wish to lower can have a clear colour:
.ribbon {
  --r: 30px;
  --a: 15deg;

  background:
    linear-gradient(calc(90deg + var(--a)),
      #0000 calc(1lh*sin(var(--a))),
      var(--c) 0 calc(100% - 1lh*sin(var(--a))),
      #0000 0
    );
}
Operating with geometry in CSS
Right here comes the geometry.
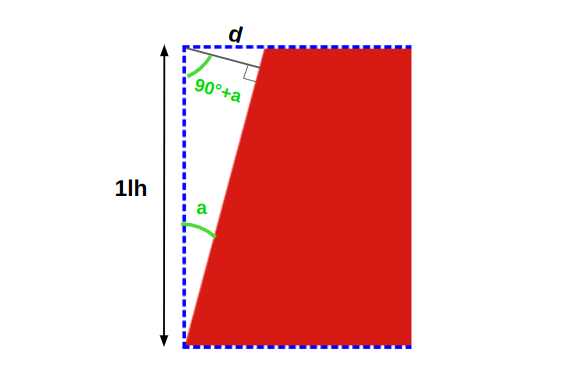
The a is the attitude variable we outlined. Bearing in mind this, the gradient must have an attitude equivalent to 90deg + a, and the clear colour will have to get started at 0 and prevent at d. Performing some math, d is the same as 1lh*sin(a). If we practice the similar common sense at the different facet, we get the next code:
background:
  linear-gradient(calc(90deg + var(--a)),
    #0000 0% calc(1lh*sin(var(--a))),
    var(--c) calc(1lh*sin(var(--a))) calc(100% - 1lh*sin(var(--a))),
    #0000 calc(100% - 1lh*sin(var(--a))) 100%
  );
We perform a little optimization by means of disposing of the 0% and 100% (they’re implicit), and when we’ve two consecutive colour stops which are equivalent, we will change the second with 0:
background:
  linear-gradient(calc(90deg + var(--a)),
    #0000 calc(1lh*sin(var(--a))),
    var(--c) 0 calc(100% - 1lh*sin(var(--a))),
    #0000 0
  );
We’re performed with the primary detail, so let’s transfer to the pseudo-elements. Right here as smartly, we’d like some geometry tips to establish the dimensions.
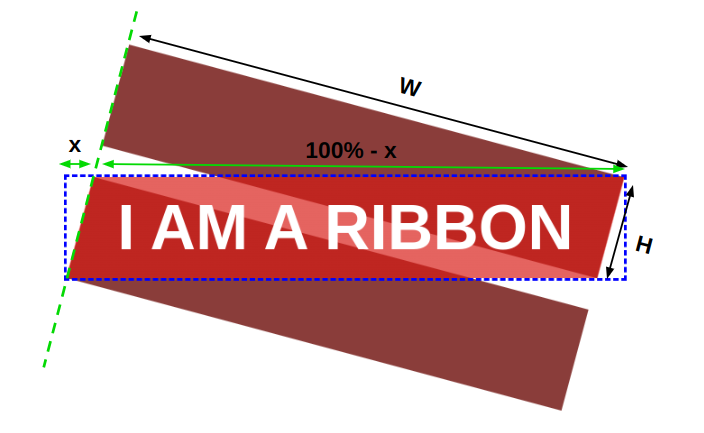
We will be able to simply in finding the peak H from the former determine we used to spot the gradient configuration. It’s equivalent to 1lh/cos(a). For the width W, it’s equivalent to (100% - x)*cos(a), the place 100% is the width of the primary detail and x is that small section the place we’ve the transparency. It’s equivalent to 1lh*tan(a).
Each pseudo-elements have the similar dimension, so our code is as follows:
.ribbon:prior to,
.ribbon:after {
  content material: "";
  place: absolute;
  peak: calc(1lh/cos(var(--a)));
  width: calc(100%*cos(var(--a)) - 1lh*sin(var(--a)));
}
Should you’re now not happy with the mathematics and also you’re a little bit misplaced with the components, it’s superb. You don’t wish to as it should be perceive them. The objective is so as to alter the form the use of CSS variables. The formulation are right here to make issues more straightforward and steer clear of us coping with hard-coded values and magic numbers.
After the measurement, we will have to as it should be position each and every pseudo-element, rotate it, and use clip-path for the cutout section:
.ribbon:prior to,
.ribbon:after {
  content material: "";
  place: absolute;
  rework: translate3d(0,0,-1px);
  rotate: var(--a);
  peak: calc(1lh/cos(var(--a)));
  width: calc(100%*cos(var(--a)) - 1lh*sin(var(--a)));
  background: color-mix(in srgb,var(--c),#000 40%);
}
h1:prior to {
  proper: 0;
  most sensible: 0;
  transform-origin: most sensible proper;
  clip-path: polygon(0 0,100% 0,100% 100%,0 100%,var(--r) 50%);
}
h1:after {
  left: 0;
  backside: 0;
  transform-origin: backside left;
  clip-path: polygon(0 0,100% 0,calc(100% - var(--r)) 50%,100% 100%,0 100%);
}
The code will have to be self-explanatory and the clip-path worth will have to be simple to grasp. We used extra complicated polygons with the primary form.
Notice using color-mix(), which permits me to create a gloomy model of the primary colour. I’m additionally the use of a 3-d translate with a unfavourable worth at the z-axis to convey the pseudo-elements in the back of the primary detail. You may assume that that is the activity of z-index, nevertheless it received’t paintings because of some stacking context problems that I’ve detailed in this Stack Overflow thread.
Now, if we rotate the detail in the other way, we get our CSS ribbon form.
As with the former instance, I’ll will let you dissect the code of the golf green ribbon and spot what adjustments I made to get the other form.
Conclusion
It used to be a a laugh workout, don’t you assume? We explored some trendy CSS options like CSS variables, calc(), and trigonometric purposes, and we blended them to create fancy ribbon shapes.
If you wish to have extra, pass take a look at my complete number of ribbon shapes. Attempt to construct a few of them by myself prior to checking the code. It’ll be a just right workout to follow what you’ve discovered right here.
[ad_2]


