

")

")


[ad_1]
Should you’re nonetheless development and turning in your tool packages the normal means, then you’re lacking out on a significant innovation within the Device Construction Procedure or Device Construction Existence Cycle. To turn you what I’m speaking about, on this article, I can proportion how you can create a CI/ CD Pipeline with Jenkins, Packing containers, and Amazon ECS that deploys your software and overcomes the constraints of the normal tool supply type. This innovation a great deal impacts time limits, time to marketplace, high quality of the product, and so forth. I can take you thru the entire step by step means of putting in place a CI/CD Docker pipeline for a pattern Node.js software.
What Is a CI/CD Pipeline?
A CI/CD Pipeline or Steady Integration Steady Supply Pipeline is a suite of directions to automate the method of Device exams, builds, and deployments. Listed here are a couple of advantages of imposing CI/CD to your group.
- Smaller code alternate: The power of CI/CD Pipelines to permit the combination of a small piece of code at a time is helping builders acknowledge any attainable drawback ahead of an excessive amount of paintings is finished.
- Sooner supply: A couple of day-to-day releases or persistent releases will also be made a truth the use of CI/CD Pipelines.
- Observability: Having automation in position that generates in depth logs at every level of the improvement procedure is helping to grasp if one thing is going flawed.
- More straightforward rollbacks: There are possibilities that the code that has been deployed could have problems. In such instances, it is extremely a very powerful to get again to the former running launch once conceivable. Probably the most greatest benefits of the use of the CI/CD Pipelines is that you’ll briefly and simply roll again to the former running launch.
- Scale back prices: Having automation in position for repetitive duties frees up the Developer and Operation guys’ time that may be spent on Product Construction.
Now, ahead of we continue with the stairs to arrange a CI/CD Pipeline with Jenkins, Packing containers, and Amazon ECS, let’s see, in brief, what gear and applied sciences we will be able to be the use of.
CI/CD Docker Software Stack
- GitHub: This is a web-based software or a cloud-based carrier the place folks or builders collaborate, retailer, and arrange their software code the use of Git. We can create and retailer our pattern Nodejs software code right here.
- AWS EC2 Example: AWS EC2 is an Elastic Pc Provider supplied by way of Amazon Internet Services and products used to create Digital Machines or Digital Cases on AWS Cloud. We can create an EC2 example and set up Jenkins and different dependencies in it.
- Java: This shall be required to run the Jenkins Server.
- AWS CLI: aws-cli i.e AWS Command Line Interface, is a command-line software used to control AWS Services and products the use of instructions. We can be the use of it to control AWS ECS Process and ECS Provider.
- Node.js and NPM: Node.js is a back-end JavaScript runtime surroundings, and NPM is a package deal supervisor for Node. We can be making a CI CD Docker Pipeline for the Node.js software.
- Docker: Docker is an open-source containerization platform used for creating, delivery, and operating packages. We can use it to construct Docker Pictures of our pattern Node.js software and push/pull them to/from AWS ECR.
- Jenkins: Jenkins is an open-source, freely to be had automation server used to construct, take a look at, and deploy tool packages. We can be growing our CI/CD Docker Pipeline to construct, take a look at, and deploy our Node.js software on AWS ECS the use of Jenkins
- AWS ECR: AWS Elastic Container Registry is a Docker Symbol Repository totally controlled by way of AWS to simply retailer, proportion, and deploy container pictures. We can be the use of AWS ECR to retailer Docker Pictures of our pattern Node.js software.
- AWS ECS: AWS Elastic Container Provider is a container orchestration carrier totally controlled by way of AWS to simply deploy, arrange, and scale containerized packages. We can be the use of it to host our pattern Node.js software.
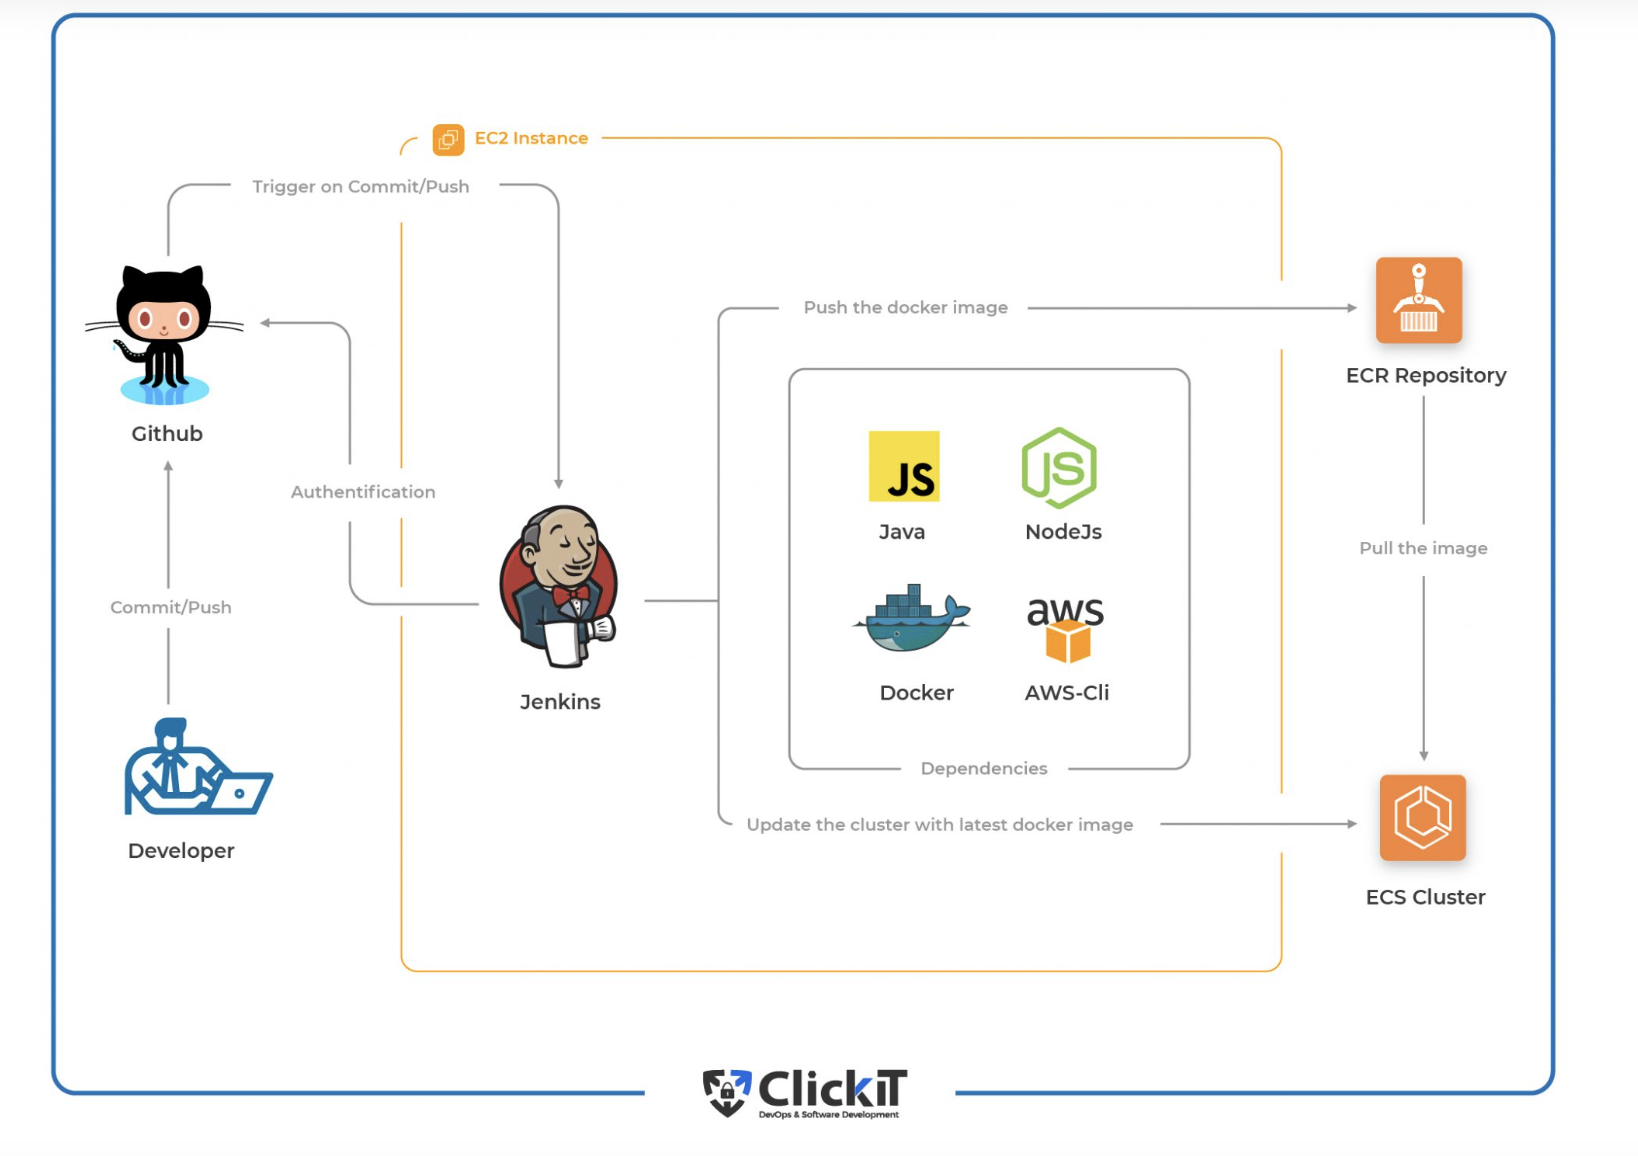
Structure
That is how our structure will seem like after putting in place the CI/CD Pipeline with Docker.
After the CI/CD Docker Pipeline is effectively arrange, we will be able to push commits to our GitHub repository, and in flip, GitHub Webhook will cause the CI/CD Pipeline on Jenkins Server. Jenkins Server will then pull the newest code, carry out unit exams, construct a docker symbol, and push it to AWS ECR. After the picture is driven to AWS ECR, the similar symbol shall be deployed in AWS ECS by way of Jenkins.
CI/CD Workflow and Levels
Workflow
CI and CD Workflow lets in us to concentrate on Construction whilst it carries out the exams, construct, and deployments in an automatic means.
- Steady Integration: This permits the builders to push the code to the Model Regulate Device or Supply Code Control Device, construct & take a look at the newest code driven by way of the developer, and generate and retailer artifacts.
- Steady Supply: That is the method that shall we us deploy the examined code to the Manufacturing every time required.
- Steady Deployment: This is going one step additional and releases each and every unmarried alternate with none guide intervention to the buyer machine each and every time the manufacturing pipeline passes the entire exams.
Levels
The main purpose of the automatic CI/CD pipeline is to construct the newest code and deploy it. There will also be more than a few levels as in keeping with the desire. The most typical ones are discussed under.
- Cause: The CI/CD pipeline can do its process at the specified time table when carried out manually or brought on mechanically on a specific motion within the Code Repository.
- Code pull: On this section, the pipeline pulls the newest code every time the pipeline is brought on.
- Unit exams: On this section, the pipeline plays exams which are there within the codebase. This may be known as unit exams.
- Construct or package deal: As soon as the entire exams go, the pipeline strikes ahead and builds artifacts or docker pictures in case of dockerized packages.
- Push or retailer: On this section, the code that has been constructed is driven to the Artifactory or Docker Repository in case of dockerized packages.
- Acceptance exams: This section or level of the pipeline validates if the tool behaves as supposed. This is a solution to make sure that the tool or software does what it’s intended to do.
- Deploy: That is the general level in any CI/CD pipeline. On this level, the applying is in a position for supply or deployment.
Deployment Technique
A deployment technique is some way during which packing containers of the micro-services are taken down and added. There are more than a few choices to be had; alternatively, we will be able to simplest talk about those which are to be had and supported by way of ECS
Rolling Updates
In rolling updates, the scheduler within the ECS Provider replaces the lately operating duties with new ones. The duties within the ECS cluster are not anything however operating packing containers created out of the duty definition. Deployment configuration controls the selection of duties that Amazon ECS provides or eliminates from the carrier. The decrease and the higher prohibit at the selection of duties that are meant to be operating is managed by way of minimumHealthyPercent and maximumPercent, respectively.
- minimumHealthyPercent instance: If the price of minimumHealthyPercent is 50 and the required process depend is 4, then the scheduler can prevent two current duties ahead of beginning two new duties
- maximumPercent instance: If the price of maximumPercent is 4 and the required process is 4, then the scheduler can get started 4 new duties ahead of preventing 4 current duties.
If you wish to be informed extra about this, seek advice from the legitimate documentation right here.
Blue/Inexperienced Deployment
Blue/Inexperienced deployment technique permits the developer to ensure a brand new deployment ahead of sending site visitors to it by way of putting in an up to date model of the applying as a brand new substitute process set.
There are essentially 3 ways during which site visitors can shift all through blue/inexperienced deployment.
- Canary — Traffic is shifted in two increments. The proportion of traffic shifted in your up to date process set within the first increment and the period, in mins, ahead of the rest traffic is shifted in the second one increment.
- Linear — Traffic is shifted in equivalent increments, the proportion of traffic shifted in every increment, and the selection of mins between every increment.
- All-at-once — All traffic is shifted from the unique process set to the up to date process set all of sudden.
To be told extra about this, seek advice from the legitimate documentation right here.
Out of those two methods, we will be able to be the use of the rolling-updates deployment technique in our demo software.
Dockerize Node.js App
Now, let’s get began and make our palms grimy.
The Dockerfile for the pattern Nodejs software is as follows. There’s no want to copy-paste this document. It’s already to be had within the pattern git repository that you simply cloned up to now.
Let’s simply attempt to perceive the directions of our Dockerfile.
- FROM node:12.18.4-alpine
This shall be our base symbol for the container. - WORKDIR /app
This shall be set as a running listing within the container. - ENV PATH /app/node_modules/.bin:$PATH
PATH variable is assigned a trail to /app/node_modules/.bin. - COPY package deal.json ./
Bundle.json shall be copied within the running listing of the container. - RUN npm set up
Set up dependencies. - COPY . ./
Reproduction recordsdata and folders with dependencies from the host system to the container. - EXPOSE 3000
Permit to port 300 of the container. - CMD [“node”, “./src/server.js”]
Get started the applying
That is the Docker document that we will be able to use to create a Docker symbol.
Setup GitHub Repositories
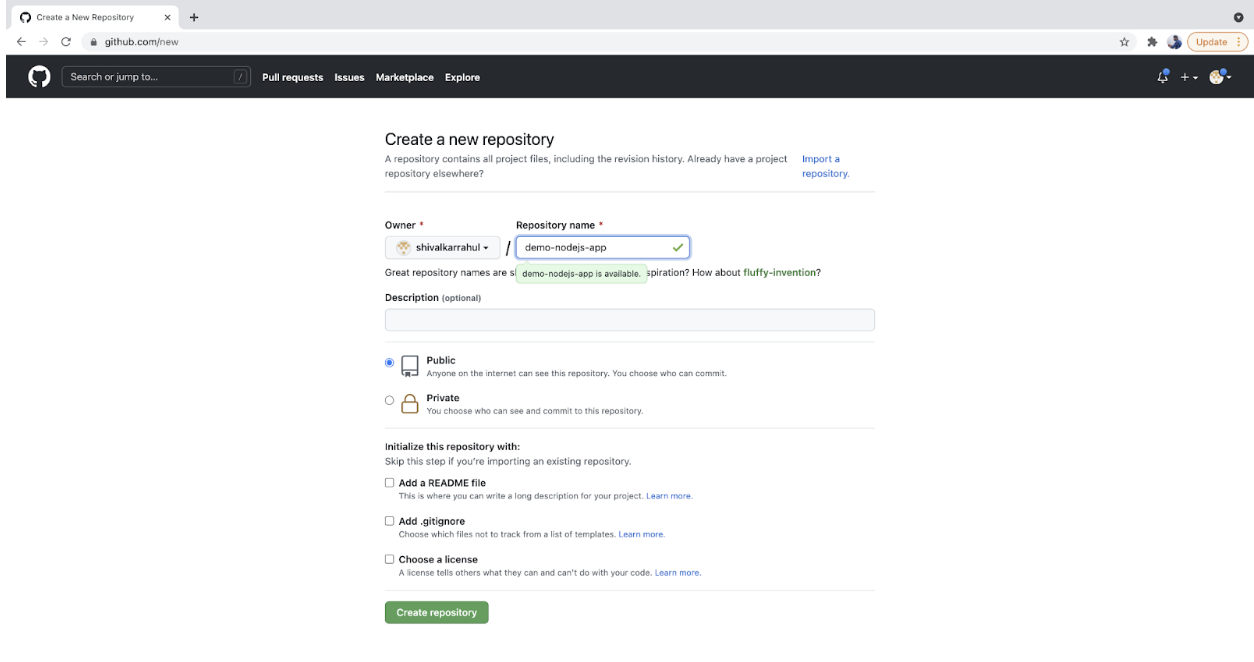
Create a New Repository
- Move to GitHub, create an account for those who don’t have it already else log in in your account and create a brand new repository. You’ll be able to call it as in keeping with your selection; alternatively, I might counsel the use of the similar call to keep away from any confusion.
- You are going to get the display screen as follows: replica the repository URL and stay it at hand. Name this URL a GitHub Repository URL and be aware it down within the textual content document for your machine.
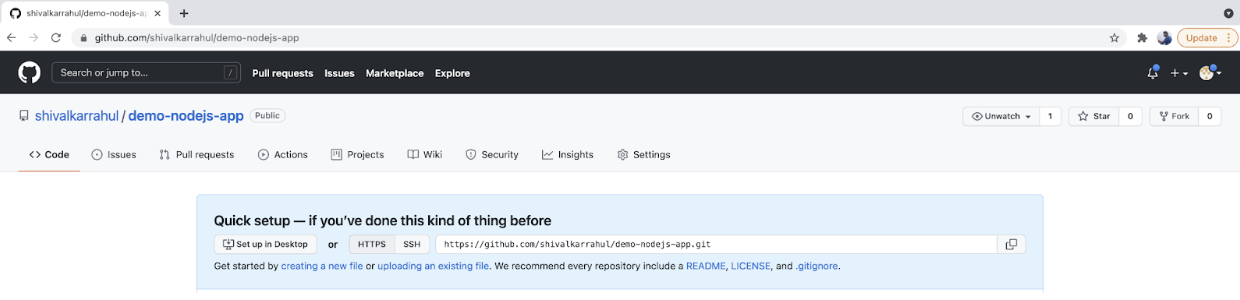
Notice: Create a brand new textual content document for your machine and be aware down the entire main points that shall be required later.
Create a GitHub Token
This shall be required for authentication functions. It is going to be used as an alternative of a password for Git over HTTP or can be utilized to authenticate to the API over Elementary Authentication.
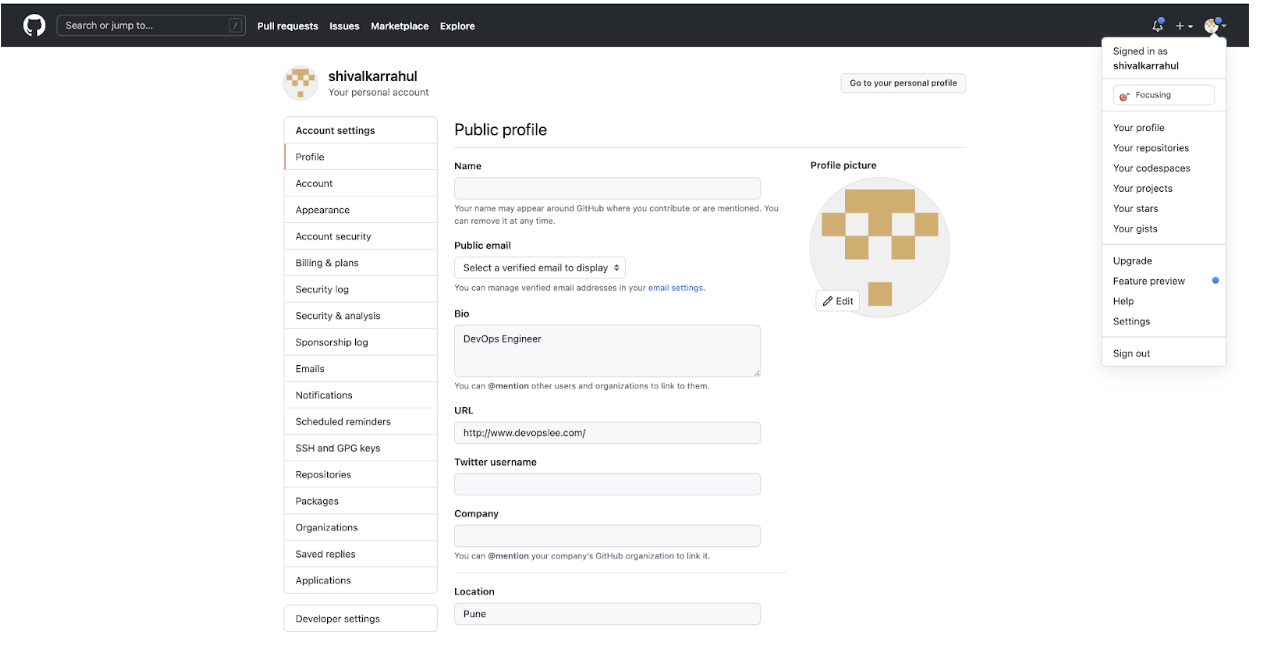
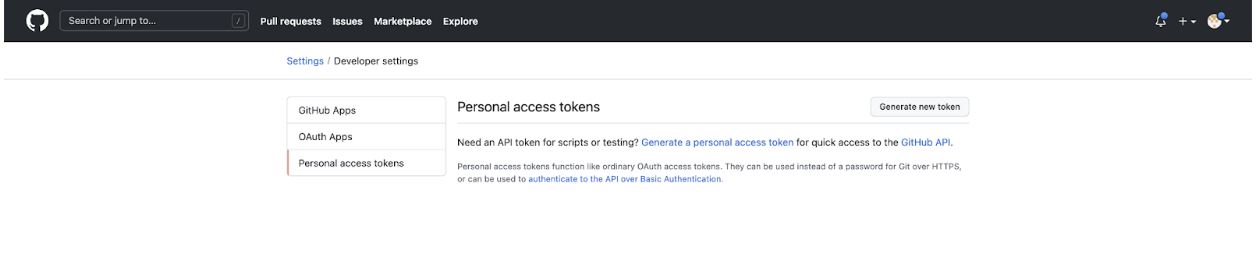
- Click on at the consumer icon within the top-right, pass to “Settings,” then click on at the “Builders settings” possibility within the left panel.
- Click on at the “Private get entry to tokens” choices and “Generate new token” to create a brand new token.
- Tick the “repo” checkbox. The token will then have “complete regulate of personal repositories”
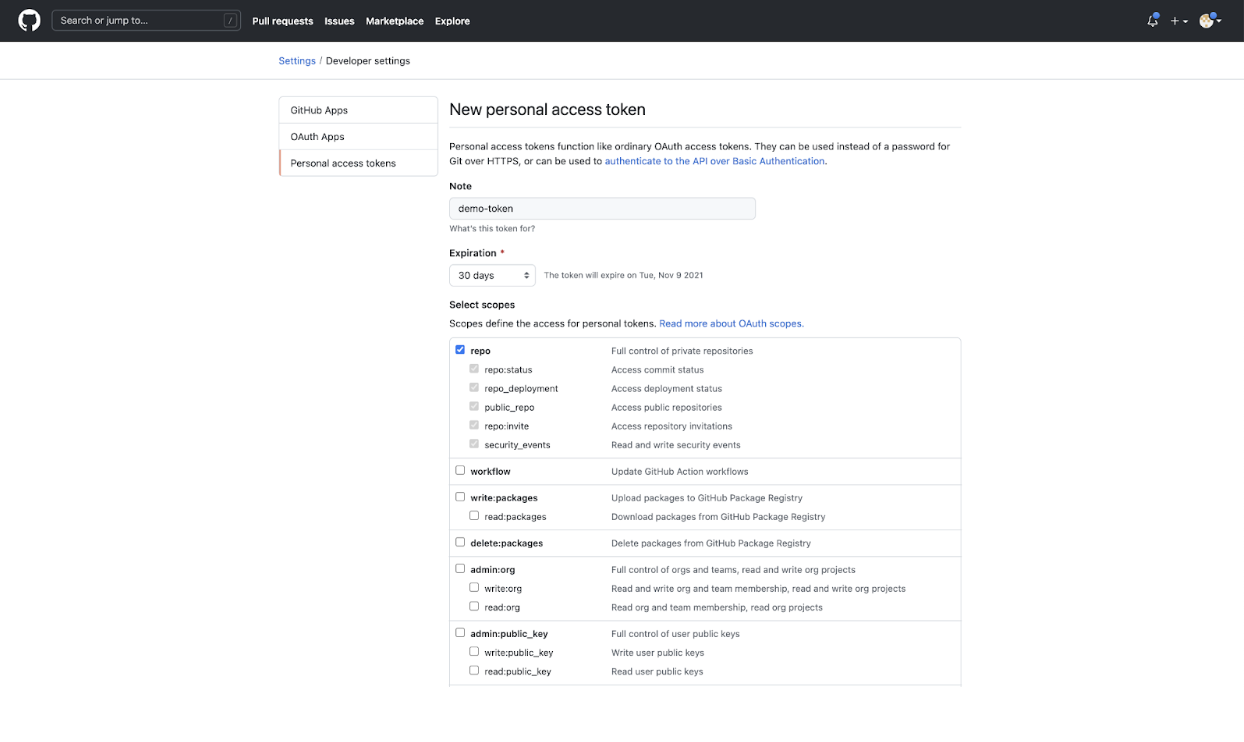
- You must see your token created now.

Clone the Pattern Repository
- Test your provide running listing.
pwd
Notice: You’re in the house listing, i.e.,/house/ubuntu.
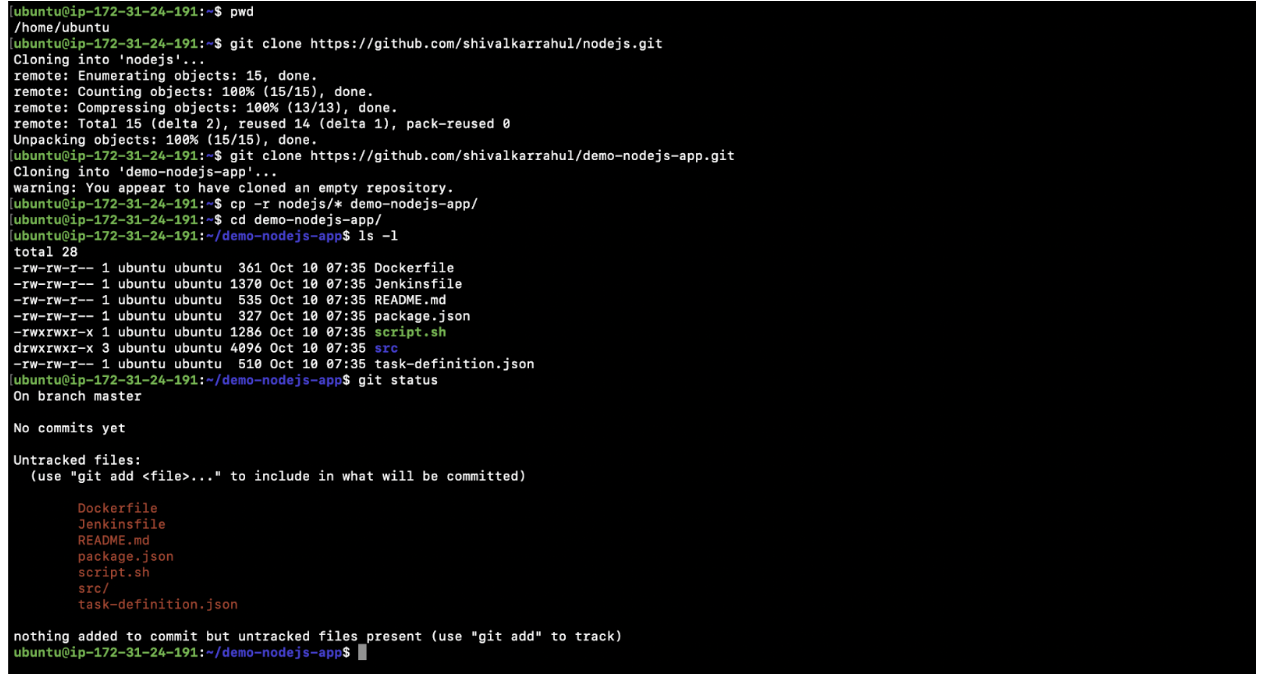
- Clone my pattern repository containing the entire required code.
git clone - Create a brand new repository. This repository shall be used for CI/CD Pipeline setup.
git clone - Reproduction the entire code from my node.js repository to the newly created demo-nodejs-app repository.
cp -r nodejs/* demo-nodejs-app/ - Trade your running listing.
cd demo-nodejs-app/
Notice: For the remainder of the object, don’t alternate your listing. Keep in the similar listing. Right here it’s /house/ubuntu/demo-nodejs-app/, and execute the entire instructions from there.
- ls -l
- git standing
Push Your First Decide to the Repository
- Test your provide running listing. It must be the similar. Right here it’s:/house/ubuntu/demo-nodejs-app/
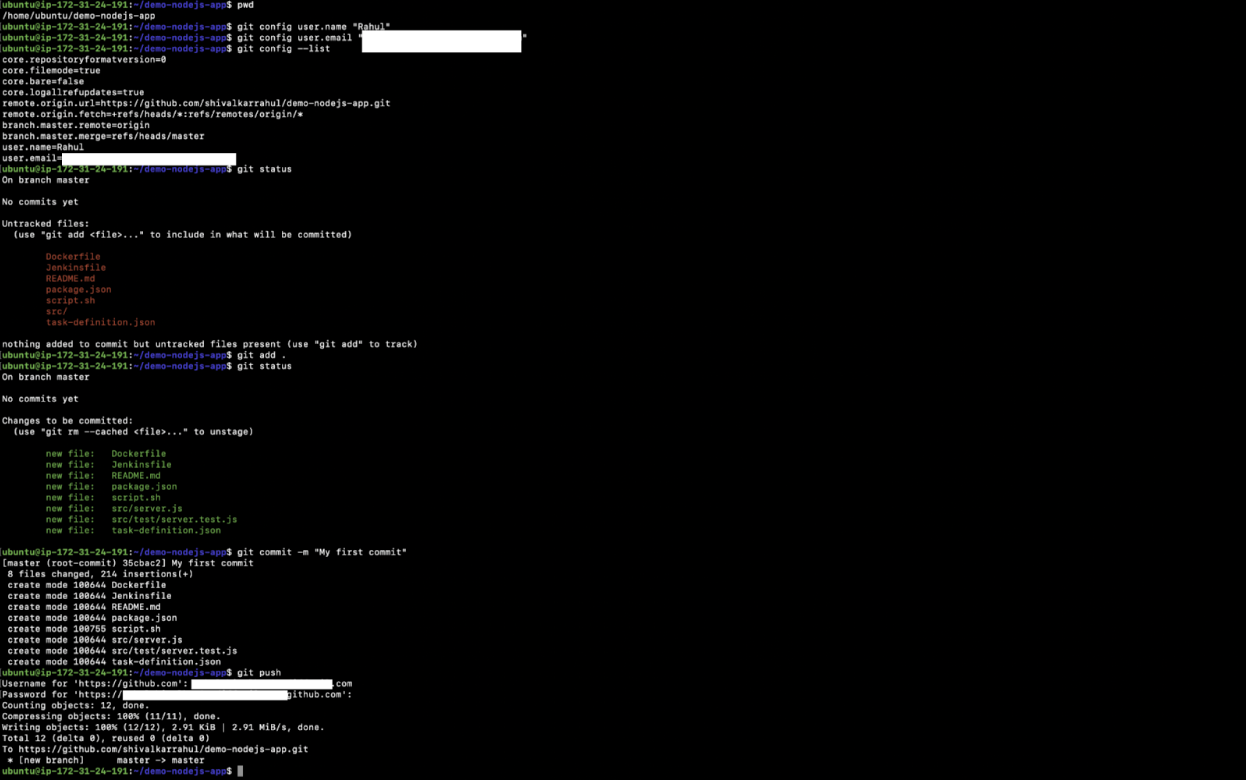
pwd - Set a username in your git dedicate message.
git config consumer.call “Rahul” - Set an e-mail in your git dedicate message.
git config consumer.e-mail “<>” - Test the username and e-mail you place.
git config –checklist - Test the standing, see recordsdata which have been modified or added in your git repository.
git standing - Upload recordsdata to the git staging space.
git upload - Test the standing, see recordsdata which have been added to the git staging space.
git standing - Dedicate your recordsdata with a dedicate message.
git dedicate -m “My first dedicate” - Push the dedicate in your far flung git repository.
git push
Setup the AWS Infrastructure
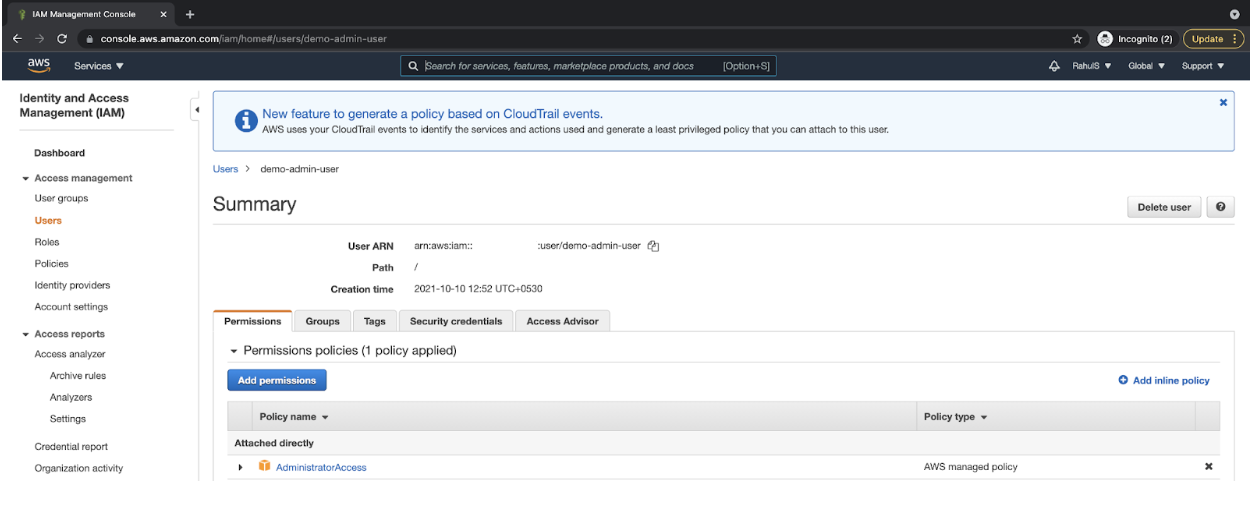
Create an IAM Consumer With Programmatic Get admission to
- Create an IAM consumer with programmatic get entry to to your AWS account and be aware down the get entry to key and secret key to your textual content document for long term reference. Supply administrator permissions to the consumer. We don’t want admin get entry to; alternatively, to keep away from permission problems and for the sake of the demo, let’s continue with administrator get entry to.
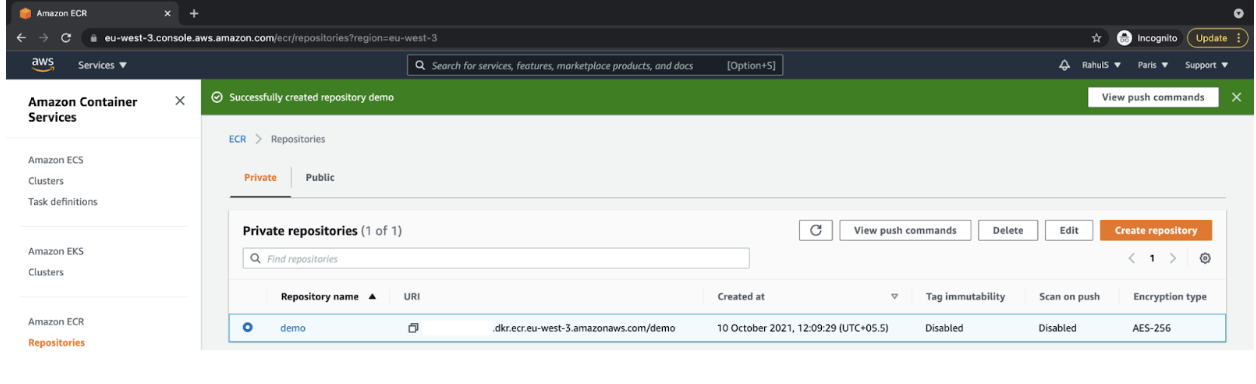
Create an ECR Repository
- Create an ECR Repository to your AWS account and be aware its URL to your textual content document for long term reference.
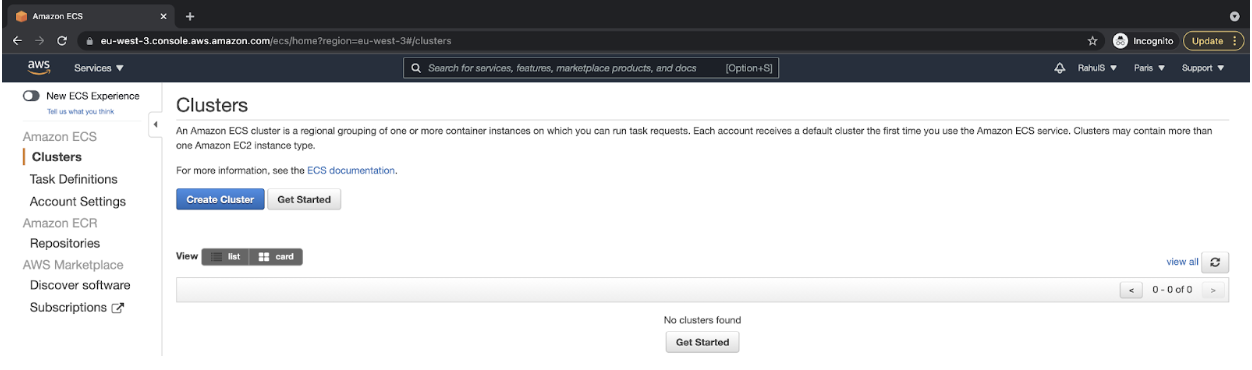
Create an ECS Cluster
- Move to ECS Console and click on on “Get Began” to create a cluster.
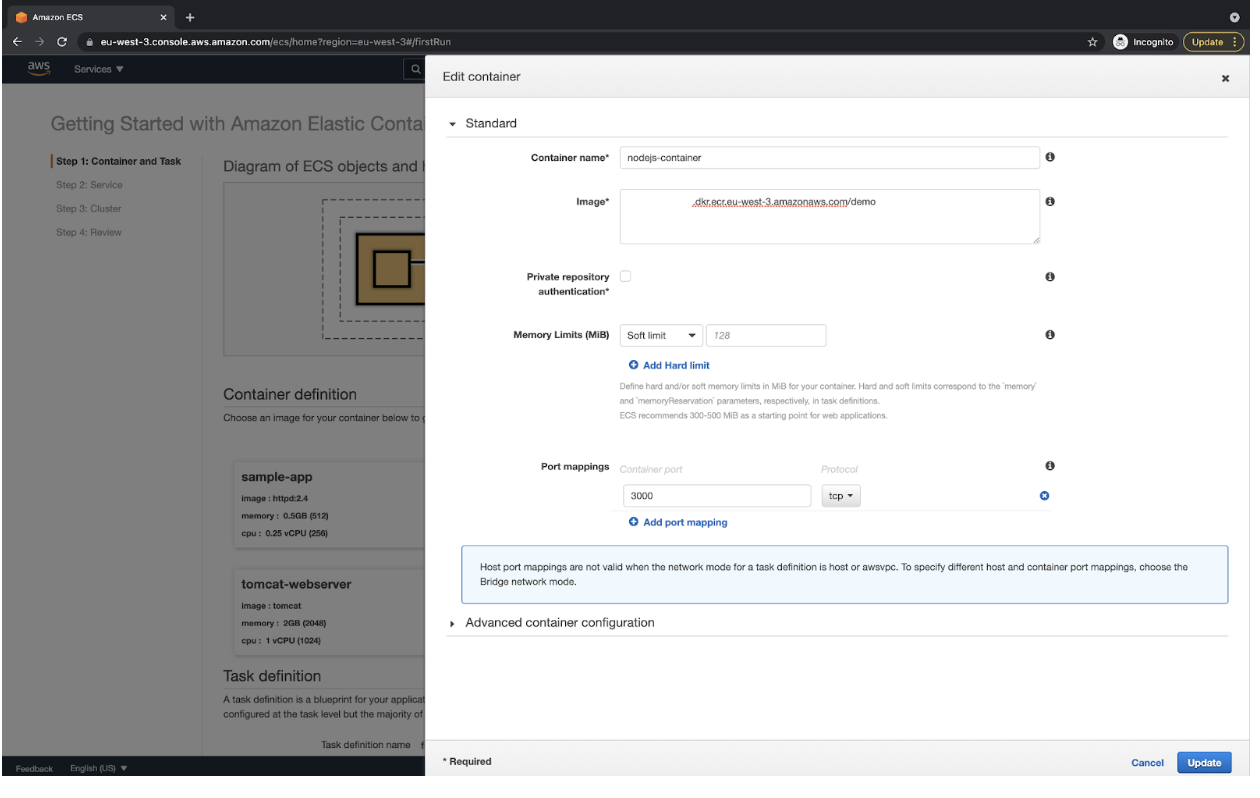
- Click on at the “Configure” button to be had within the “customized” possibility beneath “Container definition.”
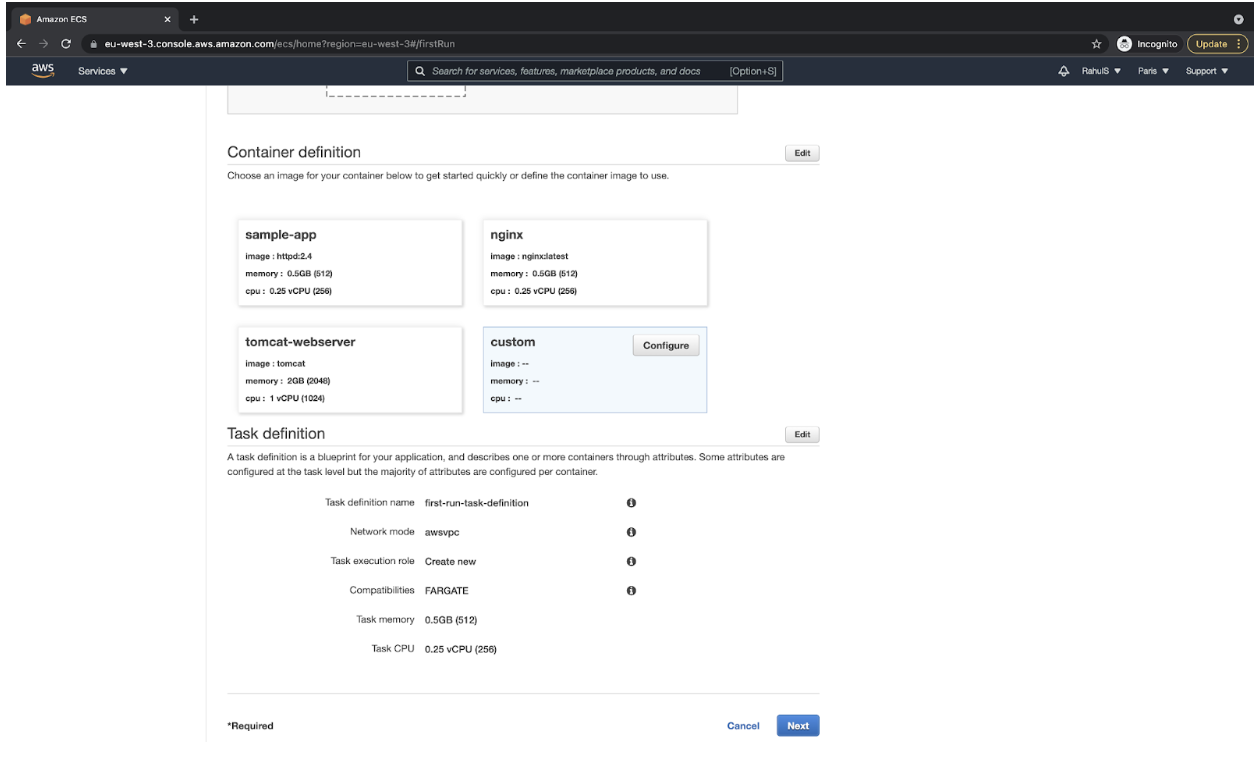
- Specify a reputation to the container as “nodejs-container,” the ECR Repository URL within the “Symbol” textual content field, and “3000” port within the Port mappings segment, after which click on at the “Replace” button. You’ll be able to specify any call of your selection for the container.
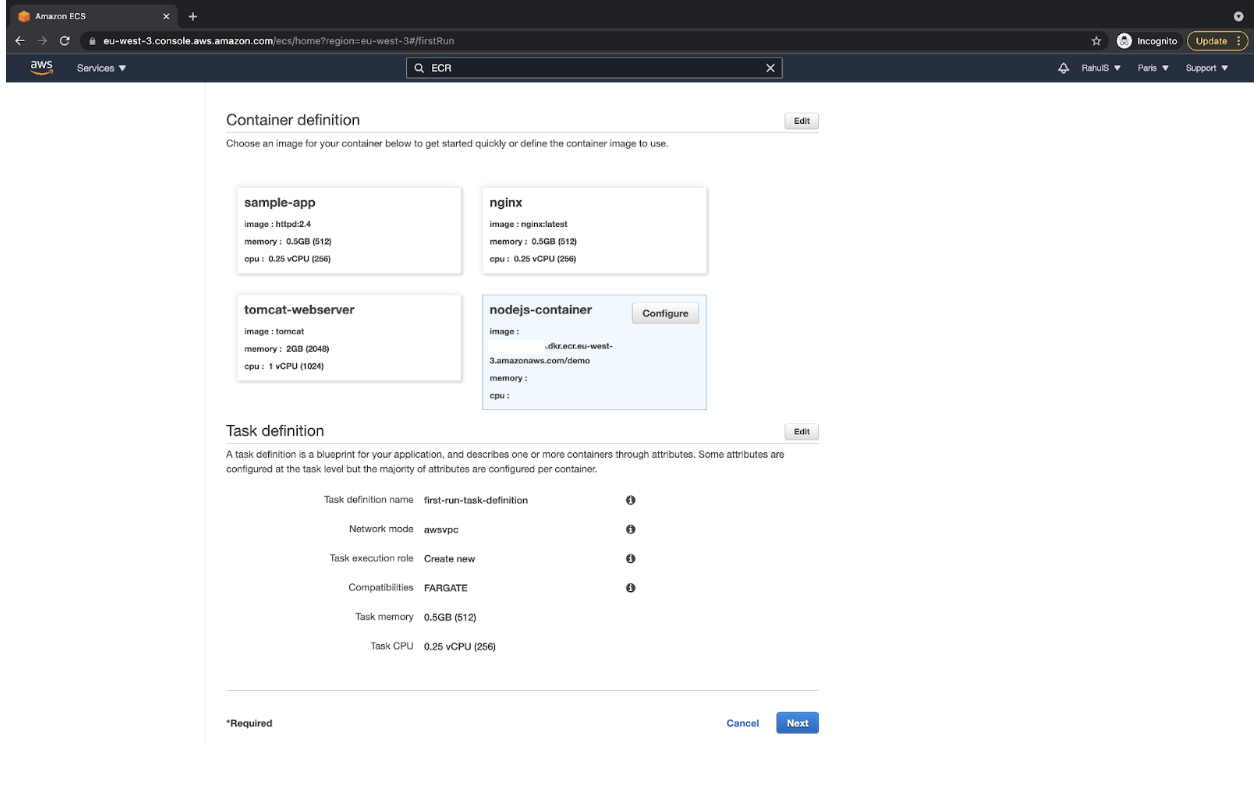
- You’ll be able to now see the main points you specified beneath “Container definition.” Click on at the “Subsequent” button to continue.
- Make a choice “Utility Load Balancer” beneath “Outline your carrier” after which click on at the “Subsequent” button.

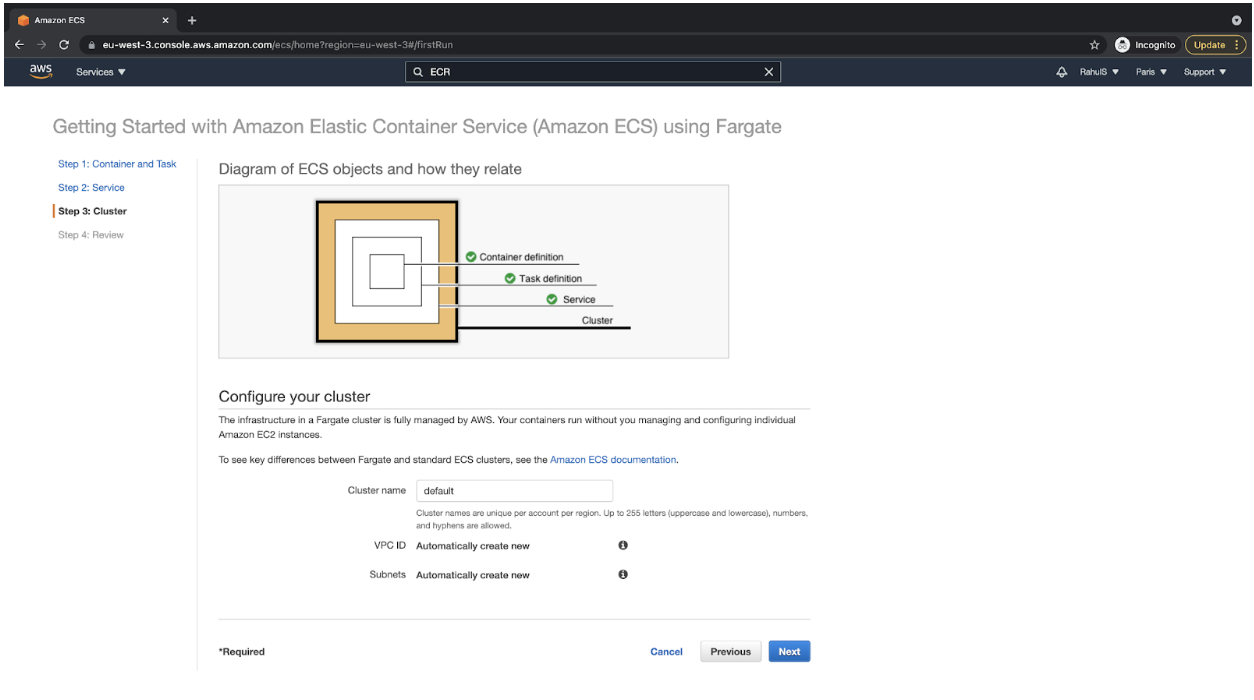
- Stay the cluster call as “default” and continue by way of clicking at the “Subsequent” button. You’ll be able to alternate the cluster call if you need.
- Evaluation the configuration, and it must glance as follows. If the configurations fit, then click on at the “Create” button. This will likely begin the ECS Cluster introduction.

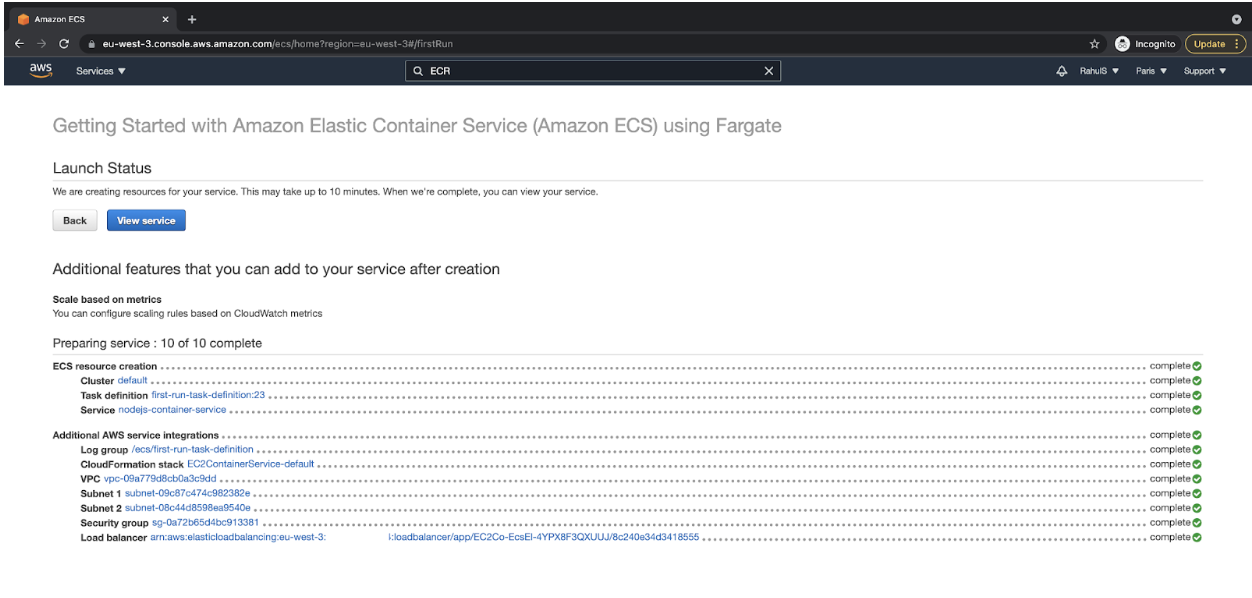
- After a couple of mins, you’ll have your ECS cluster created, and the Release Standing must be one thing as follows.
 Create an EC2 Example for Putting in place the Jenkins Server
- Create an EC2 Example with Ubuntu 18.04 AMI and open Port 22 in your IP and Port 8080 for 0.0.0.0/0 in its Safety Workforce. Port 22 shall be required for ssh and 8080 for getting access to the Jenkins Server. Port 8080 is the place GitHub Webhook will check out to connect with on Jenkins Server therefore we want to permit it for 0.0.0.0/0
Setup Jenkins at the EC2 Example
After the example is to be had, let’s set up Jenkins Server on it together with the entire dependencies.
Must haves of the EC2 Example
- Test if the OS is Ubuntu 18.04 LTS
cat /and so forth/factor - Test the RAM, minimal of two GB is what we require.
unfastened -m - The Consumer that you simply use to log in to the server must have sudo privileges. “ubuntu” is the consumer to be had with sudo privileges for EC2 cases created the use of “Ubuntu 18.04 LTS” AMI.
whoami - Test your provide running listing, it’ll be your house listing.
pwd

Set up Java, JSON Processor jq, Node.js/NPM, and aws-cli at the EC2 Example
- Replace your machine by way of downloading package deal knowledge from all configured assets.
sudo apt replace - Seek and Set up Java 11
sudo apt seek openjdk
sudo apt set up openjdk-11-jdk - Set up jq command, the JSON processor.
sudo apt set up jq - Set up Nodejs 12 and NPM
curl -sL https://deb.nodesource.com/setup_12.x | sudo -E bash –
sudo apt set up nodejs - Set up aws cli software.
sudo apt set up awscli - Test the Java model.
java –model - Test the jq model.
jq –model - Test the Nodejs model
node –model - Test the NPM model
npm –model - Test the aws cli model
aws –model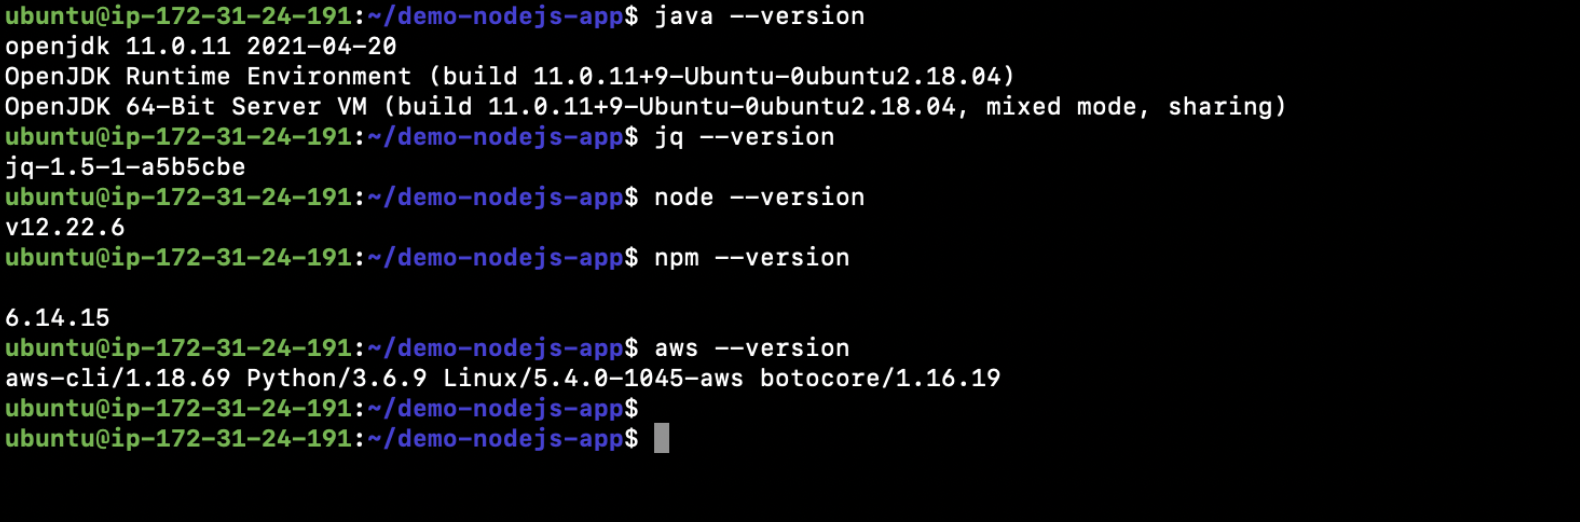
Notice: Make sure that your whole variations fit the variations noticed within the above symbol.
Set up Jenkins at the EC2 Example
- Jenkins will also be put in from the Debian repository
wget -q -O – http://pkg.jenkins-ci.org/debian/jenkins-ci.org.key | sudo apt-key upload -sudo sh -c ‘echo deb http://pkg.jenkins-ci.org/debian binary/ > /and so forth/apt/assets.checklist.d/jenkins.checklist’ - Replace the apt package deal index
sudo apt-get replace - Set up Jenkins at the system
sudo apt-get set up jenkins - Test the carrier standing whether it is operating or now not.
carrier jenkins standing - You’ll have your Jenkins up and operating now. Chances are you’ll check with the legitimate documentation right here for those who face any problems with the set up.

Set up Docker at the EC2 Example
- Set up applications to permit apt to make use of a repository over HTTPS:
sudo apt-get set up apt-transport-https ca-certificates curl gnupg lsb-release - Upload Docker’s legitimate GPG key:
curl -fsSL https://obtain.docker.com/linux/ubuntu/gpg | sudo gpg –dearmor -o /usr/proportion/keyrings/docker-archive-keyring.gpg - Arrange the solid repository
echo “deb [arch=amd64 signed-by=/usr/share/keyrings/docker-archive-keyring.gpg] https://obtain.docker.com/linux/ubuntu $(lsb_release -cs) solid” | sudo tee /and so forth/apt/assets.checklist.d/docker.checklist > /dev/null - Replace the apt package deal index
sudo apt-get replace - Set up the newest model of Docker Engine and containerd,
sudo apt-get set up docker-ce docker-ce-cli containerd.io - Test the docker model.
docker –model - Create a “docker” workforce, this will go out.
sudo groupadd docker - Upload “ubuntu” consumer to the “docker” workforce
sudo usermod -aG docker ubuntu - Upload “jenkins” consumer to the “docker” workforce
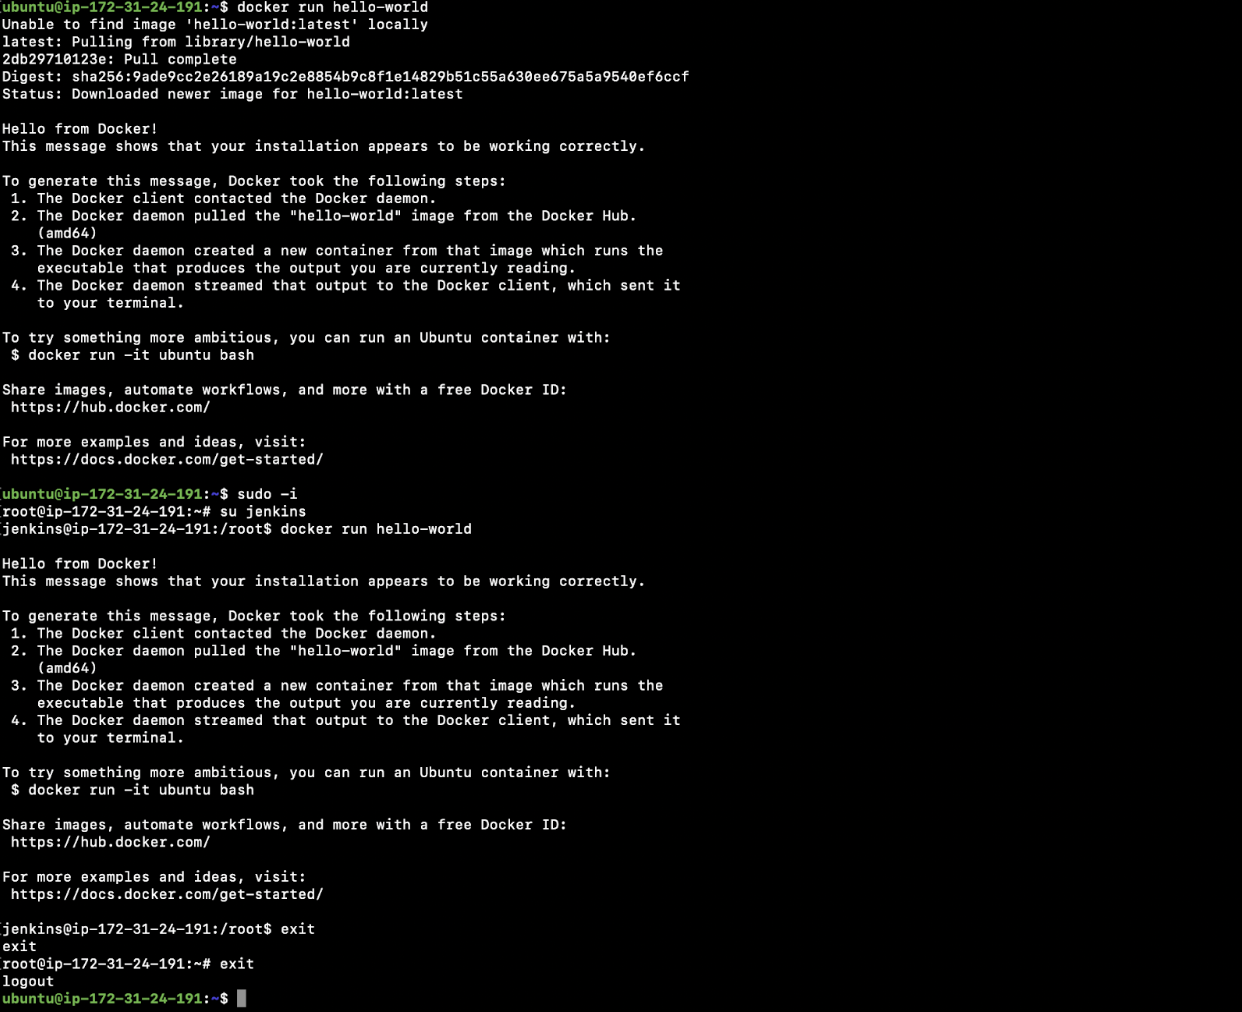
sudo usermod -aG docker jenkins - Take a look at if you’ll create docker items the use of “ubuntu” consumer.
docker run hello-world - Transfer to “root” consumer
sudo -i - Transfer to “jenkins” consumer
su jenkins - Take a look at if you’ll create docker items the use of “jenkins” consumer.
docker run hello-world - Go out from “jenkins” consumer
go out - Go out from “root” consumer
go out - Now you must be again in “ubuntu” consumer. Chances are you’ll check with the legitimate documentation right here for those who face any problems with the set up.
Configure the Jenkins Server
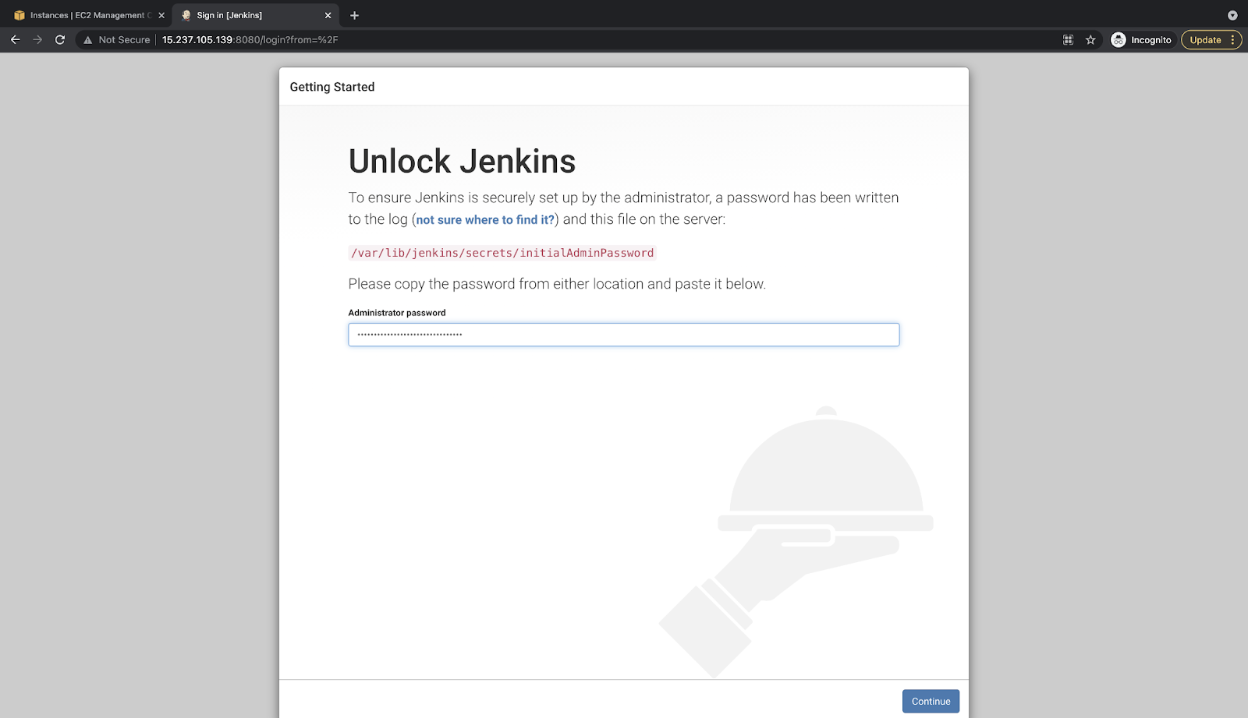
- After Jenkins has been put in, step one is to extract its password.
sudo cat /var/lib/jenkins/secrets and techniques/initialAdminPassword
- Hit the URL within the browser
Jenkins URL: http://<public-ip-of-the-ec2-instace>:8080
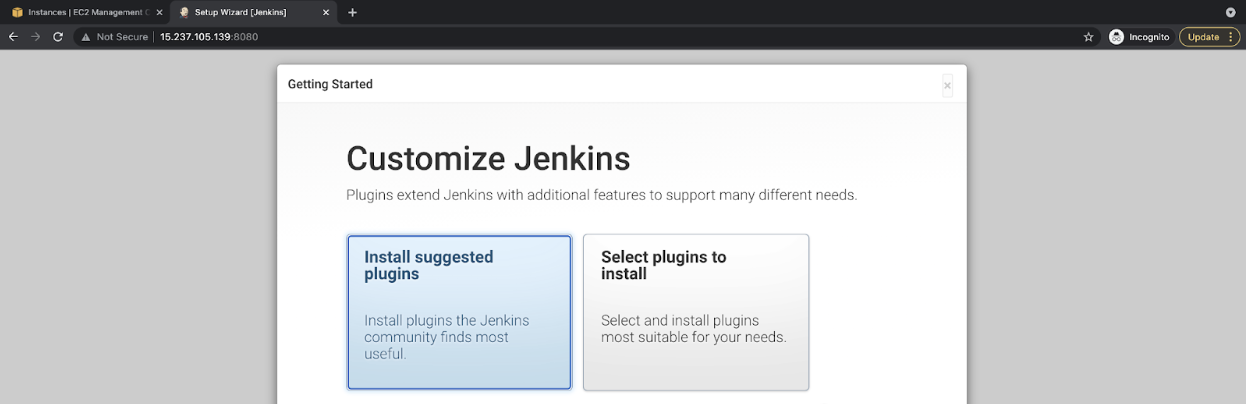
- Make a choice the “Set up prompt plugins” possibility
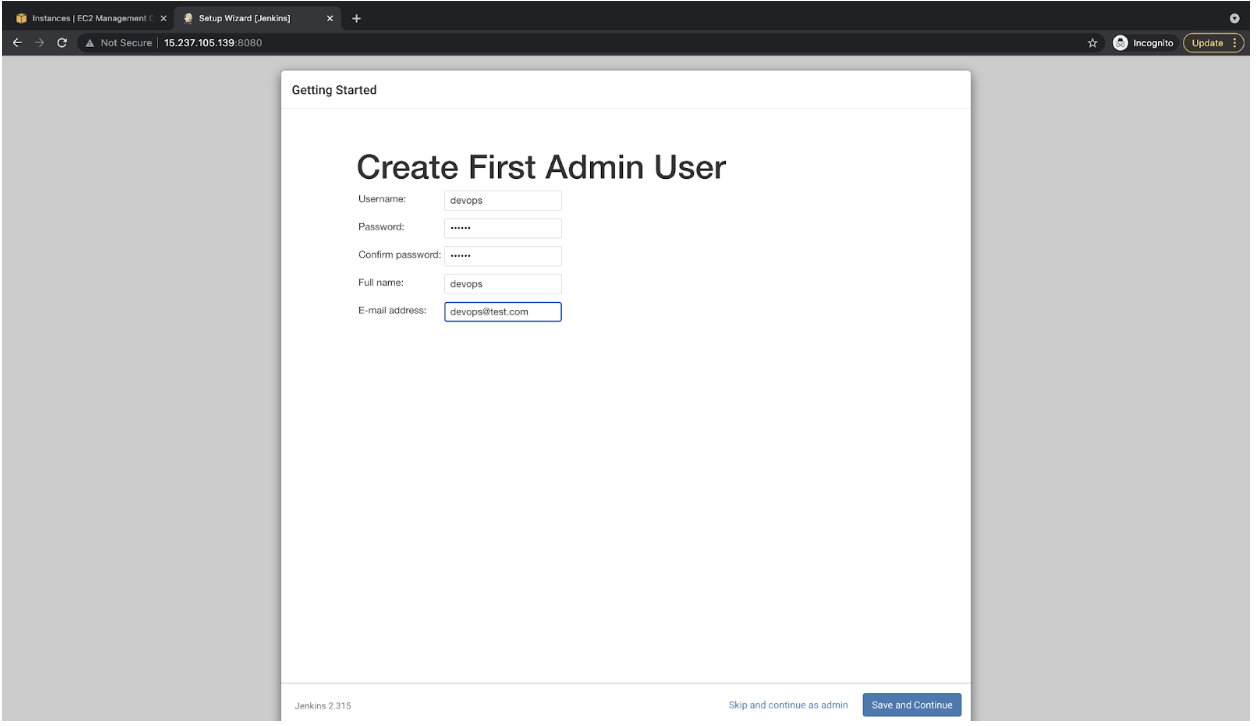
- Specify the user-name, and password for the brand new admin consumer to be created. You’ll be able to use this consumer as an admin consumer.
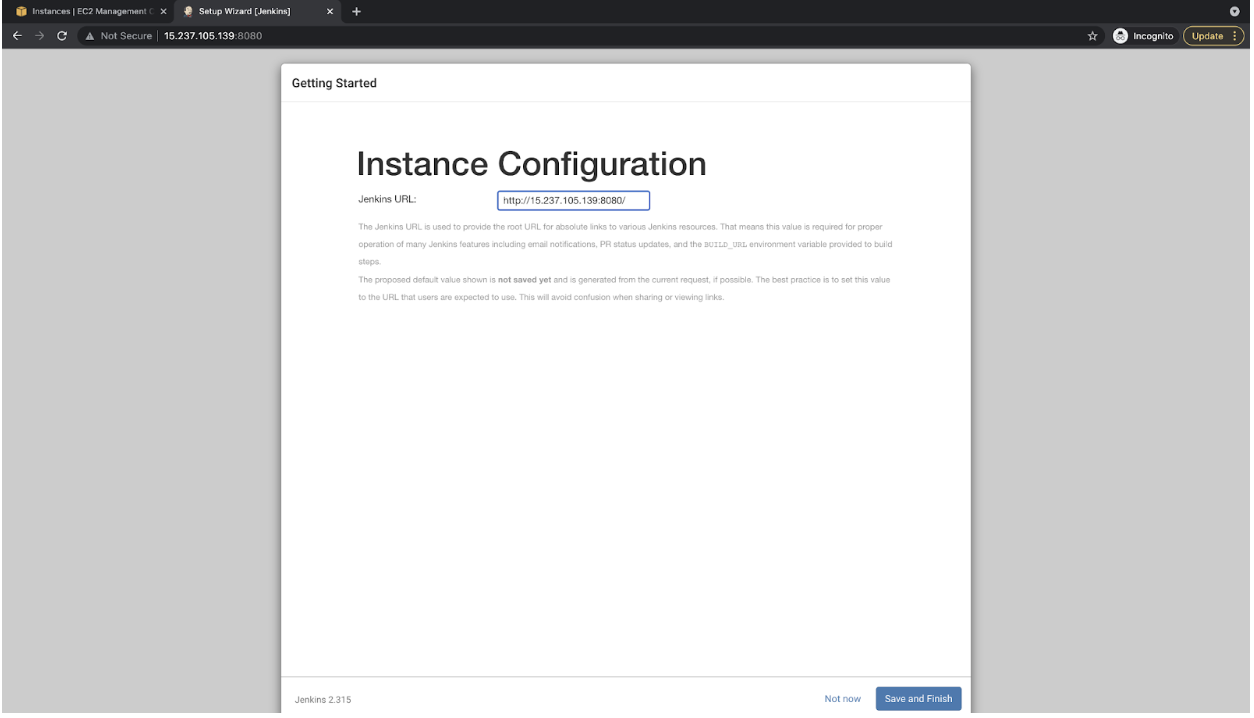
- This URL box shall be auto-filled. Click on at the “Save and End” button to continue.
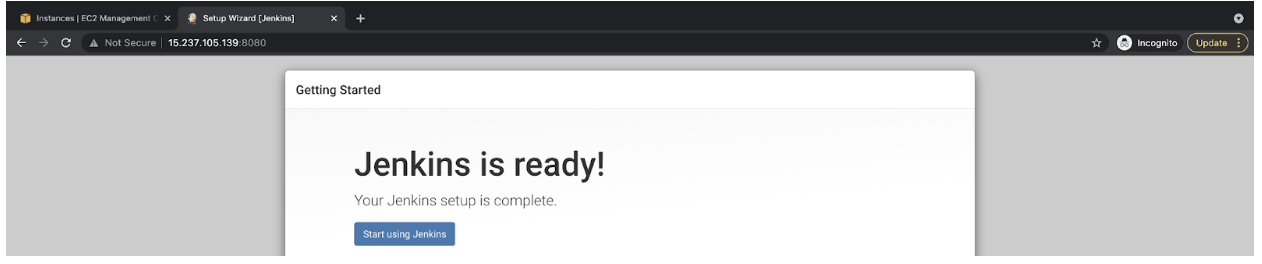
- Your Jenkins Server is in a position now.
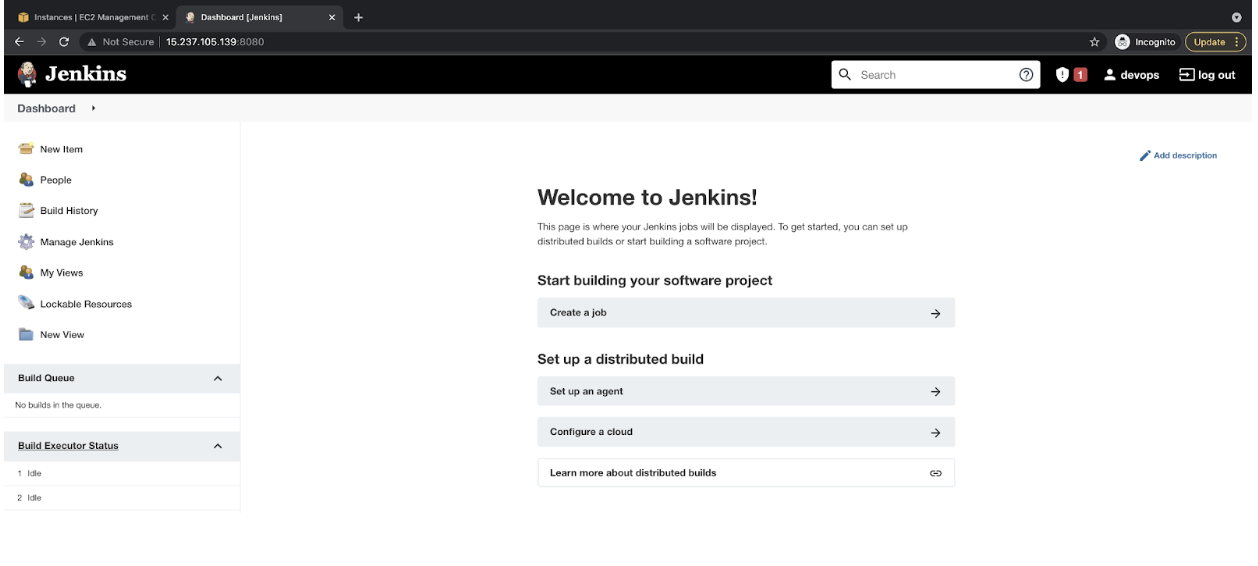
- Here’s what its Dashboard seems like.
 Set up Plugins
- Let’s set up the entire plugins that we will be able to want. Click on on “Set up Jenkins” within the left panel.
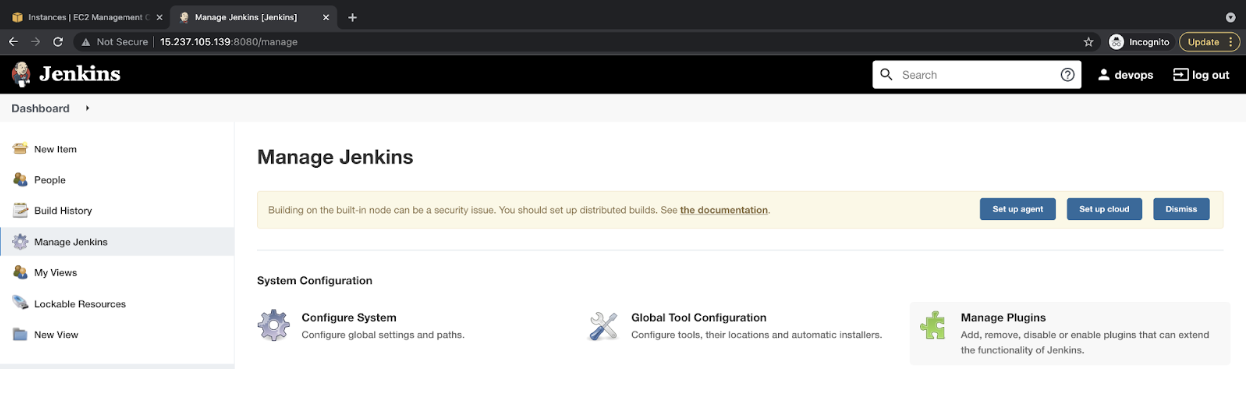
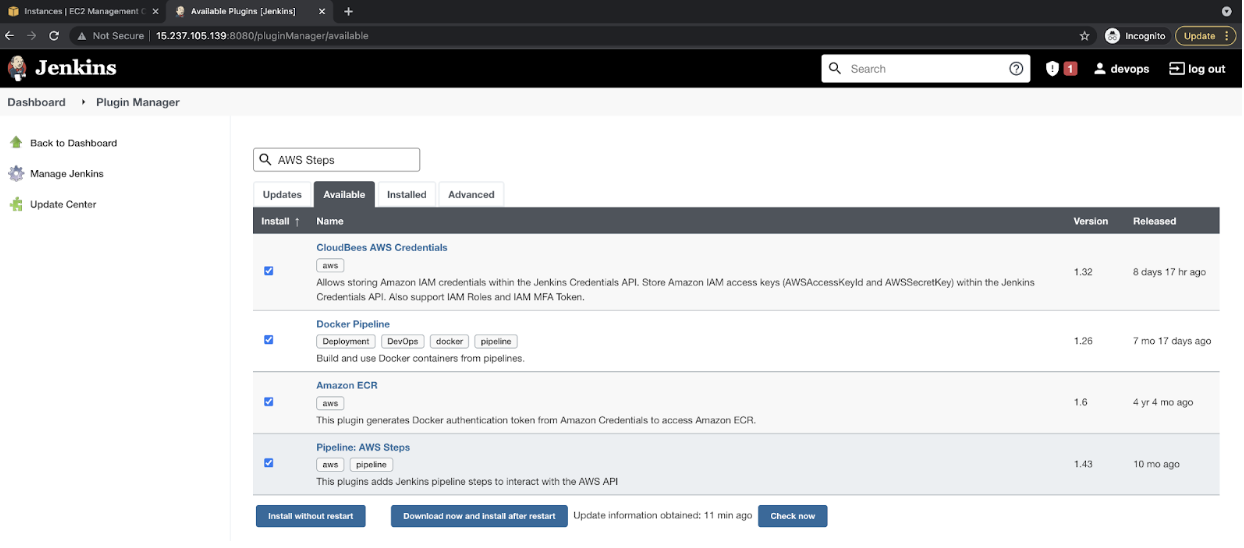
- Here’s a checklist of plugins that we want to set up
- CloudBees AWS Credentials:
Permits storing Amazon IAM credentials keys inside the Jenkins Credentials API. - Docker Pipeline:
This plugin lets in development, trying out, and the use of Docker pictures from Jenkins Pipeline. - Amazon ECR:
This plugin supplies integration with AWS Elastic Container Registry (ECR)
Utilization: - AWS Steps:
This plugin provides Jenkins pipeline steps to have interaction with the AWS API.
- CloudBees AWS Credentials:
-
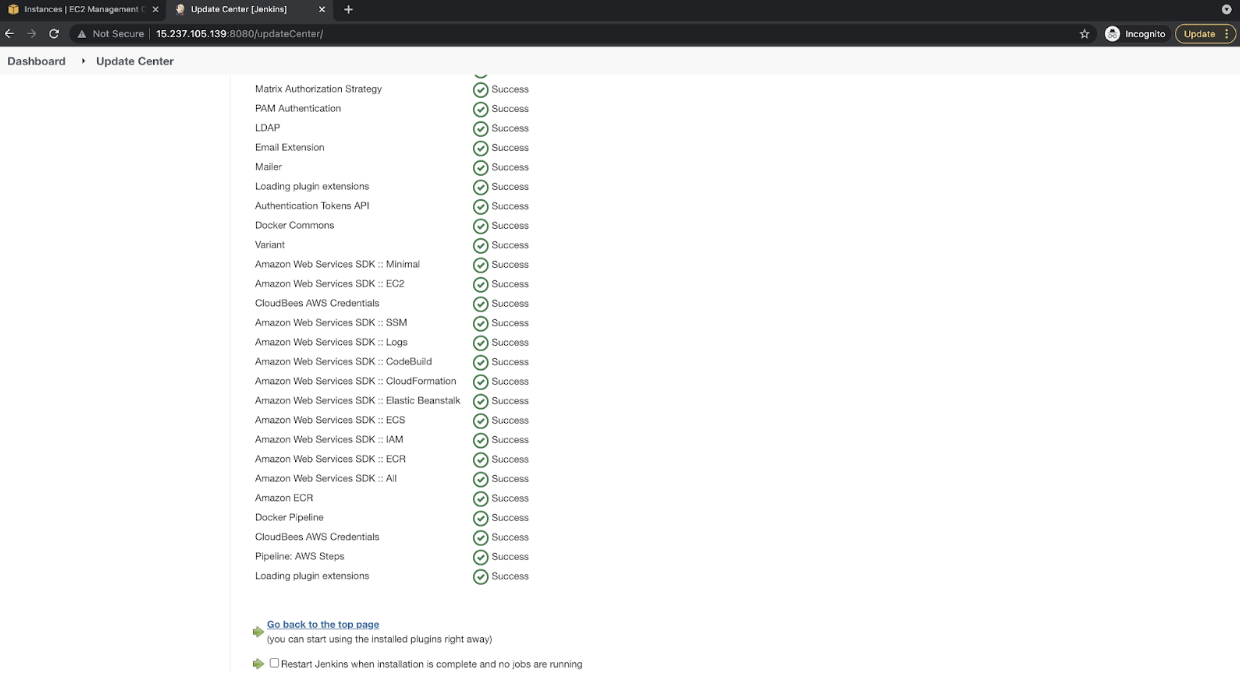
Within the “To be had” tab, seek some of these plugins and click on on “Set up with out restart.”
-
You are going to see the display screen as follows after the plugins were put in effectively.
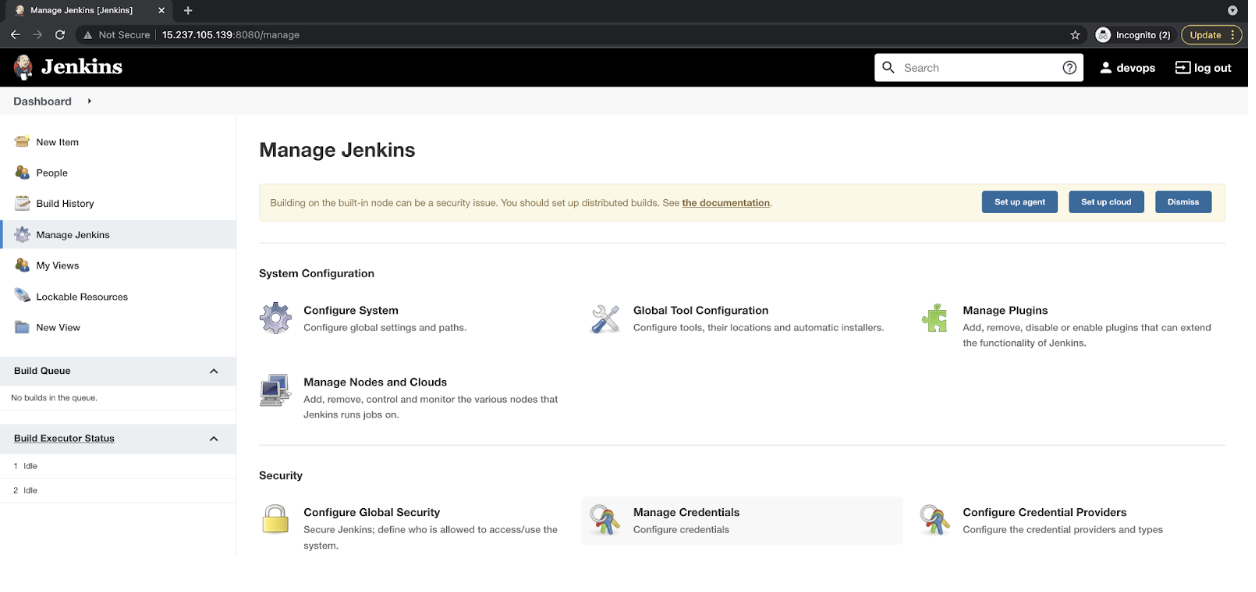
Create Credentials in Jenkins
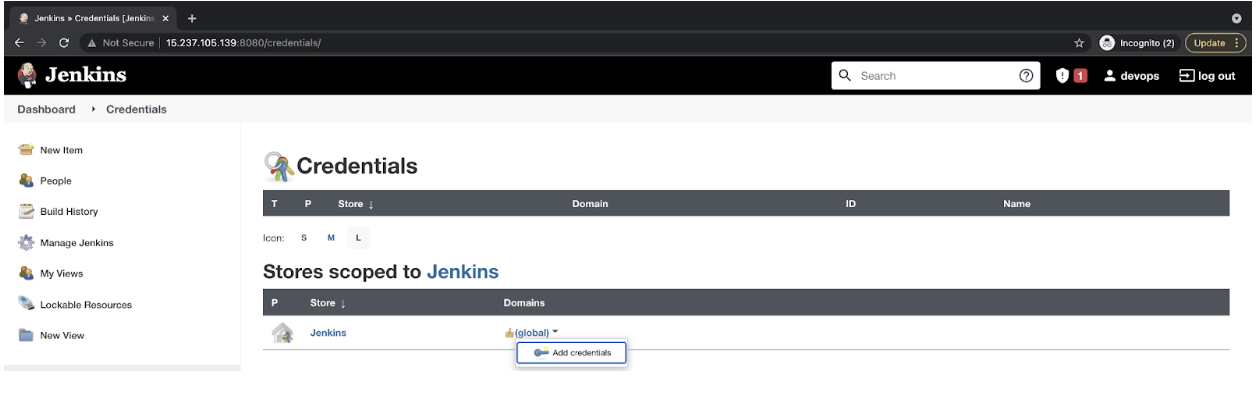
- CloudBees AWS Credentials plugin will come to the rescue right here. Move to “Set up Jenkins,” after which click on on “Set up Credentials.”
- Click on on “(international)” “Upload credentials”.
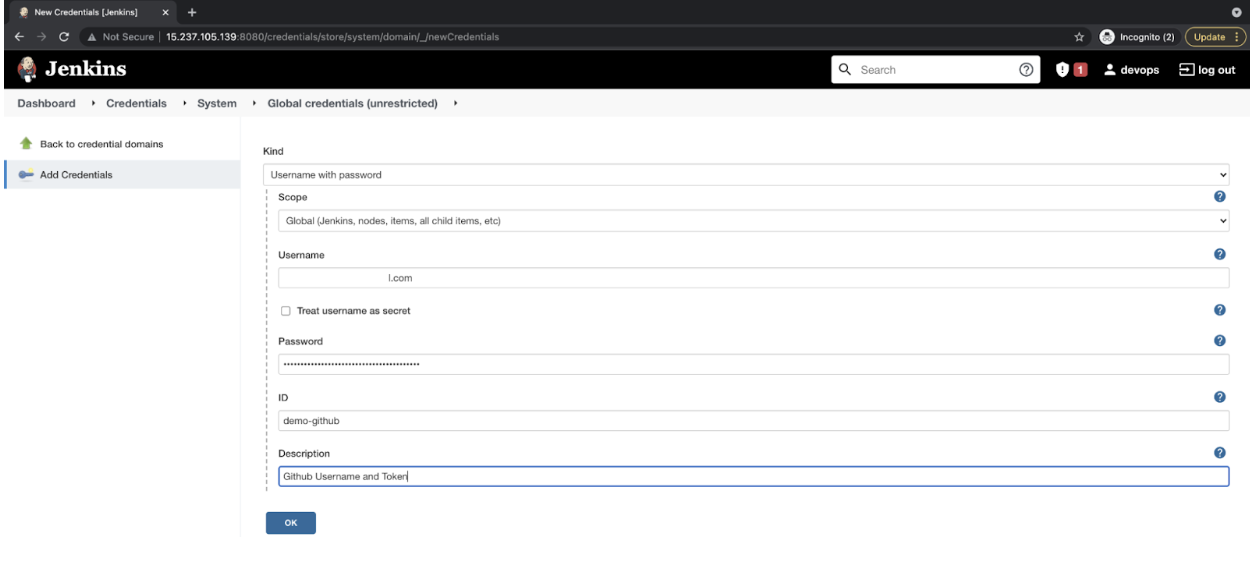
- Make a choice Sort as “AWS Credentials” and supply ID as “demo-admin-user.” This will also be supplied as in keeping with your selection. Stay a be aware of this ID within the textual content document. Specify the Get admission to Key and Secret Key of the IAM consumer we created within the earlier steps. Click on on “OK” to retailer the IAM credentials.

- Practice the similar step, and this time make a selection Sort as “Username with password” to retailer the GitHub Username and Token we created previous. Click on on “Adequate” to retailer the GitHub credentials.
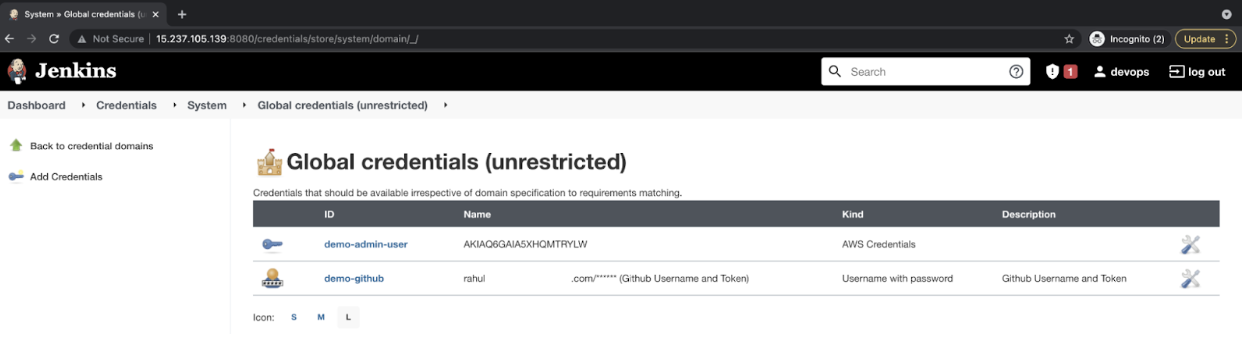
- You must now have IAM and GitHub credentials to your Jenkins.
Create a Jenkins Task
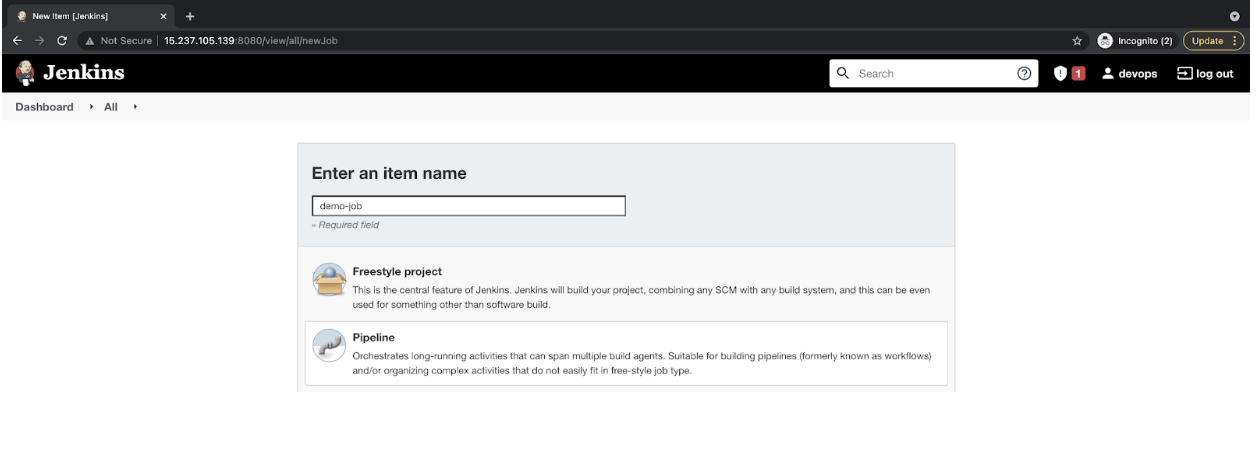
- Move to the principle dashboard and click on on “New Merchandise” to create a Jenkins Pipeline.

- Make a choice the “Pipeline” and call it “demo-job,” or supply a reputation of your selection.
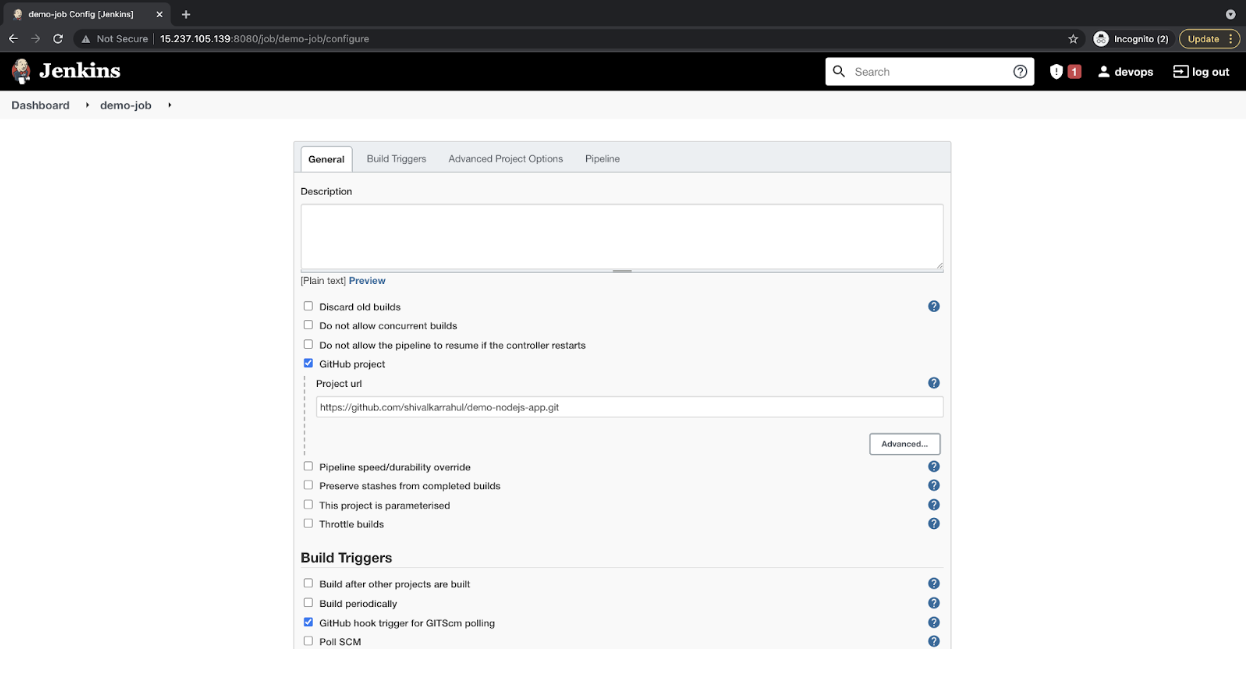
- Tick the “GitHub challenge” checkbox beneath the “Basic” tab, and give you the GitHub Repository URL of the only we created previous. Additionally, tick the checkbox “GitHub hook cause for GitScm polling” beneath the “Construct Cause” tab.
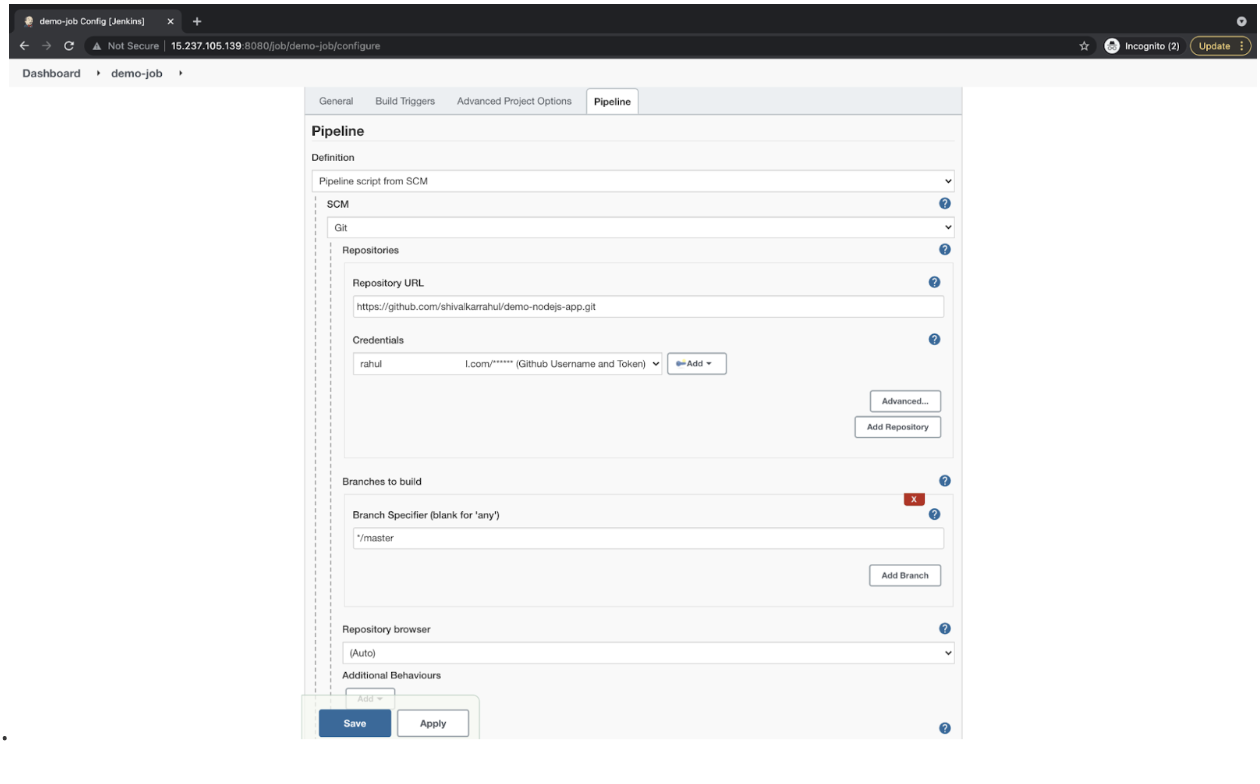
- Below the “Pipeline” tab, make a selection “Pipeline script from the SCM” definition, specify our repository URL, and make a selection the credential we created for Github. Test the department call if it fits the only you’ll be the use of in your commits. Evaluation the configurations and click on on “Save” to avoid wasting your adjustments to the pipeline.
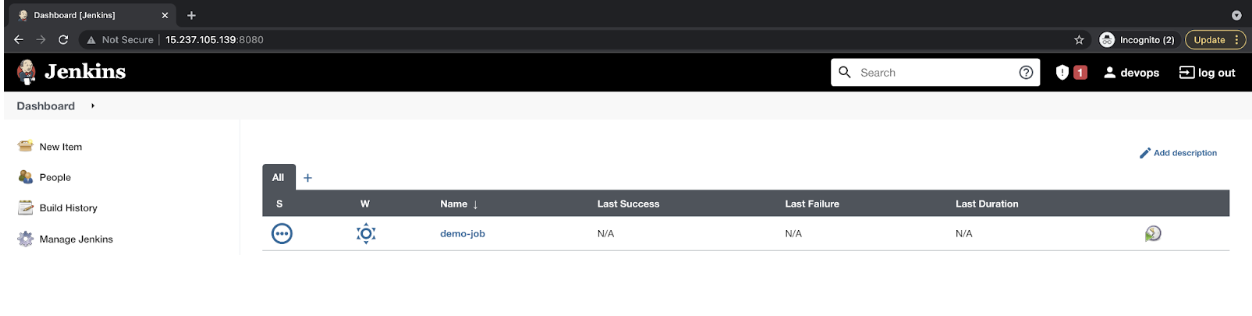
- Now you’ll see the pipeline we simply created.
Combine GitHub and Jenkins
Your next step is to combine Github with Jenkins in order that every time there’s an tournament at the Github Repository, it could actually cause the Jenkins Task.
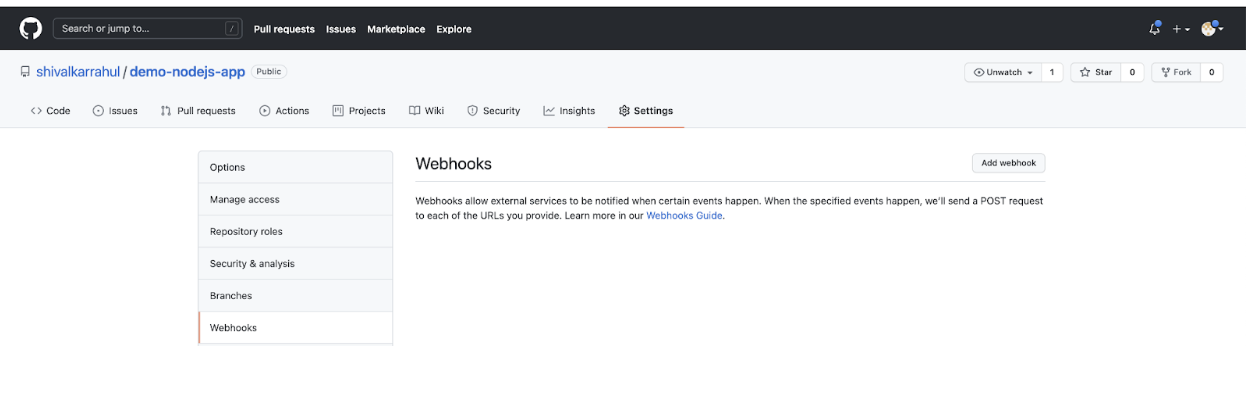
- Move to the settings tab of the repository and click on on “Webhooks” within the left panel. You’ll be able to see the “Upload webhook” button. Click on on it to create a webhook.
- Give you the Jenkins URL with context as “/github-webhook/.” The URL will glance as follows.
Webhook URL: http://<Jenkins-IP>:8080/github-webhook/
You’ll be able to make a selection the occasions of your selection; alternatively, for the sake of simplicity, I’ve selected “Ship me the whole lot.” Make sure that the “Energetic” checkbox is checked. Click on on “Upload webhook” to create a webhook that may cause the Jenkins process every time there’s any roughly tournament within the GitHub Repository.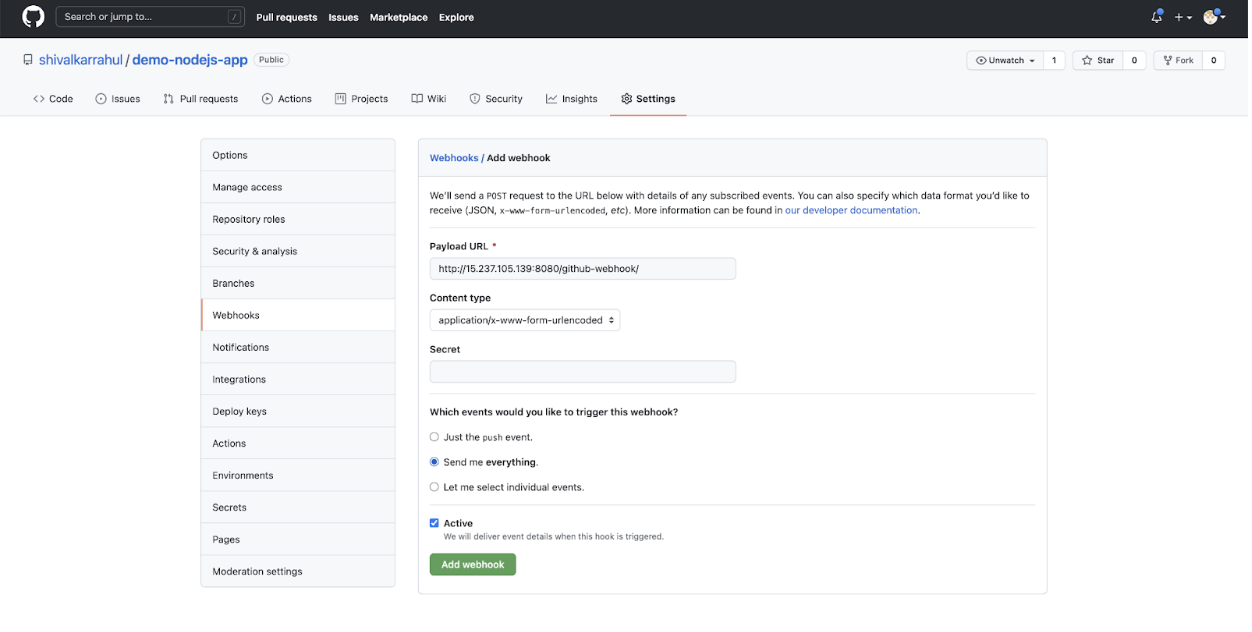
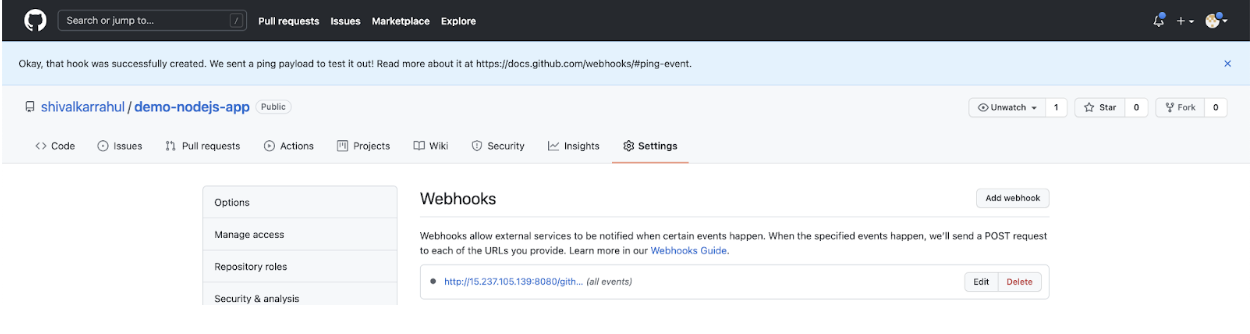
- You must see your webhook. Click on on it to look if it’s been configured as it should be or now not.
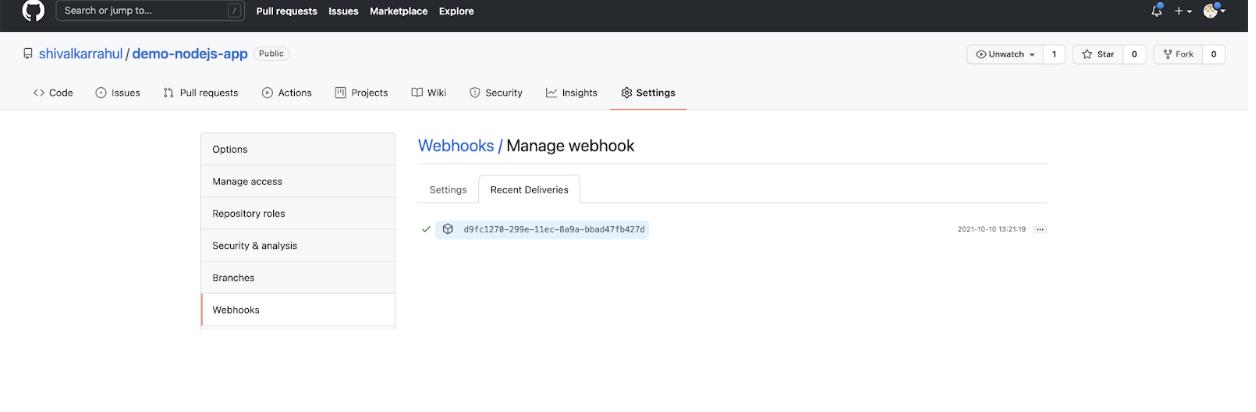
- Click on at the “Contemporary Deliveries” tab, and also you must see a inexperienced tick mark. The fairway tick mark displays that the webhook used to be in a position to connect with the Jenkins Server.
Deploy the Node.js Utility to the ECS Cluster
Prior to we cause the Pipeline from GitHub Webhook, let’s attempt to execute it manually.
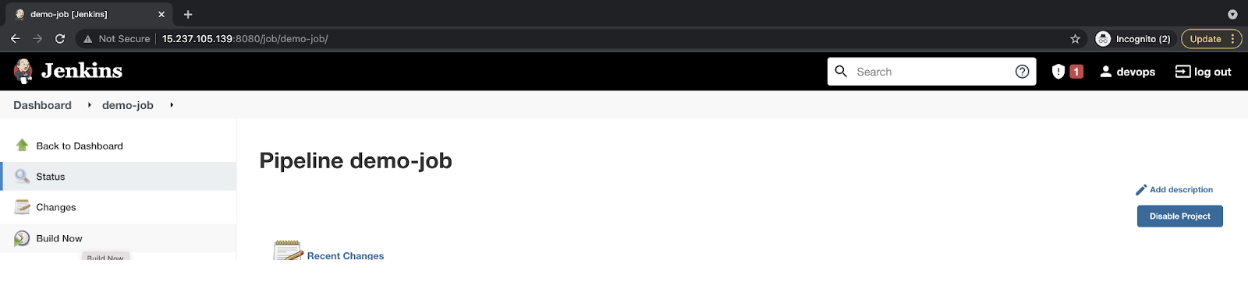
Construct the Task Manually
- Move to the Task we created and Construct it.
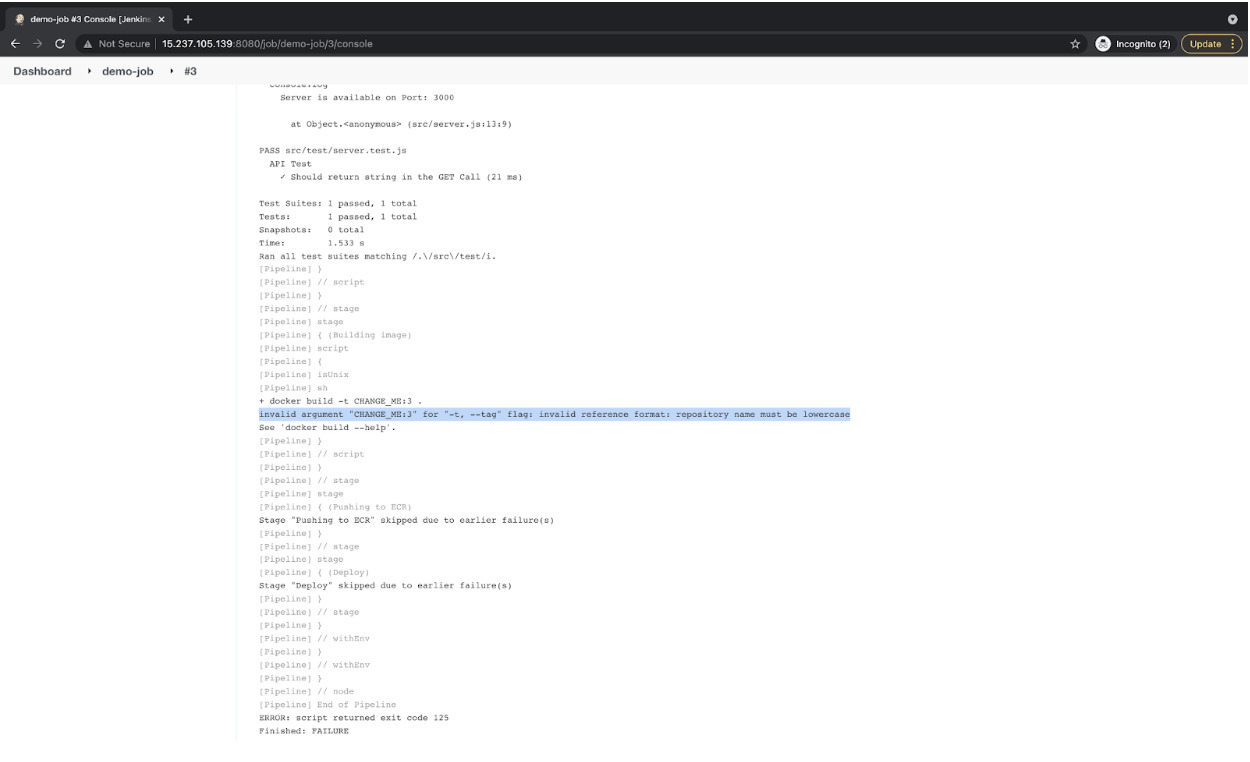
- Should you see its logs, you’ll see that it failed. The reason being now we have now not but assigned values to the variable now we have in our Jenkinsfile.
Push Your 2d Dedicate
Reminder Notice: For the remainder of the object, don’t alternate your listing. Keep in the similar listing, i.e.,/house/ubuntu/demo-nodejs-app, and execute the entire instructions from right here.
Assign values to the variable within the Jenkinsfile
- To conquer the above error, you wish to have to make some adjustments to the Jenkinsfile. We now have variables in that document, and we want to assign values to these variables to deploy our software to the ECS cluster we created. Assign right kind values to the variables having “CHANGE_ME.”
cat Jenkinsfile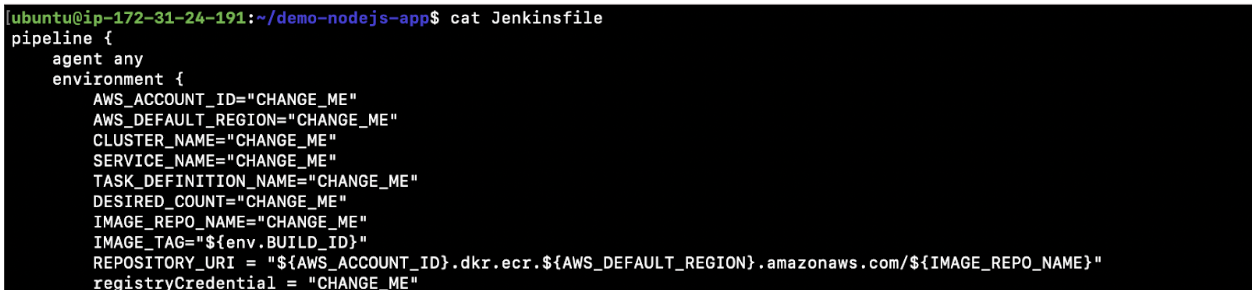
- Here’s the checklist of variables in your comfort.
We now have the next variables within the Jenkinsfile.- AWS_ACCOUNT_ID=”CHANGE_ME”
Assign your AWS Account Quantity right here. - AWS_DEFAULT_REGION=”CHANGE_ME”
Assign the area you created your ECS Cluster in - CLUSTER_NAME=”CHANGE_ME”
Assign the call of the ECS Cluster that you simply created. - SERVICE_NAME=”CHANGE_ME”
Assign the Provider call that were given created within the ECS Cluster. - TASK_DEFINITION_NAME=”CHANGE_ME”
Assign the Process call that were given created within the ECS Cluster. - DESIRED_COUNT=”CHANGE_ME”
Assing the selection of duties you need to be created within the ECS Cluster. - IMAGE_REPO_NAME=”CHANGE_ME”
Assign the ECR Repositoy URL - IMAGE_TAG=”${env.BUILD_ID}”
Don’t alternate this. - REPOSITORY_URI = “${AWS_ACCOUNT_ID}.dkr.ecr.${AWS_DEFAULT_REGION}.amazonaws.com/${IMAGE_REPO_NAME}”
Don’t alternate this. - registryCredential = “CHANGE_ME”
Assign the call of the credentials you created in Jenkins to retailer the AWS Get admission to Key and Secret Key
- AWS_ACCOUNT_ID=”CHANGE_ME”
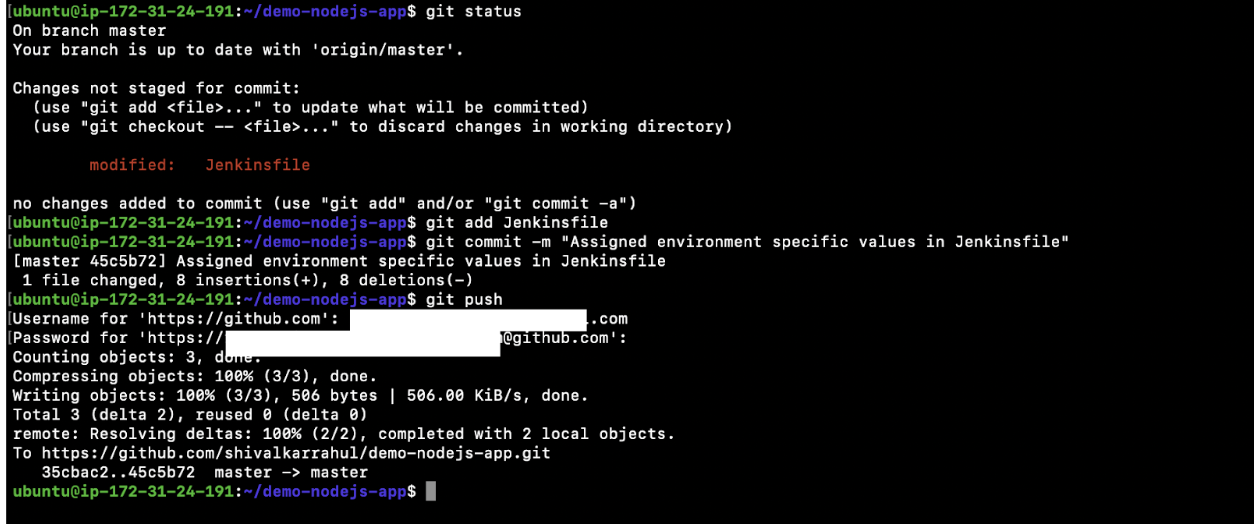
- Test the standing to verify that the document has been modified.
git standing
cat Jenkinsfile

- Upload a document to the git staging space, dedicate it, after which push it to the far flung Github Repository.
git standing
git upload Jenkinsfile
git dedicate -m “Assigned surroundings particular values in Jenkinsfile”
git push
Error on Jenkins Server
After pushing the dedicate, the Jenkins Pipeline gets brought on. Alternatively, you’ll see an error “Were given permission denied whilst making an attempt to connect with the Docker daemon socket at unix:///var/run/docker.sock” to your Jenkins Task. The cause of this can be a “Jenkins” consumer this is utilized by the Jenkins Task isn’t allowed to create docker items. To present permission to a “Jenkins” consumer, we added it to the “docker” workforce within the earlier step; alternatively, we didn’t restart the Jenkins carrier after that.
I stored this intentionally in order that I may just display you the want to upload the “Jenkins” consumer to the “docker” workforce to your EC2 Example.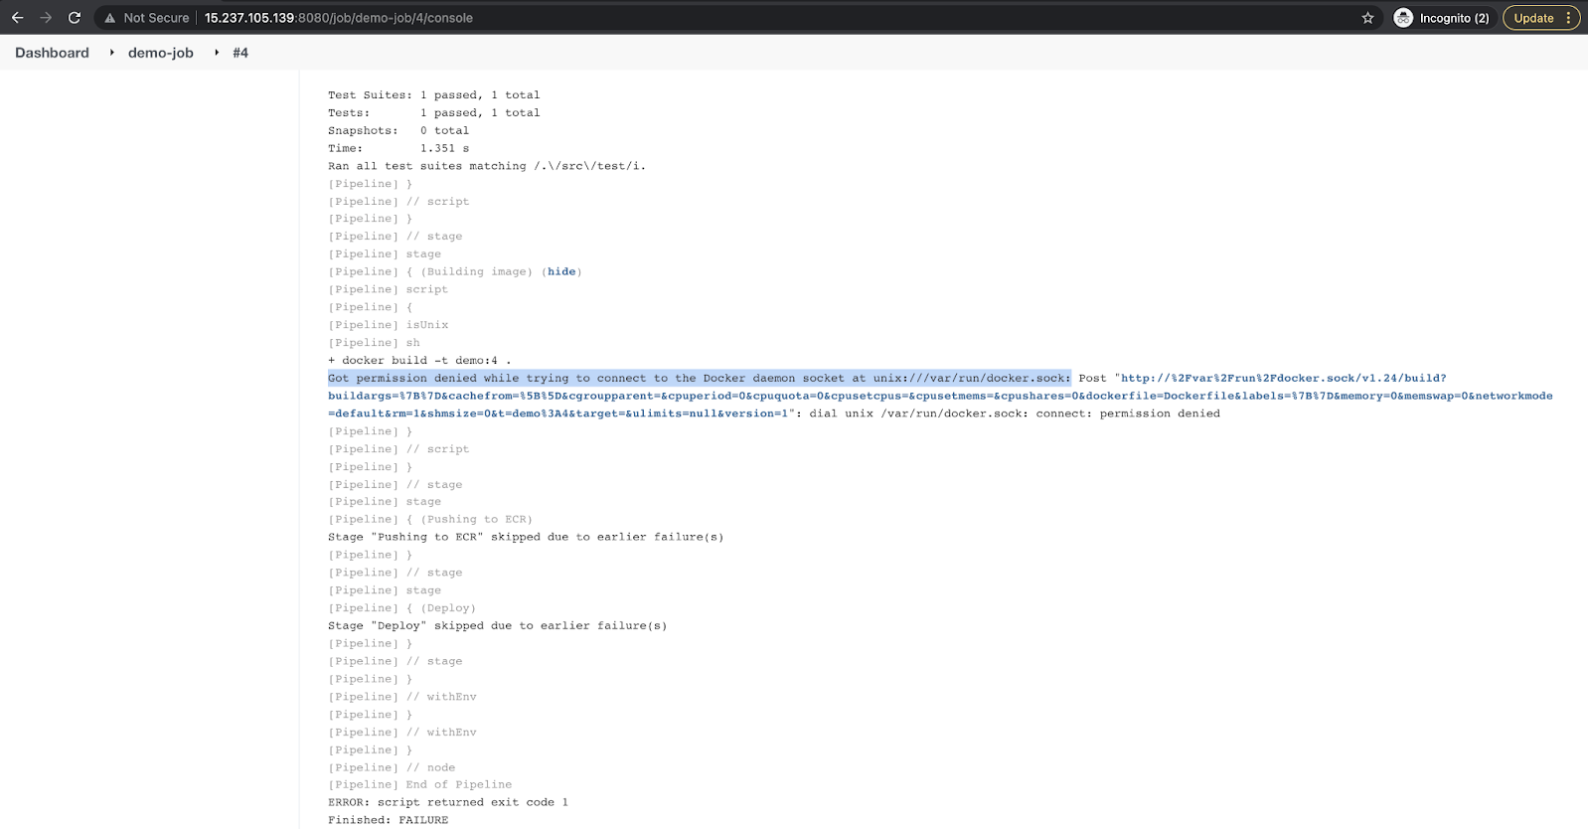
Now you already know what must be carried out to conquer the above error.
- Restart the Jenkins carrier.
sudo carrier jenkins restart - Test if the Jenkins carrier has began or now not.
sudo carrier jenkins standing
Push Your 3rd Dedicate
- Make some adjustments in README.md to dedicate, push, and take a look at if the Pipeline will get brought on mechanically or now not.
vim README.md
- Upload, dedicate, and push the document.
git standing
git diff README.md
git upload README.md
git dedicate -m “Changed README.md to cause the Jenkins process after restarting the Jenkins carrier”
git push - This time, you’ll apply that the process will have to were brought on mechanically. Move to the Jenkins process and examine the similar.
- That is what the Level View seems like. It displays us the levels that we’ve got laid out in our Jenkinsfile.
Test the Standing of the Process within the ECS Cluster
- Move to the Cluster, click on at the “Duties” tab, after which open the operating “Process.”
- Click on at the “JSON” tab and examine the picture. The picture tag must fit the Jenkins Construct quantity. On this case, it’s “6,” and it fits my Jenkins Task Construct quantity.
- Hit the ELB URL to test if the Nodejs software is to be had or now not. You must get the message as follows within the browser after hitting the ELB URL.
Push Your Fourth Dedicate
- Open the “src/server.js” document and make some adjustments within the show message to check the CI CD Pipeline once more.
vim src/server.js - Test the recordsdata which have been modified. On this case, just one document will also be noticed as modified.
git standing - Test the adaptation that your alternate has brought about within the document.
git diff src/server.js - Upload the document that you simply modified to the git staging space.
git upload src/server.js - Test the standing of the native repository.
git standing - Upload a message to the dedicate.
git dedicate -m “Up to date welcome message” - Push your alternate to the far flung repository.
git push - Move to the Process. This time, you’ll see two duties operating. One with the older revision and one with the more moderen revision. You spot two duties as a result of the rolling-update deployment technique configured by way of default within the cluster.
- Look forward to round 2-3 mins, and also you must simplest have one process operating with the newest revision.
- Once more, hit the ELB URL, and also you must see your adjustments. On this case, we had modified the show message.
Congratulations! You may have a running Jenkins CI CD Pipeline to deploy your Nodejs containerized software on AWS ECS every time there’s a alternate to your supply code.
Cleanup the Sources We Created
Should you have been simply seeking to arrange a CI/CD pipeline to get accustomed to it or for POC functions to your group and now not want it, it’s at all times higher to delete the assets you created whilst wearing out the POC. As a part of this CI/CD pipeline, we created a couple of assets. We created the under checklist that will help you delete them.
- Delete the GitHub Repository
- Delete the GitHub Token
- Delete the IAM Consumer
- Delete the EC2 Example
- Delete the ECR Repository
- Delete the ECS Cluster
- Deregister the Process Definition
Abstract
In the end, here’s the abstract of what it’s a must to do to arrange a CI/CD Docker pipeline to deploy a pattern Node.js software on AWS ECS the use of Jenkins.
- Clone the prevailing pattern GitHub Repository
- Create a brand new GitHub Repository and replica the code from the pattern repository in it
- Create a GitHub Token
- Create an IAM Consumer
- Create an ECR Repository
- Create an ECS Cluster
- Create an EC2 Example for putting in place the Jenkins Server
- Set up Java, JSON processor jq, Node.js, and NPM at the EC2 Example
- Set up Jenkins at the EC2 Example
- Set up Docker at the EC2 Example
- Set up Plugins
- Create Credentials in Jenkins
- Create a Jenkins Task
- Combine GitHub and Jenkins
- Test the deployment
- Cleanup the assets
Conclusion
A CI/CD Pipeline serves as some way of automating your tool packages’ builds, exams, and deployments. It’s the spine of any group with a DevOps tradition. It has a lot of advantages for tool construction, and it boosts your online business a great deal.
On this weblog, we demonstrated the stairs to create a Jenkins CI/CD Docker Pipeline to deploy a pattern Node.js containerized software on AWS ECS. We noticed how GitHub Webhooks can be utilized to cause the Jenkins pipeline on each and every push to the repository, which in flip deploys the newest docker symbol to AWS ECS.
CI/CD Pipelines with Docker is best possible in your group to enhance code high quality and ship tool releases briefly with none human mistakes. We are hoping this weblog helped you be informed extra in regards to the integral portions of the CI/CD Docker Pipeline.
[ad_2]


