
[ad_1]
To suggest an implementation, we can provide a use case that permits us to outline the necessities. We can describe the useful and technical context during which we can function after which specify the necessities. In line with those necessities, we can suggest a Keycloak implementation to satisfy them and make the important diversifications at the Angular and Springboot aspect.
Surroundings
Useful Context
This issues an accountancy company that gives products and services to exterior purchasers and has hired personnel to regulate the recordsdata. If a buyer (exterior person) needs to glue, they should create an account at the Saas software. In the similar means, when the personnel (inner person) need to paintings at the recordsdata, they should use their Lively Listing account to log in.
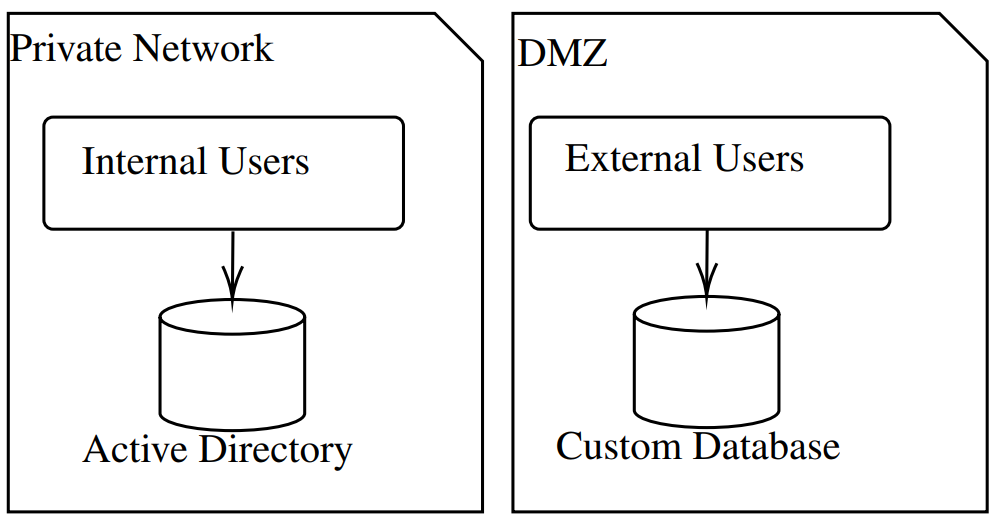
Customers illustration
You will need to imagine that buyers and staff might proportion some rights but additionally have distinct ones. The 2 databases should now not be affected, and any adjustments made to inner customers will have to now not have an effect on shoppers.
Technical Context
The present Saas product is split into 3 parts: Frontend, Backend, and database.
Frontend
It’s an Angular software and is chargeable for exhibiting data and accumulating information that has been entered by means of inner and exterior customers. Authorization to get right of entry to particular pages should even be established.
Backend
It’s constructed with SpringBoot and is predicted to retrieve information from the database, interface with exterior APIs, and, most significantly, organize information get right of entry to authorizations. It additionally manages configuration for the entrance finish.
Database
A PostgreSQL database that retail outlets and organizes information. As a result, the applying parts would require amendment to satisfy this requirement.
Keycloak
Authentication will make the most of the OAuth2 protocol in OpenID Attach. Keycloak satisfies those and different necessities.
Structure
One imaginable resolution might be to have two totally standalone Keycloak circumstances, which might result in upper repairs and infrastructure prices. Due to this fact, we can examine the opportunity of the usage of a unmarried example of Keycloak.
Nation-states
To logically separate our customers, we will be able to use nation-states. We’re going to create two Nation-states: Inside Realm: Customers who might be pulled from Lively Listing the usage of UserFederation might be designated for the Inside Realm. Exterior Realm: Exterior customers who require accounts inside the instrument might be designated for the Exterior Realm.
Shoppers
We can use two purchasers in each and every realm. The front-end Jstomer: This can be a public Jstomer that’s not confidential. We can make it to be had to the front-end part to acquire the login web page, transmit the relationship data, and input the applying. The back-end Jstomer: This Jstomer might be personal, and get right of entry to to it’s going to require a secret. It might probably most effective be contacted by means of the backend software. The aim of this Jstomer is to make sure the JWT tokens despatched by means of the front-end software.
Roles
The jobs might range as a result of they’re kingdom-specific. If a few of them are commonplace, you simply wish to give them the similar title to consult with them whilst retaining the part code realm agnostic.
Effects
In spite of everything, now we have the next structure: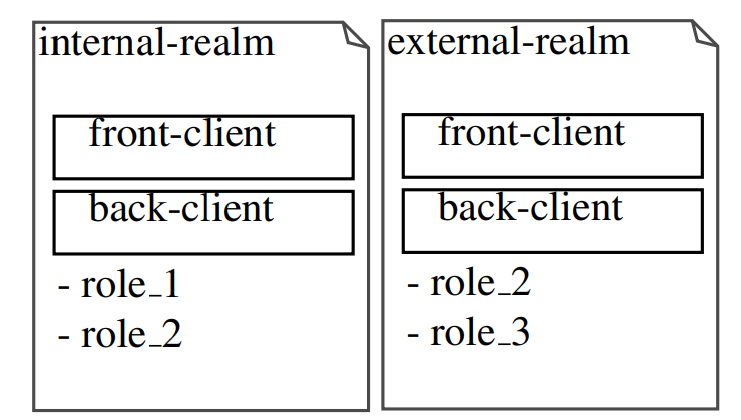
NB: The jobs is also carried out at a realm degree and a shopper degree for larger precision.
Deployments
To make deployment more straightforward, we’re going to make use of a docker-compose :
model: ’3’
products and services:
keycloak:
symbol:
quay.io/keycloak/keycloak:22.0.1
ports:
- "8080:8080"
surroundings:
- KEYCLOAK_ADMIN=admin
- KEYCLOAK_ADMIN_PASSWORD=admin
command: ["start-dev"]
You’ll deploy your software simply the usage of ’docker-compose up -d’. Then, create the 2 nation-states. No particular configurations are required. Then, create a client-front and client-back in each and every realm. For the client-front, you don’t want to switch the default realm. For client-back, you’ll have to set ’Consumer authentication’ to ’On.’
Parts Adaptation
Now that we have got Keycloak put in and configured, we wish to customise the parts.
Frontend
For the entrance finish, we imagine a easy Angular software.
Configuration
Keycloak proposes a javascript adapter. We can use it together with an angular adapter: npm set up keycloakangular keycloak-js
Code Adaptation
Thank you to those libraries, we will be able to use the keycloak initialization serve as within the app.module.ts when initializing the app, as follows: Declaration of the supplier and use of the initializeKeycloak manner.
{
supply: APP_INITIALIZER,
useFactory: initializeKeycloak,
multi: true,
deps: [KeycloakService,
KeycloakConfigService]
},
Declaration of initialiseKeycloak manner :
go back new Promise
take a look at {
look forward to initMultiTenant(keycloak, keycloakConfigService, realm);
unravel(auth);
} catch (error) {
reject(error);
}
});
};
}
export async serve as initMultiTenant(
keycloak: KeycloakService,
keycloakConfigService:
KeycloakConfigService,
realm: string
) {
go back keycloak.init({
config: {
url: look forward to
firstValueFrom(keycloakConfigService
.fetchConfig()).then(
(conf: PublicKeycloakConfig) => {
go back conf?.url;
}
),
realm,
clientId: ‘front-client’
},
initOptions: {
onLoad: ‘login-required’,
checkLoginIframe: false
},
enableBearerInterceptor: true,
bearerExcludedUrls:
[‘/public-configuration/keycloak’]
});
}” data-lang=”software/typescript”>
export serve as initializeKeycloak(
    keycloak: KeycloakService,
    keycloakConfigService:
        KeycloakConfigService
) {
// Set default realm
    let realm = "EXTERNAL";
    const pathName: string[] =
        window.location.pathname.cut up("https://feeds.dzone.com/");
    if (pathName[1] === "EXTERNAL") {
        realm = "EXTERNAL";
    }
    if (pathName[1] === "INTERNAL") {
        realm = "INTERNAL";
    }
    go back (): Promise<any> => {
        go back new Promise<any>(async (unravel, reject) => {
            take a look at {
                look forward to initMultiTenant(keycloak, keycloakConfigService, realm);
                unravel(auth);
            } catch (error) {
                reject(error);
            }
        });
    };
}

export async serve as initMultiTenant(
    keycloak: KeycloakService,
    keycloakConfigService:
        KeycloakConfigService,
    realm: string
) {
    go back keycloak.init({
        config: {
            url: look forward to
                firstValueFrom(keycloakConfigService
                    .fetchConfig()).then(
                    (conf: PublicKeycloakConfig) => {
                        go back conf?.url;
                    }
                ),
            realm,
            clientId: 'front-client'
        },
        initOptions: {
            onLoad: 'login-required',
            checkLoginIframe: false
        },
        enableBearerInterceptor: true,
        bearerExcludedUrls:
            ['/public-configuration/keycloak']
    });
}
Backend
Within the backend, we will have to intercept incoming requests with a view to: 1. Get the present realm to touch keycloak at the suitable configuration. 2. In line with the former realm, touch keycloak to validate the bearer token.
Configuration
To maintain Keycloak interactions, we first wish to import Keycloak adapters and Spring safety to regulate the Oauth2 procedure :
<dependency>
    <groupId>org.springframework.boot</groupId>
    <artifactId>
        spring-boot-starter-security
    </artifactId>
</dependency>
<dependency>
    <groupId>org.keycloak</groupId>
    <artifactId>
        keycloak-spring-boot-starter
    </artifactId>
    <model>18.0.2</model>
</dependency>
<dependency>
    <groupId>org.keycloak.bom</groupId>
    <artifactId>keycloak-adapter-bom</artifactId>
    <model>18.0.2</model>
    <kind>pom</kind>
    <scope>import</scope>
</dependency>
Code Adaptation
Now, we will be able to intercept the incoming request to learn the headers and establish the present realm of the request:
    @Override
    public KeycloakDeployment
    unravel(OIDCHttpFacade.Request request) {
        String header =
                request.getHeaders(CUSTOM_HEADER_REALM_SELECTOR)
                        .flow().findFirst().orElse(null);
        if (EXT_XEN_REALM.equals(header)) {
            buildAdapterConfig(extXenKeycloakConfig);
        } else {
            buildAdapterConfig(intXenKeycloakConfig);
        }
        go back
                KeycloakDeploymentBuilder.construct(adapterConfig);
    }
Conclusion
In spite of everything, we download the next structure: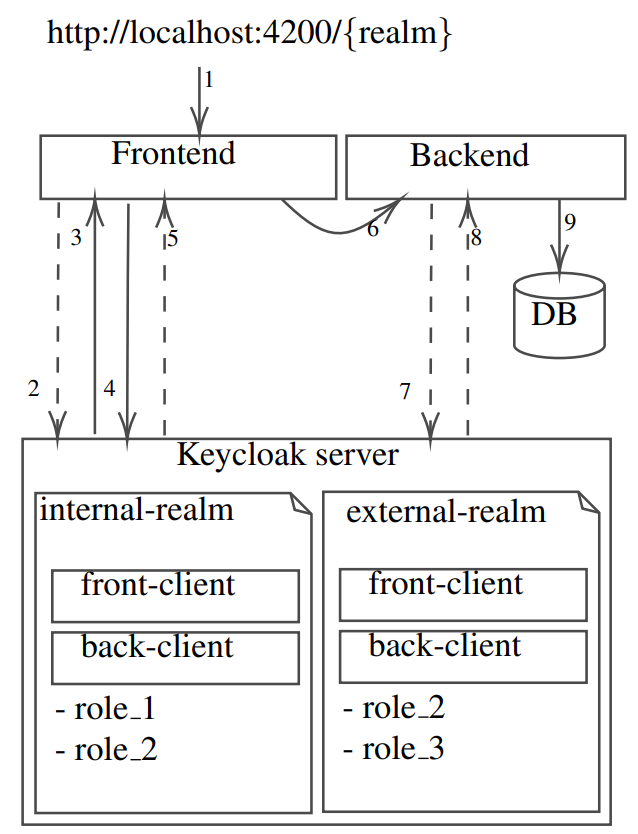
Ultimate structure
- Step 1: We will be able to touch our software with two other URLs:
- Step 2: The front-end software asks Keycloak for the login web page 3 with the world as a parameter to let the person log in at the suitable login web page.
- Step 3: The login web page is shipped again to the entrance finish.
- Step 4: The credentials are despatched to Keycloak the usage of keycloak-jsadatper, which permits for the protected switch of this delicate data.
- Step 5: If the credentials are valid4, an HTTP 302 is returned to redirect the person to the front-end house web page.
- Step 6: A request is shipped to the backend to retrieve information to show the house web page.
- Step 7: After intercepting and parsing the request to retrieve the world and Bearer, the backend resolver contacts the Keycloak server at the asked realm to validate the Bearer 3Only if the person isn’t attached but 4 If now not legitimate, a http-401:unauthaurized is returned token5.
- Step 8: Token validity is shipped again to the backend server.
- Step 9: In spite of everything, the backend can get right of entry to the asked information and ship it again to the frontend.
Via following those steps, we will be able to be sure that a person lands on the proper login web page and navigates during the software independently in their realm, all managed by means of a unmarried example of Keycloak.
[ad_2]