
[ad_1]
On this educational, we’ll stroll via methods to construct a customized Chatbot software that may permit us to invite questions and obtain top quality solutions. The bot will consider earlier activates, simulating context-aware dialog.

Chatbots have change into indispensable equipment for companies and builders looking for to enhance buyer interactions and streamline person reviews in lately’s hastily evolving virtual panorama.
OpenAI’s ChatGPT has reworked from a state-of-the-art experiment right into a powerhouse in chatbot building. Its meteoric upward thrust to good fortune is little short of exceptional, fascinating customers international.
The demo code of this undertaking is to be had on CodeSandbox. You’ll have to offer your personal OpenAI API key within the .env report to check it reside. To get one, create an account at the OpenAI, log in, navigate to the API keys and generate a brand new API key.
Making plans Options and UI
Our software shall be in accordance with React, and we’ll use OpenAI API to get admission to the knowledge and use CSS modules for styling.
Using React will let us create a dynamic and responsive person interface, bettering the full person enjoy.
The OpenAI API will allow us to achieve get admission to to complex language processing functions, offering information for growing insightful interactions.
Moreover, CSS modules will let us deal with a modular design, facilitating environment friendly building and customization of the app.
The options we’ll be imposing come with:
- A delegated enter space the place customers will be capable to craft activates, inviting contextually related inquiries.
- A Publish button that may permit customers to post their activates to the API, starting up the dialog procedure.
- Message pieces that shall be showcased as chat-style messages throughout the dialog window, bettering the interactive chat enjoy.
- Message pieces to show ChatGPT replies that may supply a conversational go with the flow.
- A Historical past function that may record the entire person’s contemporary activates. This may additionally permit customers to revisit earlier conversations.
- A Transparent button that may permit the removing of generated content material, providing a blank slate for brand new conversations.
The picture underneath displays our component-based wireframe.
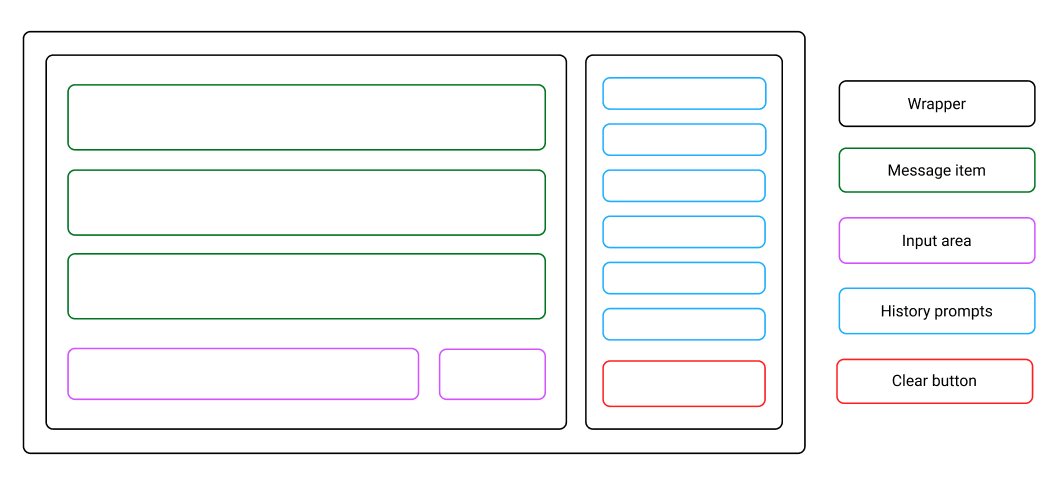
The entire software shall be wrapped in the primary container, which can grasp the entire parts in combination. It’ll be additional divided right into a two-column structure.
The primary column will come with the entire messages from the person and ChatGPT. On the backside of the column, there shall be an enter space and a button for filing the advised.
The second one column will grasp the historical past of the entire contemporary activates. On the backside of the column, there shall be a Transparent button that may permit the person to wipe the generated content material.
Choosing a Colour Scheme
The applying design will prioritize the convenience of content material belief. This may permit us to offer a few necessary advantages:
- Customers will be capable to briefly comprehend the offered data, resulting in a extra intuitive and user-friendly enjoy.
- It’ll additionally give a boost to accessibility, making sure that people of various backgrounds and talents will be capable to simply navigate and interact with the content material.
The picture underneath displays our shade scheme.
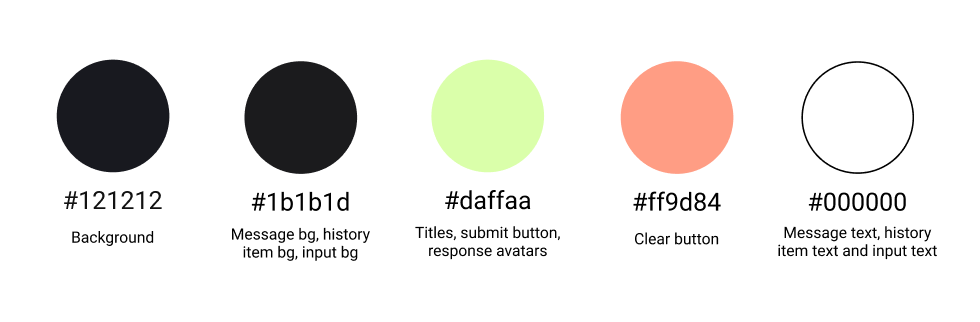
The background of the applying shall be black, whilst the messages, historical past pieces, and enter shape shall be darkish grey.
The textual content at the messages and enter backgrounds shall be white, offering a pleasing distinction and make textual content smooth to learn.
To present the app some highlights, the column titles, Publish button, and reaction message avatars will use a shiny, lime-green tone.
To accessory the Transparent button, a gentle purple tone shall be used. This may additionally lend a hand customers keep away from clicking the button unintentionally.
Atmosphere Up the React App
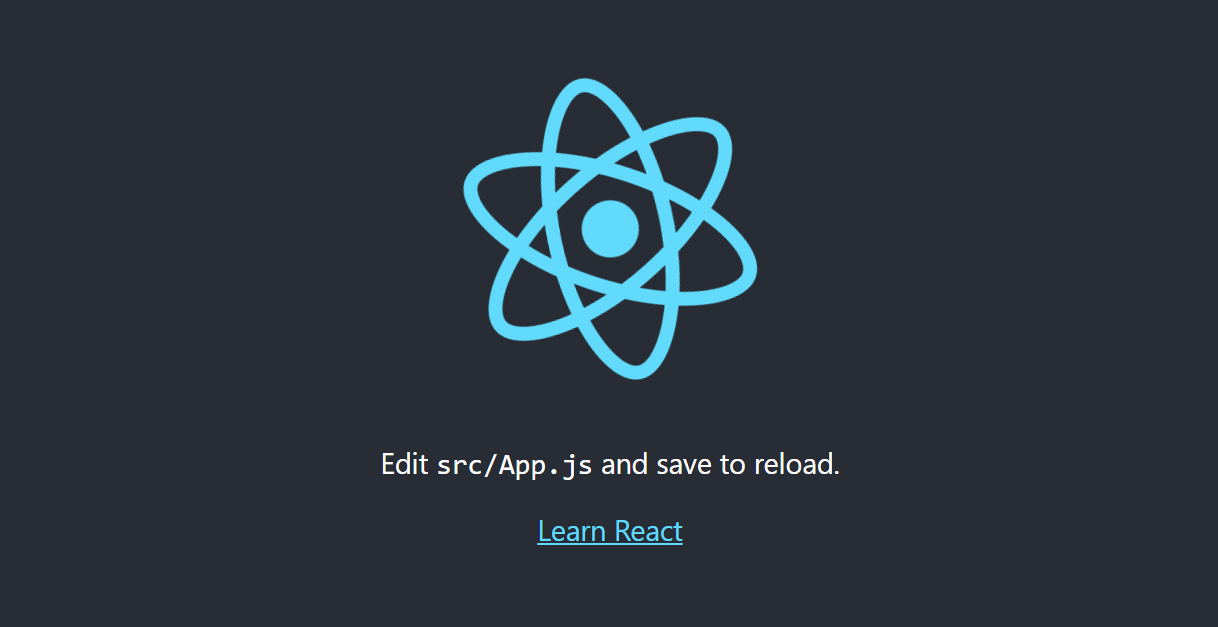
We’ll use create-react-app to create our software. Run npx create-react-app react-chatgpt to create a brand new React undertaking.
Look forward to a minute for the setup to finish, after which trade the running listing to the newly created folder by means of cd react-chatgpt and run npm get started to begin the developer server.
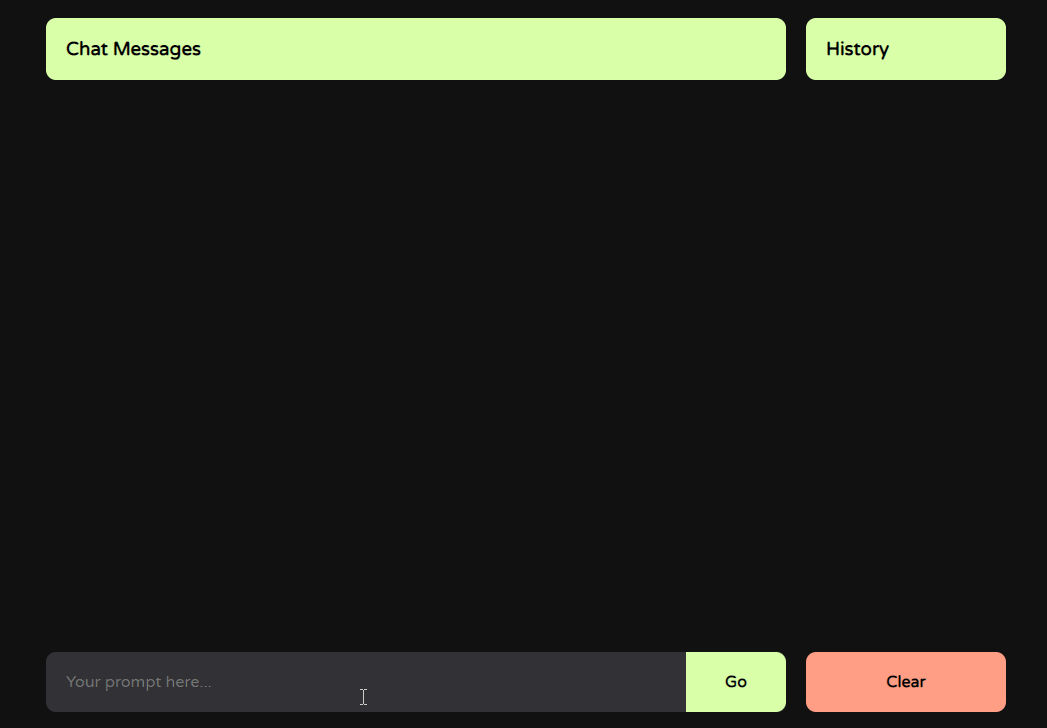
This must open up our undertaking in our default browser. If now not, navigate to http://localhost:3000 to open it manually. We must be offered with the React welcome display, as pictured underneath.
Including International Kinds
We’ll upload world styling to ascertain a constant and unified visible look throughout all parts of the applying.
Open index.css and come with the next styling regulations:
@import url("https://fonts.googleapis.com/css2?kin=Varela+Spherical&show=switch");

* {
  margin: 0;
  padding: 0;
  box-sizing: border-box;
  font-family: "Varela Spherical", sans-serif;
}

frame {
  background-color: #121212;
}
First, we import the Varela Spherical font and set the entire app to make use of it.
We additionally take away any pre-defined margins and paddings, in addition to set box-sizing to border-box so the app seems the similar on other browsers.
In spite of everything, we set the background of the frame to a gloomy tone, which permits us to spotlight the content material of the applying.
We’ll want a few avatars to constitute the authors of the messages from the person and OpenAI API. This manner, they’ll be more straightforward to differentiate.
Create a brand new icons folder throughout the src listing and come with the bot.png and person.png icons.
You’ll obtain samples from icons listing right here, or you’ll use customized ones from websites like FlatIcon or Icons8, so long as you stay the above report names.
Construction the Parts
First, we’d like a well-organized report construction that fits the wireframe design.
We’ll use the terminal to create the essential folder and element recordsdata. Every element could have its personal JavaScript report for capability and CSS report for styling.
Alternate the running listing within the src folder by means of working cd src after which run the next command:
mkdir parts && cd parts && contact Message.js Message.module.css Enter.js Enter.module.css Historical past.js Historical past.module.css Transparent.js Transparent.module.css
The command above will first create a /parts/ folder, then trade the running listing to it, and create all of the essential recordsdata inside of it.
The Message element
The Message element will show person activates and API responses throughout the dialog, facilitating the real-time trade of data between the person and the chatbot.
Open the Message.js report and come with the next code:
import bot from "../icons/bot.png";
import person from "../icons/person.png";

import kinds from "./Message.module.css";

export default serve as Message({ position, content material }) {
  go back (
    <div className={kinds.wrapper}>
      <div>
        <img
          src={position === "assistant" ? bot : person}
          className={kinds.avatar}
          alt="profile avatar"
        />
      </div>
      <div>
        <p>{content material}</p>
      </div>
    </div>
  );
}
First, we import the downloaded icons for avatars after which import the exterior CSS regulations for styling.
After that, we create the wrapper for the Message element, which can include each icons and textual content content material.
We use the position prop within the conditional to show the precise avatar as the picture src.
We additionally use the content material prop, which shall be handed in because the textual content reaction from the OpenAI API and person enter advised.
Now let’s genre the element so it seems like a talk message! Open the Message.module.css report and come with the next regulations:
.wrapper {
  show: grid;
  grid-template-columns: 60px auto;
  min-height: 60px;
  padding: 20px;
  margin-bottom: 20px;
  border-radius: 10px;
  background-color: #1b1b1d;
}

.avatar {
  width: 40px;
  top: 40px;
}
We divide the structure into two columns, with the avatars proven within the fixed-width container at the proper and the textual content at the left.
Subsequent, we upload some padding and margin to the ground of the message. We additionally genre the message to have spherical borders and set the background to darkish grey.
In spite of everything, we set the avatar icon to a set width and top.
The Enter element
The Enter element shall be an interface part designed to seize person queries, serving because the manner during which customers have interaction and interact with the chatbot.
Open the Enter.js report and come with the next code:
import kinds from "./Enter.module.css";

export default serve as Enter({ price, onChange, onClick }) {
  go back (
    <div className={kinds.wrapper}>
      <enter
        className={kinds.textual content}
        placeholder="Your advised right here..."
        price={price}
        onChange={onChange}
      />
      <button className={kinds.btn} onClick={onClick}>
        Cross
      </button>
    </div>
  );
}
We first import the exterior stylesheet to genre the element.
We go back the element wrapper that comes with the enter box for the person activates and the button to post it to the API.
We set the placeholder price to be displayed when the enter shape is empty, and create the price prop to carry the entered advised, in addition to the onChange prop that shall be known as as soon as the enter price adjustments.
For the button, the onClick prop shall be known as as soon as the person clicks at the button.
Now let’s genre the element in order that the enter space seems gorgeous and the person is inspired to offer activates! Open the Enter.module.css report and come with the next regulations:
.wrapper {
  show: grid;
  grid-template-columns: auto 100px;
  top: 60px;
  border-radius: 10px;
  background-color: #323236;
}

.textual content {
  border: none;
  define: none;
  background: none;
  padding: 20px;
  shade: white;
  font-size: 16px;
}

.btn {
  border: none;
  border-radius: 0 10px 10px 0;
  font-size: 16px;
  font-weight: daring;
  background-color: rgb(218, 255, 170);
}

.btn:hover {
  cursor: pointer;
  background-color: rgb(200, 253, 130);
}
We set the wrapper to be divided into two columns, with a set width for the button and the remainder of the to be had width devoted to the enter space.
We additionally outline the particular top of the element, set the rounded borders for it, and set the background to darkish grey.
For the enter space, we take away the default border, define, background and upload some padding. We set the textual content shade to white and set a selected font length.
The Historical past element
The Historical past element will show the collection of previous person and chatbot interactions, offering customers with a contextual reference in their dialog.
Open the Historical past.js report and come with the next code:
import kinds from "./Historical past.module.css";

export default serve as Historical past({ query, onClick }) {
  go back (
    <div className={kinds.wrapper} onClick={onClick}>
      <p>{query.substring(0, 15)}...</p>
    </div>
  );
}
We first import the exterior genre regulations for the element. Then we go back the wrapper that may come with the textual content.
The textual content price shall be handed in as a query prop from the person advised, and most effective the primary 15 characters of the textual content string shall be displayed.
Customers shall be allowed to click on at the historical past pieces, and we’ll move the onClick prop to regulate the press habits.
Now let’s genre the element to verify it’s visually interesting and suits nicely within the sidebar! Open the Historical past.module.css report and come with the next regulations:
.wrapper {
  padding: 20px;
  margin-bottom: 20px;
  border-radius: 10px;
  background-color: #1b1b1d;
}

.wrapper:hover {
  cursor: pointer;
  background-color: #323236;
}
We set some padding, upload the margin to the ground, and set the rounded corners for the historical past pieces. We additionally set the background shade to darkish grey.
As soon as the person hovers over the object, the cursor will trade to a pointer and the background shade will trade to a lighter coloration of grey.
The Transparent element
The Transparent element shall be a UI part designed to reset or transparent the continuing dialog, offering customers with a snappy strategy to get started a brand new interplay with out navigating clear of the present interface.
Open the Transparent.js report and come with the next code:
import kinds from "./Transparent.module.css";

export default serve as Transparent({ onClick }) {
  go back (
    <button className={kinds.wrapper} onClick={onClick}>
      Transparent
    </button>
  );
}
We first import the exterior stylesheet to genre the element.
We go back the button that may permit customers to transparent the content material of the applying. We’ll move the onClick prop to reach the specified habits.
Now let’s genre the element to make it stand out and scale back the possibilities of customers urgent it unintentionally! Open the Transparent.module.css report and come with the next regulations:
.wrapper {
  width: 100%;
  top: 60px;
  background-color: #ff9d84;
  border: none;
  border-radius: 10px;
  font-size: 16px;
  font-weight: daring;
}

.wrapper:hover {
  cursor: pointer;
  background-color: #ff886b;
}
We set the button to fill the to be had width of the column, set the particular top, and set the background shade to gentle purple.
We additionally take away the default border, set the rounded corners, set a selected font length, and make it daring.
On hover, the cursor will trade to a pointer and the background shade will trade to a darker coloration of purple.
Construction the Consumer Interface
Within the earlier segment, we constructed the entire essential parts. Now let’s put them in combination and construct the person interface for the applying.
We’ll configure their capability to create a practical and interactive chatbot interface with arranged and reusable code.
Open the App.js report and come with the next code:
import { useState } from "react";

import Message from "./parts/Message";
import Enter from "./parts/Enter";
import Historical past from "./parts/Historical past";
import Transparent from "./parts/Transparent";

import "./kinds.css";

export default serve as App() {
  const [input, setInput] = useState("");
  const [messages, setMessages] = useState([]);
  const [history, setHistory] = useState([]);

  go back (
    <div className="App">
      <div className="Column">
        <h3 className="Name">Chat Messages</h3>
        <div className="Content material">
          {messages.map((el, i) => {
            go back <Message key={i} position={el.position} content material={el.content material} />;
          })}
        </div>
        <Enter
          price={enter}
          onChange={(e) => setInput(e.goal.price)}
          onClick={enter ? handleSubmit : undefined}
        />
      </div>
      <div className="Column">
        <h3 className="Name">Historical past</h3>
        <div className="Content material">
          {historical past.map((el, i) => {
            go back (
              <Historical past
                key={i}
                query={el.query}
                onClick={() =>
                  setMessages([
                    { role: "user", content: history[i].query },
                    { position: "assistant", content material: historical past[i].solution },
                  ])
                }
              />
            );
          })}
        </div>
        <Transparent onClick={transparent} />
      </div>
    </div>
  );
}
First, we import the useState hook that we’ll use to trace the knowledge state for the applying. Then we import all of the parts we constructed and the exterior stylesheet for styling.
Then we create the enter state variable to retailer the person advised enter, messages to retailer the dialog between the person and ChatGPT, and historical past to retailer the historical past of person activates.
We additionally create the primary wrapper for the entire app that may grasp two columns.
Every column could have a identify and content material wrapper that may come with the dialog messages, enter space, and Publish button for the primary column and historical past pieces and the Transparent button for the second one column.
The dialog messages shall be generated by means of mapping during the messages state variable and the historical past pieces — by means of mapping during the historical past state variable.
We set the enter onChange prop to replace the enter state variable each and every time person enters any price within the enter shape.
As soon as the person clicks the Ship button, the person advised shall be despatched to the OpenAI API to procedure and obtain the answer.
For the historical past pieces, we set the onClick prop in order that the messages state variable will get up to date to the particular advised and solution.
In spite of everything, for the Transparent button, we move the onClick prop a serve as that may transparent each the message and historical past values, clearing the applying information.
Developing the App Format
On this segment, we’ll organize the person interface parts to create an intuitive construction for efficient person interplay.
Open App.css and come with the next styling regulations:
.App {
  show: grid;
  grid-template-columns: auto 200px;
  hole: 20px;
  max-width: 1000px;
  margin: 0 auto;
  min-height: 100vh;
  padding: 20px;
}

.Column {
  shade: white;
}

.Name {
  padding: 20px;
  margin-bottom: 20px;
  border-radius: 10px;
  shade: black;
  background-color: rgb(218, 255, 170);
}

.Content material {
  top: calc(100vh - 200px);
  overflow-y: scroll;
  margin-bottom: 20px;
}

::-webkit-scrollbar {
  show: none;
}
We break up the primary app wrapper into two columns, separated by means of an opening by means of the use of CSS grid structure, and we set the left column for historical past pieces to a set width.
Subsequent, we set the wrapper to by no means exceed a undeniable width, middle it at the display, make it use the entire display viewport top, and upload some padding inside of it.
For each and every column’s contents, we set the textual content shade to white.
For the column titles, we set some padding, upload the ground margin, and set the rounded corners. We additionally set the identify part background shade to lime-green and set the textual content shade to black.
We additionally genre the columns themselves by means of environment the guideline that the content material shouldn’t exceed a undeniable top and set the content material to be scrollable if it reaches out of doors the peak. We additionally upload a margin to the ground.
We additionally disguise the scrollbars, in order that we don’t must genre them to override the default values for each and every browser. This rule is not obligatory and shall we depart it out.
Getting the API Key from OpenAI
In the event you haven’t already arrange your personal API key for the Sandbox within the advent of this educational, remember to create an account at the OpenAI web page.
Subsequent, log in and navigate to the API keys and generate a brand new API key.
Replica the important thing to the clipboard and open your undertaking.
Create a brand new .env report on your undertaking root and paste the price for the next key like so:
REACT_APP_OPENAI_API_KEY=paste-your-code-here
Getting ready the Request Name to OpenAI API
In the course of the OpenAI API, our chatbot will be capable to ship textual activates to the OpenAI server, which can then procedure the enter and generate human-like responses.
That is accomplished by means of leveraging a formidable language fashion that’s been educated on numerous textual content resources. Through offering the fashion with a dialog historical past and the present person advised, our chatbot will obtain context-aware responses from the API.
On this segment, we’ll get ready the request and enforce the decision to the API to obtain the reaction and set the knowledge to the state variable we explained previous.
Open the App.js once more and upload the next code:
export default serve as App() {


  const handleSubmit = async () => {
    const advised = {
      position: "person",
      content material: enter,
    };

    setMessages([...messages, prompt]);

    wait for fetch("https://api.openai.com/v1/chat/completions", {
      means: "POST",
      headers: {
        Authorization: `Bearer ${procedure.env.REACT_APP_OPENAI_API_KEY}`,
        "Content material-Kind": "software/json",
      },
      frame: JSON.stringify({
        fashion: "gpt-3.5-turbo",
        messages: [...messages, prompt],
      }),
    })
      .then((information) => information.json())
      .then((information) => {
        const res = information.alternatives[0].message.content material;
        setMessages((messages) => [
          ...messages,
          {
            role: "assistant",
            content: res,
          },
        ]);
        setHistory((historical past) => [...history, { question: input, answer: res }]);
        setInput("");
      });
  };

  const transparent = () => {
    setMessages([]);
    setHistory([]);
  };

  go back <div className="App">
}
First, we create a separate handleSubmit serve as, which shall be accomplished as soon as the person has entered the advised within the enter shape and clicks the Publish button.
Within handleSubmit, we first create the advised variable that may grasp the position person and the advised itself as an object. The position is necessary as a result of, when storing our messages, we’ll wish to know which of them are person messages.
Then we replace the messages state variable with the person advised.
Subsequent, we make a real fetch name to the api.openai.com/v1/chat/completions endpoint to get admission to the knowledge from the OpenAI API.
We specify that it’s a POST request, and set the headers with the authorization token and the content material sort. For the frame parameters, we specify which API fashion to make use of, and we move the messages variable because the content material from the person.
As soon as the reaction is gained, we retailer it within the res variable. We upload the thing consisting of the position assistant and the reaction itself to the message state variable.
We additionally replace the historical past state variable with the thing, with the query and corresponding solution because the keys.
After the reaction is gained and state variables are up to date, we transparent the enter state variable to arrange the enter shape for the following person advised.
In spite of everything, we create a easy transparent serve as to transparent the messages and historical past state variables, permitting the person to transparent the knowledge of the applying.
Checking out the Software
At this level, we must have created a completely practical chat software! The very last thing left to do is to check it.
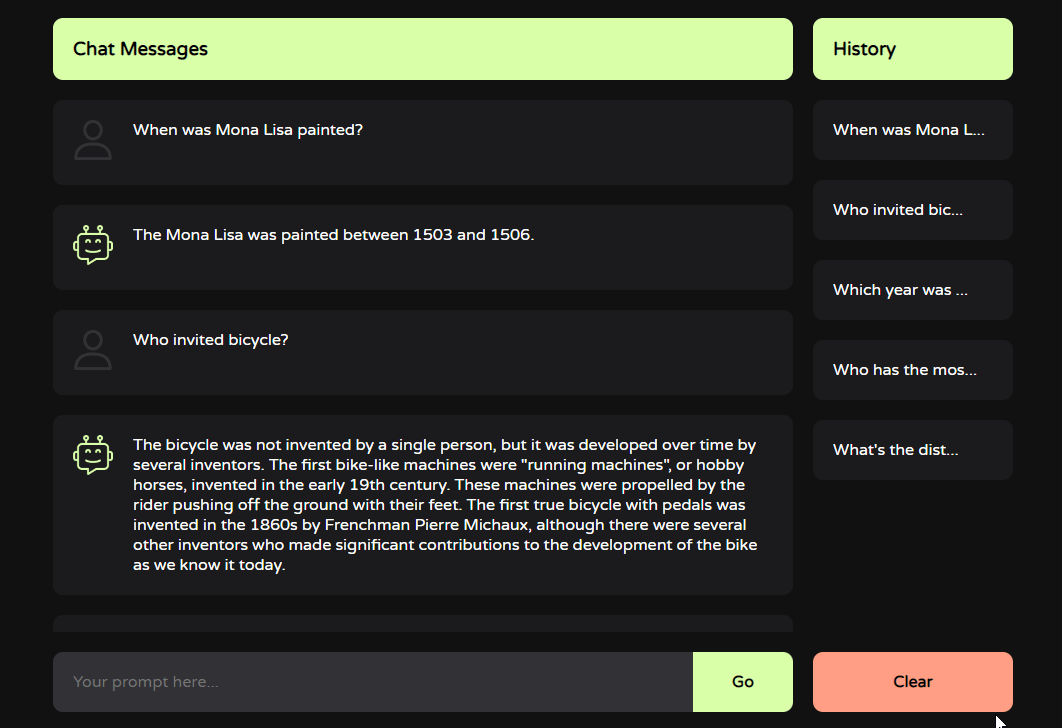
First, let’s attempt to ask ChatGPT a unmarried query.

The animation above displays a query being submitted and a solution being gained.
Now let’s attempt to create a dialog.
As proven within the animation above, the chatbot recollects the context from the former messages, so we will be able to talk with it whilst being totally context-aware.
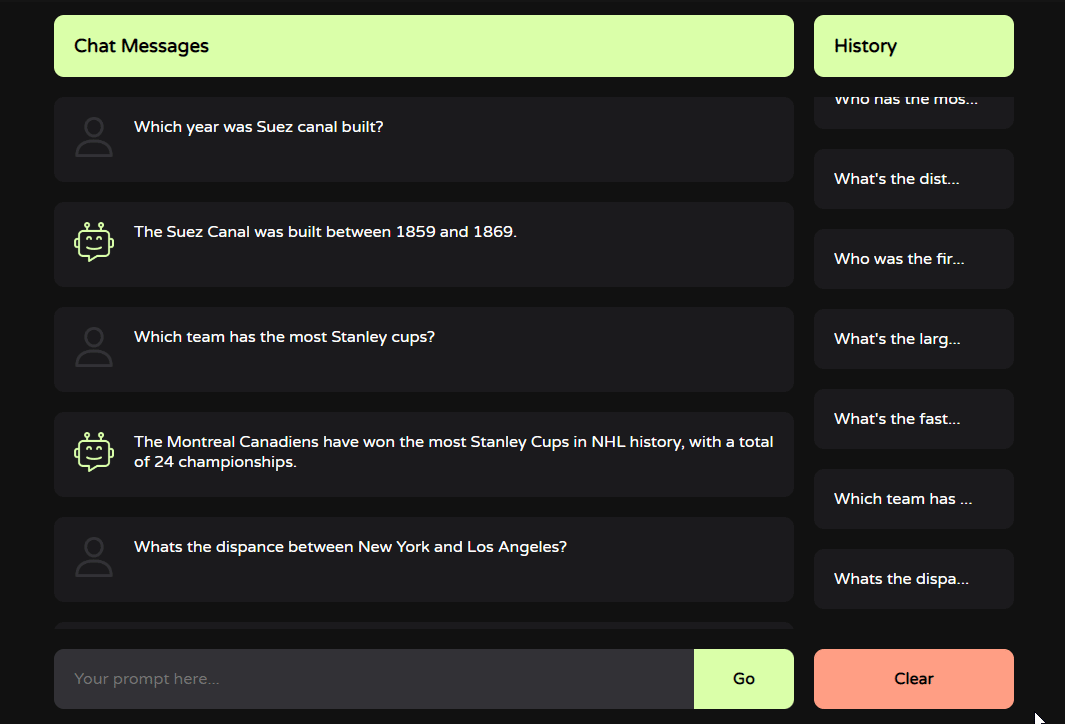
Now let’s see what occurs after we click on at the Historical past button.
Realize how the chat switches to the respective person advised and solution. This might be helpful if we need to resume the dialog from a selected level.
In spite of everything, let’s click on at the Transparent button.
As anticipated, the contents of the app are cleared. It is a helpful possibility when there’s a large number of content material and the person desires to begin contemporary.
Conclusion
On this educational, we’ve discovered methods to create an easy-to-use person interface, methods to construction our code by the use of parts, methods to paintings with states, methods to make API calls, and methods to procedure the gained information.
With the combo of complex herbal language processing functions of the OpenIAI API and the versatility of React, you’ll now be capable to create subtle chatbot programs that you’ll customise additional in your liking.
Realize that this educational retail outlets the API key at the frontend, which will not be safe for manufacturing. If you wish to deploy the undertaking, it will be really useful to create an Specific server and use the API key there.
Additionally, if you wish to have the historical past activates to be to be had after the following preliminary release, you have to retailer after which learn them from native garage, and even attach a database in your app and retailer and browse information from there.
[ad_2]