
[ad_1]
For those who’re simply getting began with Node.js and wish to check out your hand at construction a internet app, issues can ceaselessly get a bit overwhelming. When you get past the “Hi, Global!” tutorials, a lot of the fabric in the market has you copy-pasting code, with very little rationalization as to what you’re doing or why.
Which means, by the point you’ve completed, you’ve constructed one thing great and glossy, however you even have somewhat few takeaways that you’ll be able to practice for your subsequent mission.
On this instructional, I’m going to take a quite other manner. Ranging from the bottom up, I’ll display tips on how to construct a no-frills internet app the usage of Node.js, however as an alternative of that specialize in the result, I’ll focal point on a spread of belongings you’re more likely to come upon when construction a real-world app. Those come with routing, templating, coping with paperwork, interacting with a database or even fundamental authentication.
This gained’t be a JavaScript 101. If that’s the type of factor you’re after, glance right here. It is going to, on the other hand, be appropriate for the ones individuals who really feel rather assured with the JavaScript language and who need to take their first steps in Node.js.
What We’ll Be Construction
We’ll be the usage of Node.js and the Categorical framework to construct a easy registration variety with fundamental validation, which persists its information to a MongoDB database. We’ll upload a view to checklist a success registrations, which we’ll give protection to with fundamental HTTP authentication, and we’ll use Bootstrap so as to add some styling. The educational is structured so to observe alongside step-by-step. On the other hand, in the event you’d like to leap forward and spot the result, the code for this instructional may be to be had on GitHub.
Fundamental Setup
Prior to we will be able to get started coding, we’ll wish to get Node, npm and MongoDB put in on our machines. I gained’t cross into intensity at the more than a few set up directions, however when you have any hassle getting arrange, please consult with our boards and ask for assist there.
Node.js
Many web sites will suggest that you just head to the authentic Node obtain web page and take hold of the Node binaries to your gadget. Whilst that works, I might counsel that you just use a edition supervisor as an alternative. This can be a program which lets you set up a couple of variations of Node and turn between them comfortably. There are more than a few benefits to the usage of a edition supervisor. For instance, it negates doable permission problems which might in a different way see you putting in programs with admin rights.
For those who fancy going the edition supervisor path, please seek the advice of our Set up A couple of Variations of Node.js The use of nvm fast tip. In a different way, take hold of the proper binaries to your gadget from the hyperlink above and set up the ones.
npm
npm is a JavaScript kit supervisor which comes bundled with Node, so no further set up is essential right here. We’ll be making relatively in depth use of npm all over this instructional, so in the event you’re short of a refresher, please seek the advice of A Newbie’s Information to npm — the Node Bundle Supervisor.
MongoDB
MongoDB is a doc database which shops information in versatile, JSON-like paperwork. For those who’ve by no means labored with Mongo earlier than, you could like to try our beginner-friendly creation to MongoDB.
The fastest option to stand up and working with Mongo is to make use of a provider corresponding to MongoDB Atlas. It has a unfastened plan which gives a unmarried database with 512MB of garage working on a shared digital gadget. That is greater than ok for a easy app with a handful of customers. If this seems like the most suitable choice for you, please cross to the Atlas house web page and click on the Take a look at Loose button to enroll in a unfastened account. You’ll then be dropped right into a wizard to help you create and deploy a database. For those who get caught at any level, this video on getting your unfastened MongoDB Atlas cluster is relatively useful.
You’ll be able to additionally set up Mongo in the neighborhood. To do that, please consult with the authentic obtain web page and observe the directions to your working gadget. This may information you thru putting in and configuring MongoDB for your gadget.
A MongoDB GUI
Even supposing now not strictly essential for following in conjunction with this instructional, you may additionally like to put in Compass, the authentic GUI for MongoDB. This instrument is helping you visualize and manipulate your information, permitting you to have interaction with paperwork with complete CRUD capability.
Be aware: in the event you’re the usage of Home windows and putting in Mongo in the neighborhood, you’ll be able to set up Compass as a part of the Mongo set up procedure. No further obtain is needed.
Checking that the whole lot is put in as it should be
To test that Node and npm are put in as it should be, open your terminal and kind this:
node -v
Then observe it with this:
npm -v
This may output the edition choice of each and every program (18.16.0 and 9.5.1 respectively on the time of writing).
For those who put in Mongo in the neighborhood you must be capable of test the edition quantity with this:
mongod --version
This must output a host of knowledge, together with the edition quantity (6.0.6 on the time of writing).
Be aware: in the event you’re on Home windows and also you haven’t added MongoDB for your trail, you’ll wish to use the whole trail to the MongoDB Server binaries, as described at the set up web page.
Checking the database connection the usage of Compass
Assuming that MongoDB is working, open Compass.
Be aware: relying on the way you put in Mongo, you could first wish to get started it with the mongod command.
You must be capable of settle for the defaults (server: localhost, port: 27017), press the CONNECT button, and determine a connection to the database server.
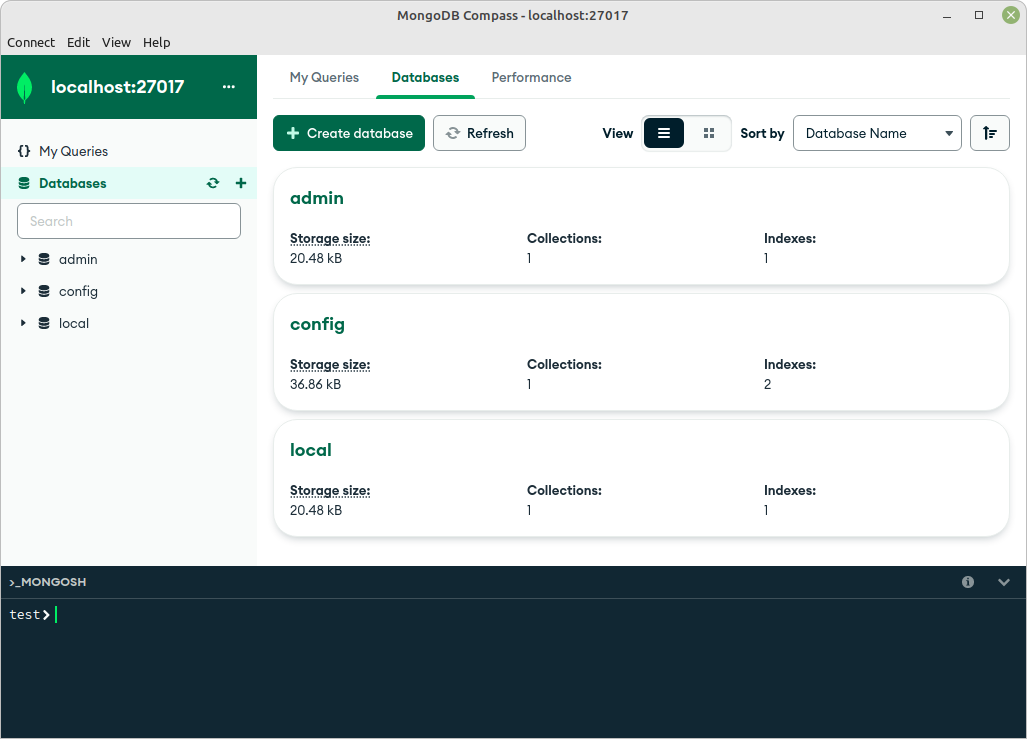
MongoDB Compass attached to localhost
The databases admin, config and native are created robotically.
The use of a cloud-hosted answer
For those who’re the usage of Mongo Atlas, create your database, arrange consumer authentication, configure IP whitelisting, then make a remark of the relationship main points.
Open Compass, click on New connection, then paste your connection string into the textual content house. This must be very similar to the next layout:
mongodb+srv://<username>:<password>@<cluster-name>.<uid>.mongodb.internet/
Click on Attach and also you must be off to the races.

MongoDB Compass attached to Atlas
Please observe: in the event you’re working a VPN, you’ll most probably wish to disable this earlier than connecting.
In each instances, Mongo will call your first database check. That is advantageous for the needs of checking out the relationship, however we’ll see tips on how to alternate this in a while.
Initializing the Software
With the whole lot arrange as it should be, the very first thing we wish to do is initialize our new mission. To do that, create a folder named demo-node-app, input that listing, and kind the next in a terminal:
npm init -y
This may create and auto-populate a kit.json document within the mission root. We will use this document to specify our dependencies and to create more than a few npm scripts, which is able to assist our building workflow.
Putting in Categorical
Categorical is a light-weight internet utility framework for Node.js, which gives us with a powerful set of options for writing internet apps. Those options come with things like path dealing with, template engine integration and a middleware framework, which permits us to accomplish further duties on request and reaction gadgets.
To put in Categorical, run the next to your terminal:
npm set up specific
This may see Categorical added to the dependencies phase of the kit.json document. This indicators to any person else working our code that Categorical is a kit our app must serve as correctly.
Putting in nodemon
nodemon is a comfort instrument. It is going to watch the recordsdata within the listing it used to be began in, and if it detects any adjustments, it’ll robotically restart your Node utility (that means you don’t need to). By contrast to Categorical, nodemon isn’t one thing the app calls for to serve as correctly (it simply aids us with building), so set up it with this:
npm set up --save-dev nodemon
This may upload nodemon to the dev-dependencies phase of the kit.json document.
Growing some preliminary recordsdata
We’re virtually thru with the setup. All we wish to do now’s create a few preliminary recordsdata earlier than kicking off the app.
Within the demo-node-app folder, create an app.js document and a get started.js document. Additionally create a routes folder, with an index.js document inside of.
On Linux you’ll be able to run this:
mkdir routes && contact app.js get started.js routes/index.js
After you’re completed, issues must seem like this:
.
├── app.js
├── node_modules
│   └── ...
├── kit.json
├── package-lock.json
├── routes
│   └── index.js
└── get started.js
Now, let’s upload some code to these recordsdata.
In app.js:
const specific = require('specific');
const routes = require('./routes/index');

const app = specific();
app.use("https://www.sitepoint.com/", routes);

module.exports = app;
Right here, we’re uploading each the specific module and our routes document into the applying. The require serve as we’re the usage of to do it is a integrated Node serve as which imports an object from any other document or module. For those who’d like a refresher on uploading and exporting modules, learn Figuring out module.exports and exports in Node.js.
After that, we’re developing a brand new Categorical app the usage of the specific serve as and assigning it to an app variable. We then inform the app that, each time it receives a request from ahead slash anything else, it must use the routes document.
In any case, we export our app variable in order that it may be imported and utilized in different recordsdata.
In get started.js:
const app = require('./app');

const server = app.pay attention(3000, () => {
  console.log(`Categorical is working on port ${server.cope with().port}`);
});
Right here we’re uploading the Categorical app we created in app.js (observe that we will be able to depart the .js off the document call within the require commentary). We then inform our app to pay attention on port 3000 for incoming connections and output a message to the terminal to signify that the server is working.
And in routes/index.js:
const specific = require('specific');

const router = specific.Router();

router.get("https://www.sitepoint.com/", (req, res) => {
  res.ship('It really works!');
});

module.exports = router;
Right here, we’re uploading Categorical into our routes document after which grabbing the router from it. We then use the router to answer any requests to the basis URL (on this case http://localhost:3000) with an “It really works!” message.
Kicking off the app
In any case, let’s upload an npm script to make nodemon get started gazing our app. Alternate the scripts phase of the kit.json document to seem like this:
"scripts": {
  "watch": "nodemon ./get started.js"
},
The scripts assets of the kit.json document is terribly helpful, because it shall we us specify arbitrary scripts to run in several situations. Which means we don’t need to time and again sort out long-winded instructions with a difficult-to-remember syntax. For those who’d like to determine extra about what npm scripts can do, learn Give Grunt the Boot! A Information to The use of npm as a Construct Device.
Now, sort npm run watch from the terminal and consult with http://localhost:3000.
You must see “It really works!”
Including a Templating Engine
Returning an inline reaction from inside the path handler is all smartly and excellent, however it’s now not very extensible, and that is the place templating engines are available in. Because the Categorical medical doctors state:
A template engine lets you use static template recordsdata to your utility. At runtime, the template engine replaces variables in a template document with precise values, and transforms the template into an HTML document despatched to the customer.
In apply, this implies we will be able to outline template recordsdata and inform our routes to make use of them as an alternative of writing the whole lot inline.
The medical doctors proceed:
Some in style template engines that paintings with Categorical are Pug, Mustache, and EJS.
So which one to make use of?
Fundamental templating with Pug
On this article, I’m going to make use of Pug as a templating engine. Pug (previously referred to as Jade) comes with its personal indentation-sensitive syntax for writing dynamic and reusable HTML.
I must indicate that there was some complaint that this mission has stagnated. On the other hand, the writer claims it’s nonetheless maintained. Individually, I to find Pug solid, complete featured and simple to paintings with, however bear in mind that there are quite a lot of different choices in the market, if you want to make a choice a distinct library.
That mentioned, let’s create a folder named perspectives and in that folder a document named variety.pug. Upload the next code to this new document:
variety(motion="." means="POST")
  label(for="call") Title:
  enter(
    sort="textual content"
    identity="call"
    call="call"
  )

  label(for="electronic mail") Electronic mail:
  enter(
    sort="electronic mail"
    identity="electronic mail"
    call="electronic mail"
  )

  enter(sort="post" worth="Publish")
Optimistically the above instance is simple to observe, however when you have any difficulties working out what it does, simply wait till we view this in a browser, then investigate cross-check the web page supply to peer the markup it produces.
For those who’d like a to be told a little bit extra about Pug earlier than proceeding, learn our instructional A Newbie’s Information to Pug.
Putting in Pug and integrating it into the Categorical app
Subsequent, we’ll wish to set up pug, saving it as a dependency:
npm set up pug
Then configure app.js to make use of Pug as a format engine and to search for templates throughout the perspectives folder:
const specific = require('specific');
const trail = require('trail');
const routes = require('./routes/index');

const app = specific();

app.set('perspectives', trail.sign up for(__dirname, 'perspectives'));
app.set('view engine', 'pug');

app.use("https://www.sitepoint.com/", routes);

module.exports = app;
You’ll understand that we’re additionally requiring Node’s local Trail module, which gives utilities for running with document and listing paths. This module lets in us to construct the trail to our perspectives folder the usage of its sign up for means and __dirname (which returns the listing through which the lately executing script is living).
Changing the path to make use of our template
In any case, we wish to inform our path to make use of our new template. In routes/index.js:
router.get("https://www.sitepoint.com/", (req, res) => {
  res.render('variety');
});
This makes use of the render means on Categorical’s reaction object to ship the rendered view to the customer.
So let’s see if it labored. As we’re the usage of nodemon to look at our app for adjustments, we must merely be capable of refresh our browser and spot our brutalist masterpiece.
Defining a format document for Pug
For those who open your browser and investigate cross-check the web page supply, you’ll see that Categorical best despatched the HTML for the shape. Our web page is lacking a doctype declaration, in addition to a head and physique phase. Let’s repair that via making a grasp format for all our templates to make use of.
To do that, create a format.pug document within the perspectives folder and upload the next code:
doctype html
html
  head
    identify= `${identify}`

  physique
    h1 Match Registration

    block content material
The very first thing to note this is the road beginning identify=. Appending an equals signal to an characteristic is without doubt one of the strategies that Pug makes use of for interpolation. You’ll be able to learn extra about it right here. We’ll use this to cross the identify dynamically to each and every template.
The second one factor to note is the road that begins with the block key phrase. In a template, a block is just a “block” of Pug {that a} kid template might substitute. We’ll see tips on how to use it in a while, however in the event you’re willing to determine extra, learn this web page at the Pug website online.
The use of the format document from the kid template
All that is still to do is to tell our variety.pug template that it must use the format document. To do that, modify perspectives/variety.pug, like so:
extends format

block content material
  variety(motion="." means="POST")
    label(for="call") Title:
    enter(
      sort="textual content"
      identity="call"
      call="call"
    )

    label(for="electronic mail") Electronic mail:
    enter(
      sort="electronic mail"
      identity="electronic mail"
      call="electronic mail"
    )

    enter(sort="post" worth="Publish")
And in routes/index.js, we wish to cross in a suitable identify for the template to show:
router.get("https://www.sitepoint.com/", (req, res) => {
  res.render('variety', { identify: 'Registration variety' });
});
Now in the event you refresh the web page and investigate cross-check the supply, issues must glance much better.
Coping with Paperwork in Categorical
These days, if we hit our variety’s Publish button, we’ll be redirected to a web page with a message: “Can’t POST /”. It’s because, when submitted, our variety POSTs its contents again to /, and we haven’t outlined a path to maintain that but.
Let’s do this now. Upload the next to routes/index.js:
router.put up("https://www.sitepoint.com/", (req, res) => {
  res.render('variety', { identify: 'Registration variety' });
});
This is equal to our GET path, apart from for the truth that we’re the usage of router.put up to answer a distinct HTTP motion.
Now after we post the shape, the mistake message can be long gone and the shape must simply re-render.
Dealing with variety enter
The following activity is to retrieve no matter information the consumer has submitted by means of the shape. To do that, we’ll wish to set up a kit named body-parser, which is able to make the shape information to be had at the request physique:
npm set up body-parser
We’ll additionally wish to inform our app to make use of this kit, so upload the next to app.js:
const bodyParser = require('body-parser');
...
app.use(bodyParser.urlencoded({ prolonged: true }));
app.use("https://www.sitepoint.com/", routes);

module.exports = app;
Be aware that there are more than a few tactics to layout the knowledge we POST to the server, and the usage of body-parser’s urlencoded means lets in us to maintain information despatched as utility/x-www-form-urlencoded.
Then we will be able to take a look at logging the submitted information to the terminal. Modify the path handler in routes/index.js like so:
router.put up("https://www.sitepoint.com/", (req, res) => {
  console.log(req.physique);
  res.render('variety', { identify: 'Registration variety' });
});
Now after we post the shape, we must see one thing alongside the strains of this:
{call: 'Jim', electronic mail: 'jim@instance.com'}
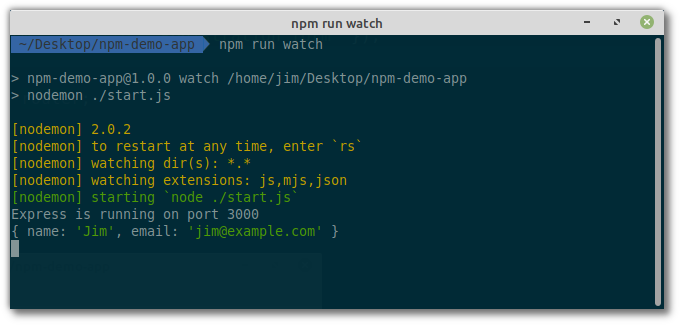
Shape output logged to terminal
A observe about request and reaction gadgets
Via now, you’ve with a bit of luck spotted the development we’re the usage of to maintain routes in Categorical:
router.METHOD(path, (req, res) => {

});
The callback serve as is performed each time any individual visits a URL that fits the path it specifies. The callback receives req and res parameters, the place req is an object filled with knowledge that’s coming in (corresponding to variety information or question parameters) and res is an object filled with strategies for sending information again to the consumer. There’s additionally an not obligatory subsequent parameter, which turns out to be useful if we don’t if truth be told wish to ship any information again, or if we wish to cross the request off for one thing else to maintain.
With out getting too deep into the weeds, it is a idea referred to as middleware (particularly, router-level middleware) which is essential in Categorical. For those who’re excited about studying extra about how Categorical makes use of middleware, I like to recommend you learn the Categorical medical doctors.
Validating variety enter
Now let’s test that the consumer has crammed out each our fields. We will do that the usage of express-validator module, a middleware that gives various helpful strategies for the sanitization and validation of consumer enter.
We will set up it like so:
npm set up express-validator
Then we wish to require the purposes we’ll want in routes/index.js:
const { test, validationResult } = require('express-validator');
We will come with it in our path handler like so:
router.put up("https://www.sitepoint.com/",
  [
    check('name')
      .isLength({ min: 1 })
      .withMessage('Please enter a name'),
    check('email')
      .isLength({ min: 1 })
      .withMessage('Please enter an email'),
  ],
  (req, res) => {
    ...
  });
We’re the usage of the test solution to validate two houses on req.physique — particularly, call and electronic mail. In our case, it’s enough to only test that those houses exist (this is, that they’ve a period more than one), however in the event you’d cherish to do extra you’ll be able to take a look at the whole vary of validators right here.
In a 2nd step, we will be able to name the validationResult solution to see if validation handed or failed. If no mistakes are provide, we will be able to cross forward and render out a “Thank you for registering” message. In a different way, we’ll wish to cross those mistakes again to our template to tell the consumer that one thing’s incorrect.
And if validation fails, we’ll additionally wish to cross req.physique again to the template, in order that any legitimate variety inputs aren’t reset:
router.put up(
  "https://www.sitepoint.com/",
  [
    ...
  ],
  (req, res) => {
    const mistakes = validationResult(req);

    if (mistakes.isEmpty()) {
      res.ship('Thanks to your registration!');
    } else {
      res.render('variety', {
        identify: 'Registration variety',
        mistakes: mistakes.array(),
        information: req.physique,
      });
    }
  }
);
Now we need to make a few adjustments to our variety.pug template. We at the beginning wish to test for an mistakes assets, and if it’s provide, loop over any mistakes and show them in a listing:
extends format

block content material
  if mistakes
    ul
      for error in mistakes
        li= error.msg
  ...
If the li= seems bizarre, remember the fact that pug does interpolation via following the tag call with an equals signal.
In any case, we wish to test if a information characteristic exists, and if this is the case, use it to set the values of the respective fields. If it doesn’t exist, we’ll initialize it to an empty object, in order that the shape will nonetheless render as it should be after we load it for the primary time. We will do that with some JavaScript, denoted in Pug via a minus signal:
-information = information || {}
We then reference that characteristic to set the sphere’s worth:
enter(
  sort="textual content"
  identity="call"
  call="call"
  worth=information.call
)
Be aware: in Pug, via default, all attributes are escaped. This is, particular characters are changed with get away sequences to stop assaults (corresponding to go website scripting).
This provides us the next:
extends format

block content material
  -information = information || {}

  if mistakes
    ul
      for error in mistakes
        li= error.msg

  variety(motion="." means="POST")
    label(for="call") Title:
    enter(
      sort="textual content"
      identity="call"
      call="call"
      worth=information.call
    )

    label(for="electronic mail") Electronic mail:
    enter(
      sort="electronic mail"
      identity="electronic mail"
      call="electronic mail"
      worth=information.electronic mail
    )

    enter(sort="post" worth="Publish")
Now, after we post a a success registration, we must see a thanks message, and after we post the shape with out filling out each box, the template must be re-rendered with an error message.
Interacting with a Database
We now wish to hook our variety as much as our database, in order that we will be able to save no matter information the consumer enters. For those who’re running with Mongo in the neighborhood, don’t overlook to ensure the server is working (in all probability with the command mongod).
Specifying connection main points
We’ll want someplace to specify our database connection main points. For this, we’ll use a configuration document (which must now not be checked into edition management) and the dotenv kit. Dotenv will load our connection main points from the configuration document into Node’s procedure.env.
Set up it like so:
npm set up dotenv
And require it on the best of get started.js:
require('dotenv').config();
Subsequent, create a document named .env within the mission root (observe that beginning a filename with a dot might reason it to be hidden on sure working techniques) and input your Mongo connection main points at the first line.
For those who’re working Mongo in the neighborhood:
DATABASE=mongodb://localhost:27017/<dbname>
Remember to substitute <db-name> with no matter you might be calling your database.
For those who’re the usage of Mongo Atlas, use the relationship string you famous down up to now. It must be on this layout:
mongodb+srv://<username>:<password>@<cluster-name>.<uid>.mongodb.internet/<dbname>
We’re now specifying a database call, which Mongo will create if it doesn’t exist. You’ll be able to call yours no matter you prefer and use Compass to delete the check database.
A phrase on safety
There are two safety issues to indicate earlier than we cross any more. Neither must have an effect on your talent to observe in conjunction with this instructional, however they’re certainly belongings you must pay attention to.
- Native installations of MongoDB don’t have a default consumer or password. That is certainly one thing you’ll wish to alternate in manufacturing, because it’s in a different way a safety possibility. You’ll be able to test the Mongo medical doctors for more information on how to do that.
- For those who’re the usage of Git to edition your mission, remember to upload the
.envdocument for your.gitignore. The.envdocument must stay for your PC and now not be shared with any person.
That mentioned, let’s lift on construction the app …
Connecting to the database
To determine the relationship to the database and to accomplish operations on it, we’ll be the usage of Mongoose. Mongoose is an ODM (object-document mapper) for MongoDB, and as we will be able to learn at the mission’s house web page:
Mongoose supplies a straight-forward, schema-based option to type your utility information. It contains integrated sort casting, validation, question construction, trade good judgment hooks and extra, out of the field.
Which means it creates more than a few abstractions over Mongo, which make interacting with our database more uncomplicated and decreases the quantity of boilerplate we need to write. For those who’d like to determine extra about how Mongo works below the hood, remember to learn our Creation to MongoDB.
Set up Mongoose like so:
npm set up mongoose
Then, require it in get started.js:
const mongoose = require('mongoose');
The relationship is made similar to this:
mongoose.attach(procedure.env.DATABASE, {
  useNewUrlParser: true,
  useUnifiedTopology: true
});

mongoose.connection
  .on('open', () => {
    console.log('Mongoose connection open');
  })
  .on('error', (err) => {
    console.log(`Connection error: ${err.message}`);
  });
Understand how we use the DATABASE variable we declared within the .env document to specify the database URL.
That is what get started.js must now seem like:
require('dotenv').config();
const mongoose = require('mongoose');

mongoose.attach(procedure.env.DATABASE, {
  useNewUrlParser: true,
  useUnifiedTopology: true
});

mongoose.connection
  .on('open', () => {
    console.log('Mongoose connection open');
  })
  .on('error', (err) => {
    console.log(`Connection error: ${err.message}`);
  });

const app = require('./app');
const server = app.pay attention(3000, () => {
  console.log(`Categorical is working on port ${server.cope with().port}`);
});
Once we save the document, nodemon will restart the app and, if all’s long gone smartly, we must see the message “Mongoose connection open”.
Defining a Mongoose Schema
MongoDB can be used as a free database, that means it’s now not essential to explain what information will seem like forward of time. On the other hand, we’re the usage of Mongoose to have interaction with it, and the whole lot in Mongoose begins with a schema. In Mongoose, each and every schema maps to a MongoDB assortment and defines the form of the paperwork inside that assortment.
To this finish, create a fashions folder within the mission root, and inside that folder, a brand new document named Registration.js.
Upload the next code to Registration.js:
const mongoose = require('mongoose');

const registrationSchema = new mongoose.Schema({
  call: {
    sort: String,
    trim: true,
  },
  electronic mail: {
    sort: String,
    trim: true,
  },
});

module.exports = mongoose.type('Registration', registrationSchema);
Right here, we’re simply defining a kind (as we have already got validation in position) and are applying the trim helper means to take away any superfluous white house from consumer enter. We then collect a type from the Schema definition, and export it to be used in other places in our app.
The general piece of boilerplate is to require the type in get started.js:
...

require('./fashions/Registration');
const app = require('./app');

const server = app.pay attention(3000, () => {
  console.log(`Categorical is working on port ${server.cope with().port}`);
});
Saving information to the database
Now we’re in a position to avoid wasting consumer information to our database. Let’s start via requiring Mongoose and uploading our type into our routes/index.js document:
const specific = require('specific');
const mongoose = require('mongoose');
const { test, validationResult } = require('express-validator');

const router = specific.Router();
const Registration = mongoose.type('Registration');
...
Now, when the consumer posts information to the server, if validation passes we will be able to cross forward and create a brand new Registration object and strive to put it aside. Because the database operation is an asynchronous operation which returns a promise, we will be able to chain a .then() onto the tip of it to handle a a success insert and a .catch() to handle any mistakes:
if (mistakes.isEmpty()) {
-  res.ship('Thanks to your registration!');
+  const registration = new Registration(req.physique);
+  registration.save()
+    .then(() => { res.ship('Thanks to your registration!'); })
+    .catch((err) => {
+      console.log(err);
+      res.ship('Sorry! One thing went incorrect.');
+    });
} else {
  ...
}

...
Now, if we input your main points into the registration variety, they must be endured to the database. We will test this the usage of Compass (hit Ctrl + R to refresh the knowledge if our newly created information aren’t appearing).
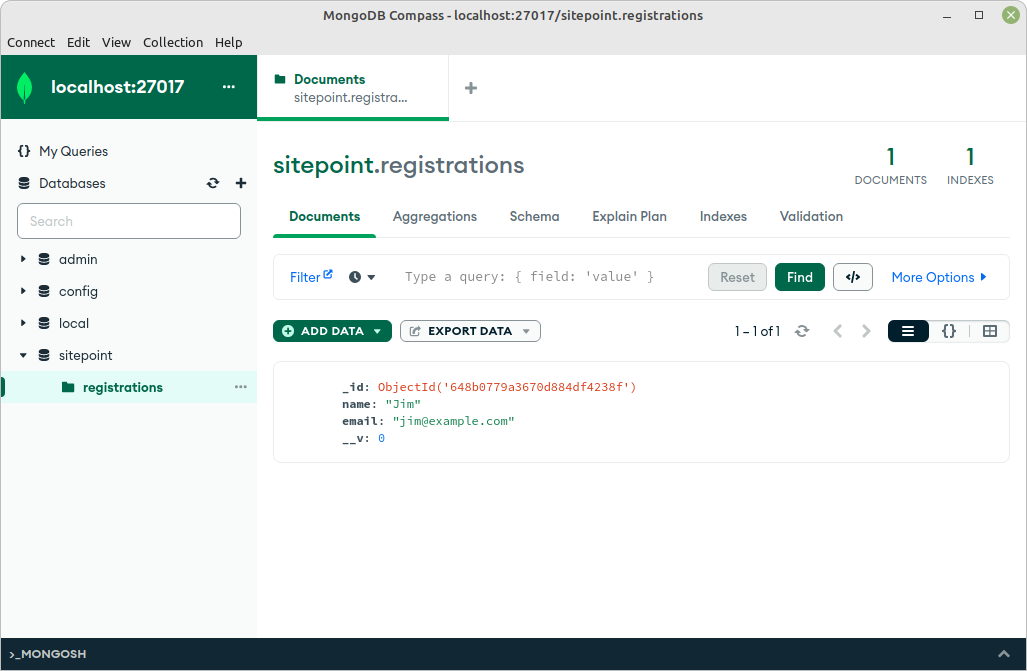
The use of Compass to test that our information used to be stored to MongoDB
Retrieving information from the database
To around the app off, let’s create a last path, which lists out all of our registrations. Optimistically you will have an affordable concept of the method via now.
Upload a brand new path to routes/index.js, as follows:
router.get('/registrations', (req, res) => {
  res.render('index', { identify: 'Record registrations' });
});
Which means we’ll additionally desire a corresponding view template (perspectives/index.pug):
extends format

block content material
  p No registrations but :(
Now after we consult with http://localhost:3000/registrations, we must see a message telling us that there aren’t any registrations.
Let’s repair that via retrieving our registrations from the database and passing them to the view. We’ll nonetheless show the “No registrations but” message, however provided that there truly aren’t any.
In routes/index.js:
router.get('/registrations', (req, res) => {
  Registration.to find()
    .then((registrations) => {
      res.render('index', { identify: 'Record registrations', registrations });
    })
    .catch(() => { res.ship('Sorry! One thing went incorrect.'); });
});
Right here, we’re the usage of Mongo’s Assortment.to find means, which, if invoked with out parameters, will go back the entire information within the assortment. For the reason that database search for is asynchronous, we’re looking forward to it to finish earlier than rendering the view. If any information have been returned, those can be handed to the view template within the registrations assets. If no information have been returned, registrations can be an empty array.
In perspectives/index.pug, we will be able to then test the period of no matter we’re passed and both loop over it and output the information to the display screen, or show a “No registrations” message:
extends format

block content material

block content material
  if registrations.period
    desk
      thead
        tr
         th Title
         th Electronic mail
      tbody
      each and every registration in registrations
        tr
          td= registration.call
          td= registration.electronic mail
  else
    p No registrations but :(
Including HTTP Authentication
The general function we’ll upload to our app is HTTP authentication, locking down the checklist of a success registrations from prying eyes.
To do that, we’ll use the http-auth module, which we will be able to set up like so:
npm set up http-auth
Subsequent we wish to require it in routes/index.js, in conjunction with the Trail module we met previous:
const trail = require('trail');
const auth = require('http-auth');
Subsequent, let it know the place to search out the document through which we’ll checklist the customers and passwords (on this case customers.htpasswd within the mission root):
const fundamental = auth.fundamental({
  document: trail.sign up for(__dirname, '../customers.htpasswd'),
});
Create this customers.htpasswd document subsequent and upload a username and password separated via a colon. This will also be in simple textual content, however the http-auth module additionally helps hashed passwords, so it’s good to additionally run the password thru a provider corresponding to Htpasswd Generator.
For me, the contents of customers.htpasswd seem like this:
jim:$apr1$FhFmamtz$PgXfrNI95HFCuXIm30Q4V0
This interprets to consumer: jim, password: password.
In any case, upload it to the path you want to offer protection to and also you’re excellent to head:
router.get('/registrations', fundamental.test((req, res) => {
  ...
}));
Take a look at gaining access to http://localhost:3000/registrations to your browser (refreshing the web page, or restarting your browser if essential). You must now be induced for a password.
Be aware: you must additionally upload customers.htpasswd for your .gitignore document in the event you’re the usage of Git.
Serving Static Belongings in Categorical
Let’s give the app some polish and upload some styling the usage of Bootstrap. We will serve static recordsdata corresponding to pictures, JavaScript recordsdata and CSS recordsdata in Categorical the usage of the integrated specific.static middleware serve as.
Surroundings it up is simple. Simply upload the next line to app.js:
app.use(specific.static('public'));
Now we will be able to load recordsdata which are within the public listing.
Styling the app with Bootstrap
Create a public listing within the mission root, and within the public listing create a css listing. Obtain Bootstrap v5.3 as a zipper document and extract it, then to find bootstrap.min.css and position it in our public/css listing.
Subsequent, we’ll wish to upload some markup to our Pug templates.
In format.pug:
doctype html
html
  head
    identify= `${identify}`
    hyperlink(rel='stylesheet', href='/css/bootstrap.min.css')
    hyperlink(rel='stylesheet', href='/css/types.css')

  physique
    div.container
      h1.text-center.mb-4 Match Registration

      block content material
Right here, we’re together with two recordsdata from our up to now created css folder and including a few Bootstrap categories.
In variety.pug we wish to upload a few wrapper divs, in addition to some additional elegance names to the mistake messages and the shape parts:
extends format

block content material
  -information = information || {}

  div.form-wrapper
    if mistakes
      ul.error-messages
        for error in mistakes
          li= error.msg

    variety(motion="." means="POST")
      div.mb-3
        label(for="call" elegance="form-label") Title:
        enter(
          sort="textual content"
          elegance="form-control"
          identity="call"
          call="call"
          placeholder="Input your call"
          worth=information.call
        )
      div.mb-3
        label(for="electronic mail" elegance="form-label") Electronic mail:
        enter(
          sort="electronic mail"
          elegance="form-control"
          identity="electronic mail"
          call="electronic mail"
          placeholder="Input your electronic mail"
          worth=information.electronic mail
        )

      enter(
        sort="post"
        elegance="btn btn-primary"
        worth="Publish"
      )
And in index.pug, extra of the similar:
extends format

block content material

  if registrations.period
    desk.desk.table-bordered.table-striped.mt-5
      thead.table-dark
        tr
         th Title
         th Electronic mail
      tbody
      each and every registration in registrations
        tr
          td= registration.call
          td= registration.electronic mail
  else
    p No registrations but :(
In any case, create a document known as types.css within the css folder and upload the next:
physique {
  show: flex;
  justify-content: middle;
  align-items: middle;
  top: 100vh;
}

.form-wrapper {
  max-width: 350px;
  margin: auto;
}

.form-wrapper .form-control,
.form-wrapper .btn {
  width: 100%;
}

.error-messages {
  colour: pink;
  list-style: none;
  padding: 0;
  margin-bottom: 10px;
}

.error-messages li::earlier than {
  content material: "•";
  margin-right: 5px;
}
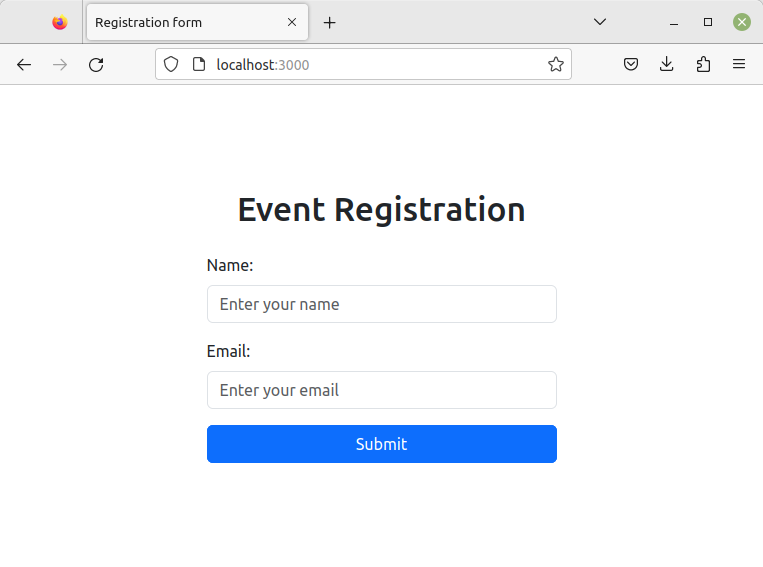
Now whilst you refresh the web page, you must see the entire Bootstrap glory!
Conclusion
I’m hoping you’ve loved this instructional. Whilst we didn’t construct the following Fb, I’m hoping that I used to be however in a position that will help you make a get started on this planet of Node-based internet apps and give you some forged takeaways to your subsequent mission within the procedure. As famous above, the code for this instructional is to be had on GitHub.
And whilst this instructional has opened doorways to basic ideas, mastering Node.js comes to diving deeper and exploring its extra intricate layers. A good way to additional your wisdom and abilities is thru considered one of our books, Node.js: Amateur to Ninja, over on SitePoint Top class.
If in case you have any questions or feedback, please achieve out on Twitter.
Satisfied coding!
[ad_2]