
[ad_1]
Have you ever ever thought to be development your personal Chrome extension however concept the method may well be too advanced? Neatly, you’re in for a marvel! In the following few mins, we’ll now not most effective lay out the fundamentals of what a Chrome extension is, but in addition information you thru 5 simple steps to craft your personal.
Curious to look how? Let’s dive in!
What Are We Going To Construct?
In recent years, we’ve witnessed an explosion in AI functions. And whilst our new cyber partners be offering exceptional ranges of help, in addition they include a reminder: don’t proportion delicate knowledge with them.
I don’t learn about you, however extra incessantly than now not, my hands are quicker than my mind. So, to forestall attainable slip-ups, we’re going to construct a “molly-guard” for ChatGPT.
When you’re scratching your head questioning what a molly-guard is, it firstly referred to a protect put over a button or transfer to forestall unintended activation. In our context, it’s a virtual parent making sure we don’t overshare.
Customers can specify an inventory of phrases or words they deem delicate. Will have to we try to put up a message to ChatGPT containing any of the ones phrases, the extension will bounce into motion, disabling the put up button and saving us from a possible oversight.
To practice in conjunction with this educational, you’ll want a ChatGPT account. Don’t have one? You’ll be able to join loose right here.
The code for this educational is to be had on GitHub.
What Is a Google Chrome Extension?
Sooner than we get began, let’s explain what a Chrome extension is. A Chrome extension is a small piece of tool designed to beef up or regulate the Chrome surfing revel in. Extensions are evolved the usage of same old internet applied sciences — HTML, JavaScript, and CSS — and they may be able to vary from easy equipment, like colour pickers, to extra intricate ones, like password managers. Many of those extensions are to be had for obtain at the Chrome Internet Retailer.
Word: for the ones curious about a deeper figuring out of Chrome extensions, Google’s legitimate documentation is a useful useful resource.
It’s value noting that Google Chrome extensions can take quite a lot of paperwork in response to their supposed serve as. Some have a browser motion, visibly represented by means of an icon subsequent to the deal with bar, offering fast get admission to to their options. Others would possibly run silently within the background, throughout all internet pages or most effective on particular ones, relying on their design.
For our instructional, we’ll center of attention on an extension kind that makes use of a content material script. This script will permit us to have interaction and manipulate the DOM of a selected web page – in our case, the ChatGPT interface.
Step 1: Create the Extension Recordsdata
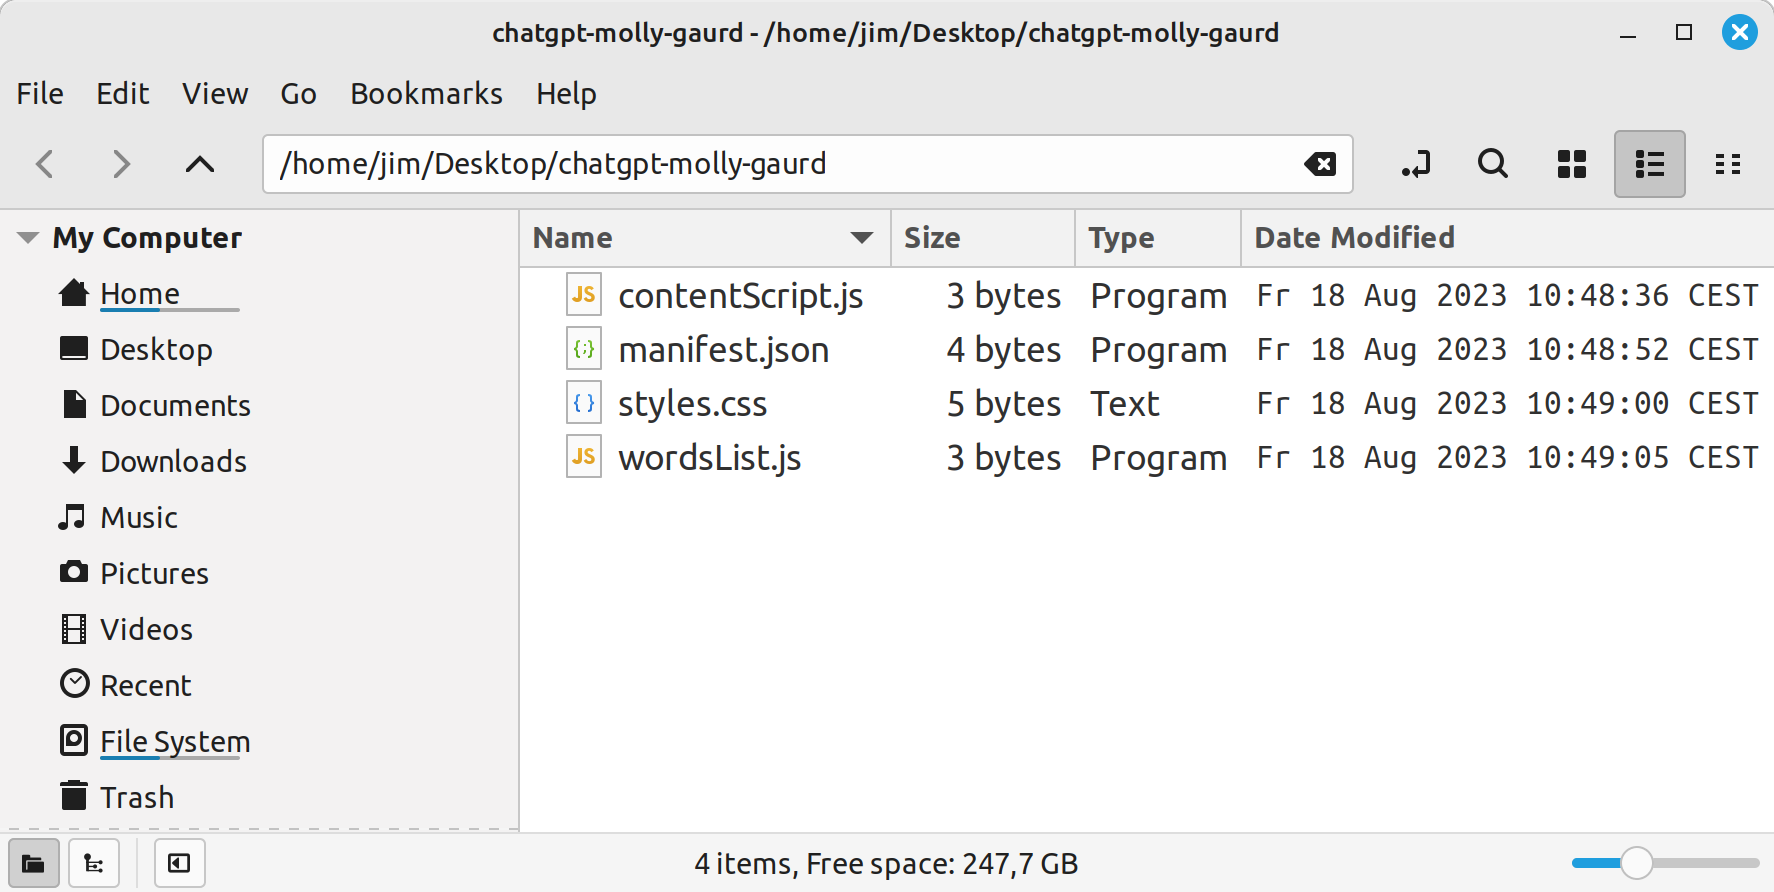
To kick issues off, we want to arrange the elemental construction for our Chrome extension. Our extension, named chatgpt-mollyguard, can be arranged in a devoted folder. This extension listing will include all of the essential recordsdata to make our molly-guard serve as easily.
Right here’s a breakdown:
- Folder:
chatgpt-molly-guard. That is the basis listing of our extension. All our recordsdata will live on this folder. - Record:
manifest.json. The center and soul of our extension. This document incorporates metadata in regards to the extension, corresponding to its title, model, and permissions it calls for. Most significantly, it specifies which scripts to run and on which internet sites. - Record:
contentScript.js. As its title suggests, this JavaScript document incorporates the content material script. This script has direct get admission to to the internet web page’s content material, permitting us to scan for delicate phrases and regulate the web page as wanted. - Record:
wordsList.js. A JavaScript document devoted to containing the checklist of delicate phrases or words the person specifies. We’ve separated this to make it simple for customers to customise their checklist with out diving into the core capability incontentScript.js. - Record:
kinds.css. A stylesheet so as to add some aptitude to our extension. Whilst our number one objective is capability, there’s no hurt in making our warnings or activates glance excellent!
To get began:
- Create a brand new folder for your pc named
chatgpt-molly-guard. - Within this folder, create the 4 recordsdata indexed above.
- With the recordsdata in position, we’re able to begin filling in the main points.
Within the subsequent sections, we’ll dive deeper into every document and description its particular position within the extension.
Step 2: Create the Manifest Record
The manifest document is a JSON document that gives the browser with crucial information about your extension. This document will have to be situated within the extension’s root listing.
Right here’s our manifest construction. Reproduction this code into manifest.json:
{
  "manifest_version": 3,
  "title": "ChatGPT Molly-guard",
  "model": "1.0",
  "description": "Prevents submission if particular phrases are typed into chat window",
  "content_scripts": [
    {
      "matches": ["https://chat.openai.com/*"],
      "css": ["styles.css"],
      "js": ["wordsList.js", "contentScript.js"]
    }
  ]
}
The manifest document has 3 obligatory fields, particularly: manifest_version, title and model. The whole thing else is not obligatory.
Key Manifest Components
manifest_version: an integer specifying the model of the manifest document layout. We’re the usage of Manifest V3, the most recent model to be had. Remember that Google is actively phasing out Manifest V2 extensions in 2023.title: a brief, undeniable textual content string (max 45 characters) that identifies the extension.model: one to 4 dot-separated integers figuring out the model of the extension.description: a undeniable textual content string (no HTML, max 132 characters) that describes the extension.content_scripts: this key specifies statically loaded JavaScript or CSS recordsdata for use each and every time a web page is opened that fits a URL trend (laid out in thefitskey). Right here, we’re pronouncing that our script must run on any URL beginning withhttps://chat.openai.com/.
Of the above fields, Google will use the title, model and description when showing your extension on Chrome’s extension control web page (
Despite the fact that our manifest is streamlined for our wishes, many different fields can upload intensity and capability for your extensions. Fields such motion, default_locale, icons, and so forth, be offering customization choices, UI regulate, and internationalization enhance.
For a complete evaluation of what’s to be had within the manifest.json document, please seek the advice of Google’s legitimate documentation.
Step 3: Create the Content material Script
Content material scripts in a Chrome extension are JavaScript recordsdata that run within the context of internet pages. They may be able to view and manipulate the DOM of the web page they’re operating on, enabling them to change each the internet web page’s content material and behaviour.
That is our content material script. Reproduction the next code into the contentScript.js document:
const debounce = (callback, wait) => {
  let timeoutId = null;
  go back (...args) => {
    window.clearTimeout(timeoutId);
    timeoutId = window.setTimeout(() => {
      callback.observe(null, args);
    }, wait);
  };
};

serve as containsForbiddenWords(price) {
  go back forbiddenWords.some(phrase => price.toLowerCase().contains(phrase.toLowerCase()));
}

serve as updateUI(goal) {
  const containsForbiddenWord = containsForbiddenWords(goal.price);
  const sendButton = goal.nextElementSibling;
  const parentDiv = goal.parentElement;

  if (containsForbiddenWord) {
    sendButton.disabled = true;
    parentDiv.classList.upload('forbidden-div');
  } else {
    sendButton.disabled = false;
    parentDiv.classList.take away('forbidden-div');
  }
}

report.frame.addEventListener('keyup', debounce((tournament) => {
  if (tournament.goal.identification === 'prompt-textarea') updateUI(tournament.goal);
}, 300));

report.addEventListener('keydown', (e) => {
  if (e.goal.identification === 'prompt-textarea' && e.key === 'Input') {
    if (containsForbiddenWords(e.goal.price)) {
      e.stopPropagation();
      e.preventDefault();
    }
  }
}, true);
Let’s ruin this down, step-by-step.
On the most sensible of the document we claim a debounce serve as. We’ll use this to make certain that we don’t test for forbidden phrases each and every time the person presses a key. That may be numerous exams! As an alternative, we’ll wait till the person forestall typing ahead of doing anything else. I’ve taken this snippet from Josh W. Comeau’s web page, so you’ll be able to take a look at his submit for an evidence of the way it works.
Subsequent comes a containsForbiddenWords serve as. Because the title implies, this serve as returns true if the textual content handed to it incorporates any of our forbidden phrases. We’re lower-casing each values to make certain that the comparability is case-insensitive.
The updateUI serve as determines if any forbidden phrases are provide within the chat field. If they’re, it disables the ship button and provides a CSS elegance (forbidden-div) to the chat field’s dad or mum div. We’ll leverage this in your next step to offer a visible cue to the person.
The script after all registers two tournament listeners:
- The primary is about to cause on a
keyuptournament. It exams if the changed part is our goal (the chat window) after which calls theupdateUIserve as. Because of ourdebounceserve as, this received’t run incessantly, however most effective after a temporary pause in typing. - The second one tournament listener is listening for a
keydowntournament on our goal. In particular, it’s staring at for the Input keypress, which, if pressed whilst a forbidden phrase is within the textual content space, will save you the the browser’s default motion (on this case a kind submission).
This successfully stops messages with forbidden phrases from being despatched, each by means of disabling the ship button and by means of intercepting and halting the Input keypress.
You’ll additionally be aware that we’re the usage of tournament delegation, because the ChatGPT interface is an SPA. In SPAs, segments of the person interface are dynamically changed in response to person interactions, which will inadvertently detach any tournament listeners sure to those components. By means of anchoring our tournament listeners to the wider DOM and selectively concentrated on particular components, we will be able to circumvent this factor.
Step 4: Including Some Styling
Whilst the core capability of our extension is to forestall positive submissions, it’s vital for customers to straight away acknowledge why their motion is being blocked. Let’s upload some styling to offer a visible cue and beef up the person revel in.
Right here’s the rule of thumb we’re the usage of. Upload it to the kinds.css document:
.forbidden-div {
  border: 2px cast crimson !vital;
  background-color: #ffe6e6 !vital;
}
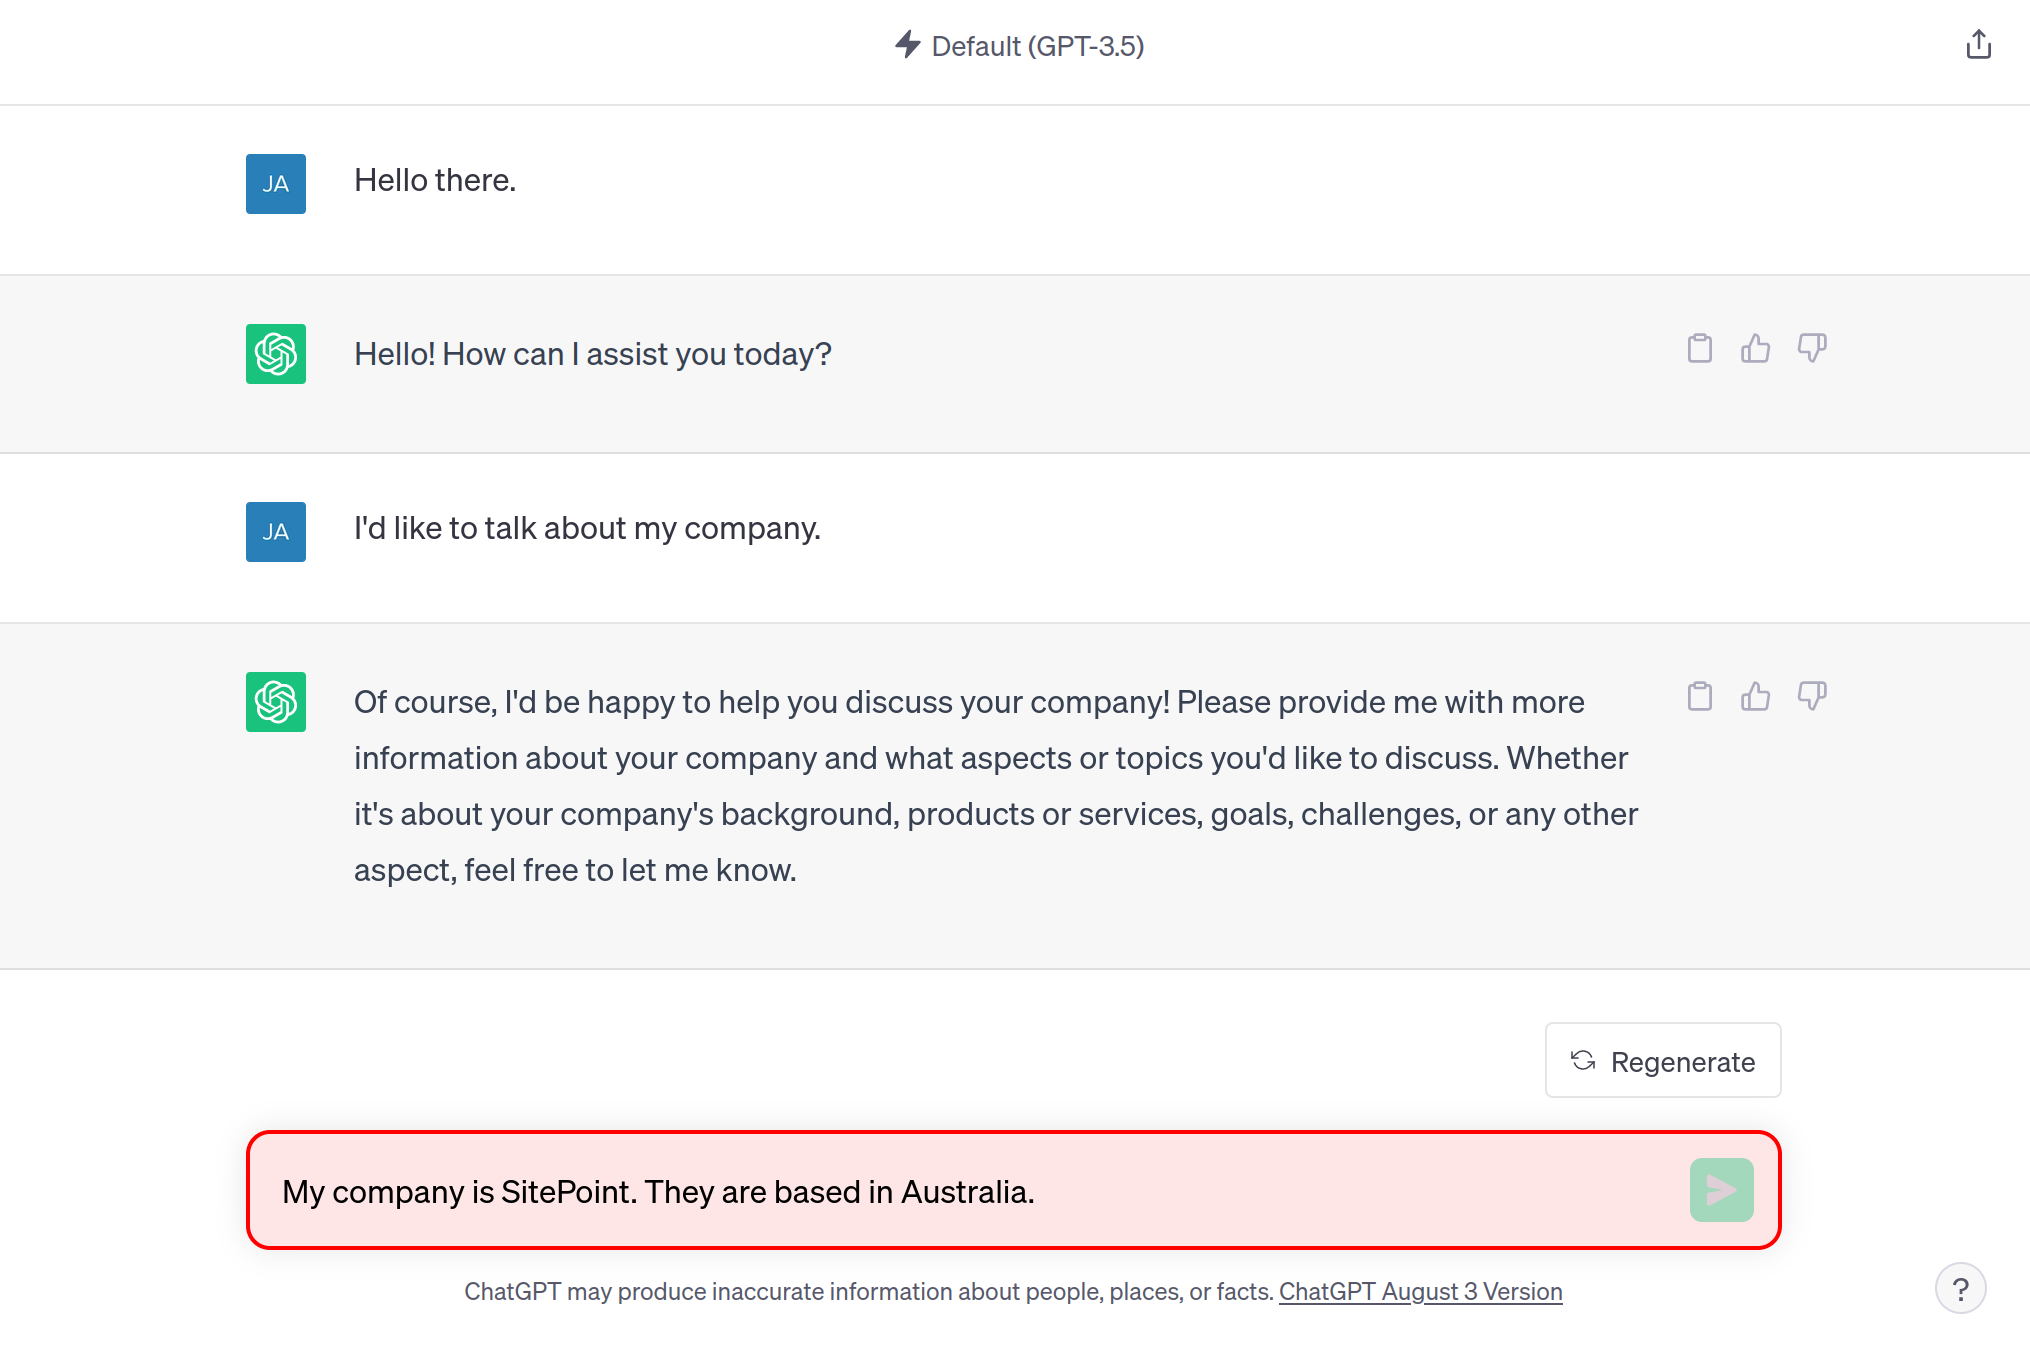
This provides a distinguished crimson border and a refined crimson background to the enter space every time forbidden phrases are detected. It right away attracts consideration and signifies that one thing isn’t correct. By means of toggling a category on a dad or mum div, we will be able to simply flip this off and on.
The !vital flag could also be value noting. When coping with internet pages that you simply don’t personal — like on this case with ChatGPT — the present kinds can also be very particular. To verify our kinds take priority and are implemented appropriately, the !vital flag overrides any attainable conflicts because of present kinds’ specificity.
Step 5: Take a look at the Extension
There’s one remaining step: populating the checklist of forbidden phrases that our extension must observe for. We will be able to upload those in forbiddenWords.js:
const forbiddenWords = [
  "my-company.com",
  "SitePoint",
  "Jim",
];
Now that our customized Google Chrome extension is all arrange, it’s time to check its capability and make sure the whole thing is operating as supposed.
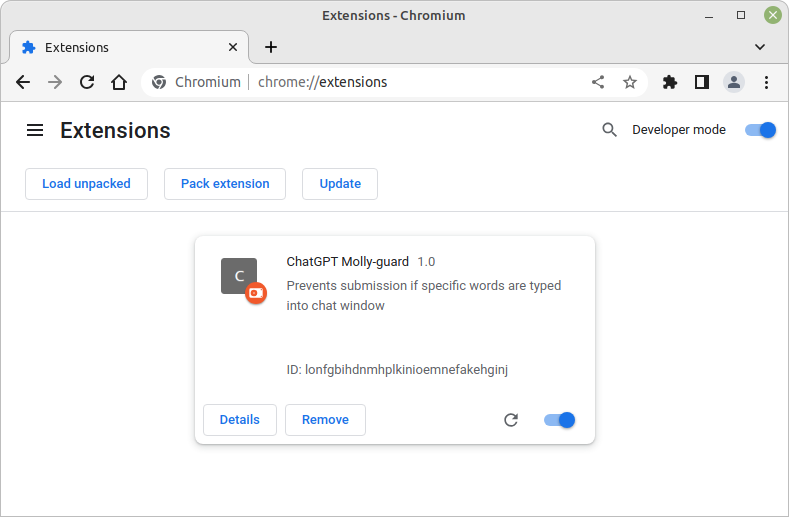
- Open Chrome and navigate to
- Flip at the Developer mode toggle, situated on the most sensible correct nook.
- Click on at the Load unpacked button, which is able to now be visual.
- Navigate to and choose the listing of your extension (
chatgpt-molly-guardin our case) and click on Make a selection. Our extension must now seem within the checklist of put in extensions.
Now, to check out the capability, navigate to ChatGPT, refresh the web page and take a look at typing on your limited phrases to look if the extension behaves as anticipated.
If all has long gone in line with plan, you must see one thing like the image under.
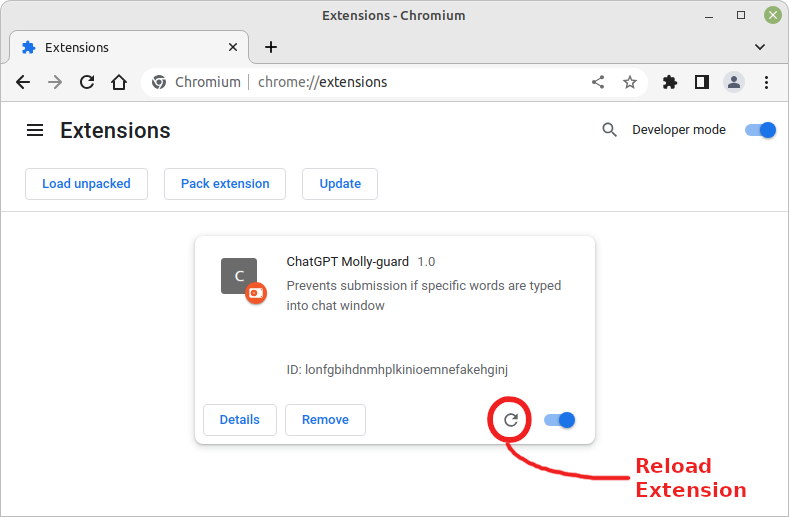
If you are making any adjustments for your extension code — corresponding to updating the glossary — be sure you hit the round arrow within the backside right-hand nook at the extension’s card at the extension web page. This may occasionally reload the extension. You’ll then want to reload the web page that your extension is concentrated on.
Taking it Additional
Our present fundamental Chrome extension serves its function, however there’s all the time room for development. When you’re desperate to refine the extension additional and enlarge its functions, there are some tips under.
1. Person Interface for Phrase Checklist Enhancing
Lately, our extension is determined by a predefined checklist of limited phrases. Enforcing a user-friendly interface would permit customers to dynamically upload, take away, or regulate phrases at the pass. This can also be achieved the usage of a popup UI (browser motion) that opens when the extension icon is clicked, the place customers can arrange their checklist. You’ll additionally want to persist the phrases to garage.
2. Dealing with Mouse Paste Occasions
Whilst our extension detects keypresses, customers can bypass this by means of pasting delicate knowledge the usage of the mouse’s right-click menu. To plug this loophole, lets upload an tournament listener for the paste tournament (or consolidate each to pay attention for enter). This may occasionally make certain that, whether or not knowledge is typed or pasted, the clear out stays powerful.
3. Contextual Override
Blockading positive phrases generally is a bit too generic. As an example, I would possibly wish to block mentions of “Jim” (my title) however haven’t any problems referencing “Jim Carey”. To handle this, believe introducing a characteristic which might disable the molly-guard till the following put up tournament happens.
You’ll be able to additionally take a look at the Firefox model of this extension, the place this capability has been applied.
Conclusion
As we’ve came upon, development your personal Google Chrome extension isn’t an insurmountable problem. We began with a transparent purpose: to create a protecting layer for ChatGPT, making sure that delicate knowledge stays confidential. Right through this educational, we’ve noticed how a handful of recordsdata and somewhat of code may end up in a purposeful and helpful browser extension.
For the ones desperate to dive deeper, Google’s legitimate Chrome Extension documentation is a superb beginning position. Moreover, the Chrome Extension migration information provides insights at the transition to Manifest V3, which is a very powerful given the approaching phase-out of Manifest V2 in 2023.
Now that you simply’ve noticed the way it’s achieved, I beg you to refine, beef up, and adapt the extension to fit your wishes. You’re welcome to hit me up on Twitter and let me learn about any enhancements you’ve made.
[ad_2]